OpenAI provides state-of-the-art LLMs for natural language understanding and generation.


Phoenix provides auto-instrumentation for the OpenAI Python Library.
We have several code samples below on different ways to integrate with OpenAI, based on how you want to use Phoenix.
pip install openinference-instrumentation-openai openaiAdd your OpenAI API key as an environment variable:
export OPENAI_API_KEY=[your_key_here]Use the register function to connect your application to Phoenix:
from phoenix.otel import register

# configure the Phoenix tracer
tracer_provider = register(
  project_name="my-llm-app", # Default is 'default'
  auto_instrument=True # Auto-instrument your app based on installed dependencies
)import openai
client = openai.OpenAI()
response = client.chat.completions.create(
model="gpt-4o",
messages=[{"role": "user", "content": "Write a haiku."}],
)
print(response.choices[0].message.content)Now that you have tracing setup, all invocations of OpenAI (completions, chat completions, embeddings) will be streamed to your running Phoenix for observability and evaluation.
Configure and run OpenAI for evals
class OpenAIModel:
    api_key: Optional[str] = field(repr=False, default=None)
    """Your OpenAI key. If not provided, will be read from the environment variable"""
    organization: Optional[str] = field(repr=False, default=None)
    """
    The organization to use for the OpenAI API. If not provided, will default
    to what's configured in OpenAI
    """
    base_url: Optional[str] = field(repr=False, default=None)
    """
    An optional base URL to use for the OpenAI API. If not provided, will default
    to what's configured in OpenAI
    """
    model: str = "gpt-4"
    """Model name to use. In of azure, this is the deployment name such as gpt-35-instant"""
    temperature: float = 0.0
    """What sampling temperature to use."""
    max_tokens: int = 256
    """The maximum number of tokens to generate in the completion.
    -1 returns as many tokens as possible given the prompt and
    the models maximal context size."""
    top_p: float = 1
    """Total probability mass of tokens to consider at each step."""
    frequency_penalty: float = 0
    """Penalizes repeated tokens according to frequency."""
    presence_penalty: float = 0
    """Penalizes repeated tokens."""
    n: int = 1
    """How many completions to generate for each prompt."""
    model_kwargs: Dict[str, Any] = field(default_factory=dict)
    """Holds any model parameters valid for `create` call not explicitly specified."""
    batch_size: int = 20
    """Batch size to use when passing multiple documents to generate."""
    request_timeout: Optional[Union[float, Tuple[float, float]]] = None
"""Timeout for requests to OpenAI completion API. Default is 600 seconds."""To authenticate with OpenAI you will need, at a minimum, an API key. The model class will look for it in your environment, or you can pass it via argument as shown above. In addition, you can choose the specific name of the model you want to use and its configuration parameters. The default values specified above are common default values from OpenAI. Quickly instantiate your model as follows:
model = OpenAI()
model("Hello there, this is a test if you are working?")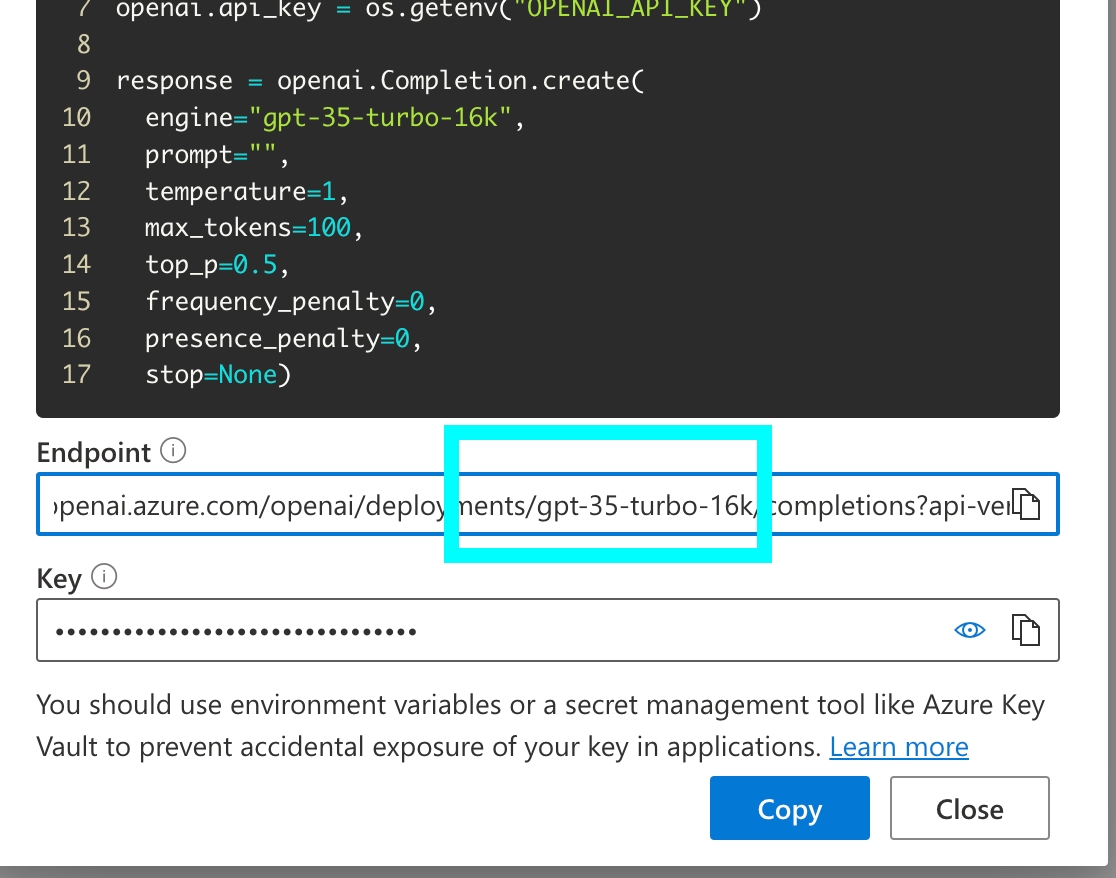
# Output: "Hello! I'm working perfectly. How can I assist you today?"The code snippet below shows how to initialize OpenAIModel for Azure:
model = OpenAIModel(
    model="gpt-35-turbo-16k",
    azure_endpoint="https://arize-internal-llm.openai.azure.com/",
    api_version="2023-09-15-preview",
)Azure OpenAI supports specific options:
api_version: str = field(default=None)
"""
The verion of the API that is provisioned
https://learn.microsoft.com/en-us/azure/ai-services/openai/reference#rest-api-versioning
"""
azure_endpoint: Optional[str] = field(default=None)
"""
The endpoint to use for azure openai. Available in the azure portal.
https://learn.microsoft.com/en-us/azure/cognitive-services/openai/how-to/create-resource?pivots=web-portal#create-a-resource
"""
azure_deployment: Optional[str] = field(default=None)
azure_ad_token: Optional[str] = field(default=None)
azure_ad_token_provider: Optional[Callable[[], str]] = field(default=None)
For full details on Azure OpenAI, check out the OpenAI Documentation
Instrument and observe OpenAI calls
This module provides automatic instrumentation for the . which may be used in conjunction with .
To instrument your application, import and enable OpenAIInstrumentation
Create the instrumentation.js file:
Import the instrumentation.js file first, then use OpenAI as usual.
After setting up instrumentation and running your OpenAI application, traces will appear in the Phoenix UI for visualization and analysis.
You can specify a custom tracer provider for OpenAI instrumentation in multiple ways:
npm install --save @arizeai/openinference-instrumentation-openai openai

npm install --save @opentelemetry/api @opentelemetry/sdk-trace-node \
  @opentelemetry/sdk-trace-base \
  @opentelemetry/resources \
  @opentelemetry/semantic-conventions \
  @opentelemetry/instrumentation \
  @opentelemetry/exporter-trace-otlp-proto \
@arizeai/openinference-semantic-conventionsimport { OTLPTraceExporter } from "@opentelemetry/exporter-trace-otlp-proto";
import { resourceFromAttributes } from "@opentelemetry/resources";
import { SimpleSpanProcessor } from "@opentelemetry/sdk-trace-base";
import { NodeTracerProvider } from "@opentelemetry/sdk-trace-node";
import { ATTR_SERVICE_NAME } from "@opentelemetry/semantic-conventions";
import { SEMRESATTRS_PROJECT_NAME } from "@arizeai/openinference-semantic-conventions";
import { registerInstrumentations } from "@opentelemetry/instrumentation";
// OpenAI instrumentation
import OpenAI from "openai";
import { OpenAIInstrumentation } from "@arizeai/openinference-instrumentation-openai";
const COLLECTOR_ENDPOINT = "your-phoenix-collector-endpoint";
const SERVICE_NAME = "openai-app";
const provider = new NodeTracerProvider({
resource: resourceFromAttributes({
[ATTR_SERVICE_NAME]: SERVICE_NAME,
[SEMRESATTRS_PROJECT_NAME]: SERVICE_NAME,
}),
spanProcessors: [
new SimpleSpanProcessor(
new OTLPTraceExporter({
url: `${COLLECTOR_ENDPOINT}/v1/traces`,
// (optional) if connecting to Phoenix with Authentication enabled
headers: { Authorization: `Bearer ${process.env.PHOENIX_API_KEY}` },
})
),
],
});
provider.register();
console.log("Provider registered");
const instrumentation = new OpenAIInstrumentation();
instrumentation.manuallyInstrument(OpenAI);
registerInstrumentations({
instrumentations: [instrumentation],
});
console.log("OpenAI instrumentation registered");import "./instrumentation.js";
import OpenAI from "openai";
// set OPENAI_API_KEY in environment, or pass it in arguments
const openai = new OpenAI({
apiKey: 'your-openai-api-key'
});
openai.chat.completions
.create({
model: "gpt-4o",
messages: [{ role: "user", content: "Write a haiku."}],
})
.then((response) => {
console.log(response.choices[0].message.content);
});const instrumentation = new OpenAIInstrumentation({
tracerProvider: customTracerProvider,
});
instrumentation.manuallyInstrument(OpenAI);const instrumentation = new OpenAIInstrumentation();
instrumentation.setTracerProvider(customTracerProvider);
instrumentation.manuallyInstrument(OpenAI);const instrumentation = new OpenAIInstrumentation();
instrumentation.manuallyInstrument(OpenAI);
registerInstrumentations({
instrumentations: [instrumentation],
tracerProvider: customTracerProvider,
});Use Phoenix and OpenAI Agents SDK for powerful multi-agent tracing
We have several code samples below on different ways to integrate with OpenAI, based on how you want to use Phoenix.
Sign up for Phoenix:
Sign up for an Arize Phoenix account at https://app.phoenix.arize.com/login
Install packages:
pip install arize-phoenix-otelSet your Phoenix endpoint and API Key:
import os

# Add Phoenix API Key for tracing
PHOENIX_API_KEY = "ADD YOUR API KEY"
os.environ["PHOENIX_CLIENT_HEADERS"] = f"api_key={PHOENIX_API_KEY}"
os.environ["PHOENIX_COLLECTOR_ENDPOINT"] = "https://app.phoenix.arize.com"
Your Phoenix API key can be found on the Keys section of your dashboard.
Launch your local Phoenix instance:
pip install arize-phoenix
phoenix serve
For details on customizing a local terminal deployment, see Terminal Setup.
Install packages:
pip install arize-phoenix-otelSet your Phoenix endpoint:
import os

os.environ["PHOENIX_COLLECTOR_ENDPOINT"] = "http://localhost:6006"
See Terminal for more details
Pull latest Phoenix image from Docker Hub:
docker pull arizephoenix/phoenix:latestRun your containerized instance:
docker run -p 6006:6006 arizephoenix/phoenix:latestThis will expose the Phoenix on localhost:6006
Install packages:
pip install arize-phoenix-otelSet your Phoenix endpoint:
import os

os.environ["PHOENIX_COLLECTOR_ENDPOINT"] = "http://localhost:6006"
For more info on using Phoenix with Docker, see Docker.
Install packages:
pip install arize-phoenixLaunch Phoenix:
import phoenix as px
px.launch_app()pip install openinference-instrumentation-openai-agents openai-agentsAdd your OpenAI API key as an environment variable:
export OPENAI_API_KEY=[your_key_here]Use the register function to connect your application to Phoenix:
from phoenix.otel import register

# configure the Phoenix tracer
tracer_provider = register(
  project_name="agents", # Default is 'default'
  auto_instrument=True # Auto-instrument your app based on installed dependencies
)
Run your agentscode.
from agents import Agent, Runner

agent = Agent(name="Assistant", instructions="You are a helpful assistant")
result = Runner.run_sync(agent, "Write a haiku about recursion in programming.")
print(result.final_output)
View your traces in Phoenix.
Sign up for Phoenix:
Sign up for an Arize Phoenix account at https://app.phoenix.arize.com/login
Click Create Space, then follow the prompts to create and launch your space.
Install packages:
pip install arize-phoenix-otelSet your Phoenix endpoint and API Key:
From your new Phoenix Space
Create your API key from the Settings page
Copy your Hostname from the Settings page
In your code, set your endpoint and API key:
import os

os.environ["PHOENIX_API_KEY"] = "ADD YOUR PHOENIX API KEY"
os.environ["PHOENIX_COLLECTOR_ENDPOINT"] = "ADD YOUR PHOENIX HOSTNAME"

# If you created your Phoenix Cloud instance before June 24th, 2025,
# you also need to set the API key as a header:
# os.environ["PHOENIX_CLIENT_HEADERS"] = f"api_key={os.getenv('PHOENIX_API_KEY')}"Launch your local Phoenix instance:
pip install arize-phoenix
phoenix serve
For details on customizing a local terminal deployment, see Terminal Setup.
Install packages:
pip install arize-phoenix-otelSet your Phoenix endpoint:
import os

os.environ["PHOENIX_COLLECTOR_ENDPOINT"] = "http://localhost:6006"
See Terminal for more details.
Pull latest Phoenix image from Docker Hub:
docker pull arizephoenix/phoenix:latestRun your containerized instance:
docker run -p 6006:6006 arizephoenix/phoenix:latestThis will expose the Phoenix on localhost:6006
Install packages:
pip install arize-phoenix-otelSet your Phoenix endpoint:
import os

os.environ["PHOENIX_COLLECTOR_ENDPOINT"] = "http://localhost:6006"
For more info on using Phoenix with Docker, see Docker.
Install packages:
pip install arize-phoenixLaunch Phoenix:
import phoenix as px
px.launch_app()