Configure and run Bedrock for evals
class BedrockModel:
    model_id: str = "anthropic.claude-v2"
    """The model name to use."""
    temperature: float = 0.0
    """What sampling temperature to use."""
    max_tokens: int = 256
    """The maximum number of tokens to generate in the completion."""
    top_p: float = 1
    """Total probability mass of tokens to consider at each step."""
    top_k: int = 256
    """The cutoff where the model no longer selects the words"""
    stop_sequences: List[str] = field(default_factory=list)
    """If the model encounters a stop sequence, it stops generating further tokens. """
    session: Any = None
    """A bedrock session. If provided, a new bedrock client will be created using this session."""
    client = None
    """The bedrock session client. If unset, a new one is created with boto3."""
    max_content_size: Optional[int] = None
    """If you're using a fine-tuned model, set this to the maximum content size"""
    extra_parameters: Dict[str, Any] = field(default_factory=dict)
    """Any extra parameters to add to the request body (e.g., countPenalty for a21 models)"""
To Authenticate, the following code is used to instantiate a session and the session is used with Phoenix Evals
import boto3

# Create a Boto3 session
session = boto3.session.Session(
    aws_access_key_id='ACCESS_KEY',
    aws_secret_access_key='SECRET_KEY',
    region_name='us-east-1'  # change to your preferred AWS region
)#If you need to assume a role
# Creating an STS client
sts_client = session.client('sts')
# (optional - if needed) Assuming a role
response = sts_client.assume_role(
RoleArn="arn:aws:iam::......",
RoleSessionName="AssumeRoleSession1",
#(optional) if MFA Required
SerialNumber='arn:aws:iam::...',
#Insert current token, needs to be run within x seconds of generation
TokenCode='PERIODIC_TOKEN'
)
# Your temporary credentials will be available in the response dictionary
temporary_credentials = response['Credentials']
# Creating a new Boto3 session with the temporary credentials
assumed_role_session = boto3.Session(
aws_access_key_id=temporary_credentials['AccessKeyId'],
aws_secret_access_key=temporary_credentials['SecretAccessKey'],
aws_session_token=temporary_credentials['SessionToken'],
region_name='us-east-1'
)client_bedrock = assumed_role_session.client("bedrock-runtime")
# Arize Model Object - Bedrock ClaudV2 by default
model = BedrockModel(client=client_bedrock)
model("Hello there, how are you?")
# Output: "As an artificial intelligence, I don't have feelings,
# but I'm here and ready to assist you. How can I help you today?"Amazon Bedrock is a managed service that provides access to top AI models for building scalable applications.
Instrument LLM calls to AWS Bedrock via the boto3 client using the BedrockInstrumentor
boto3 provides Python bindings to AWS services, including Bedrock, which provides access to a number of foundation models. Calls to these models can be instrumented using OpenInference, enabling OpenTelemetry-compliant observability of applications built using these models. Traces collected using OpenInference can be viewed in Phoenix.
OpenInference Traces collect telemetry data about the execution of your LLM application. Consider using this instrumentation to understand how a Bedrock-managed models are being called inside a complex system and to troubleshoot issues such as extraction and response synthesis.
pip install openinference-instrumentation-bedrock opentelemetry-exporter-otlpConnect to your Phoenix instance using the register function.
from phoenix.otel import register

# configure the Phoenix tracer
tracer_provider = register(
  project_name="my-llm-app", # Default is 'default'
  auto_instrument=True # Auto-instrument your app based on installed OI dependencies
)
After connecting to your Phoenix server, instrument boto3 prior to initializing a bedrock-runtime client. All clients created after instrumentation will send traces on all calls to invoke_model.
import boto3

session = boto3.session.Session()
client = session.client("bedrock-runtime")From here you can run Bedrock as normal
prompt = (
    b'{"prompt": "Human: Hello there, how are you? Assistant:", "max_tokens_to_sample": 1024}'
)
response = client.invoke_model(modelId="anthropic.claude-v2", body=prompt)
response_body = json.loads(response.get("body").read())
print(response_body["completion"])Now that you have tracing setup, all calls to invoke_model will be streamed to your running Phoenix for observability and evaluation.

Instrument LLM calls to AWS Bedrock via the boto3 client using the BedrockInstrumentor
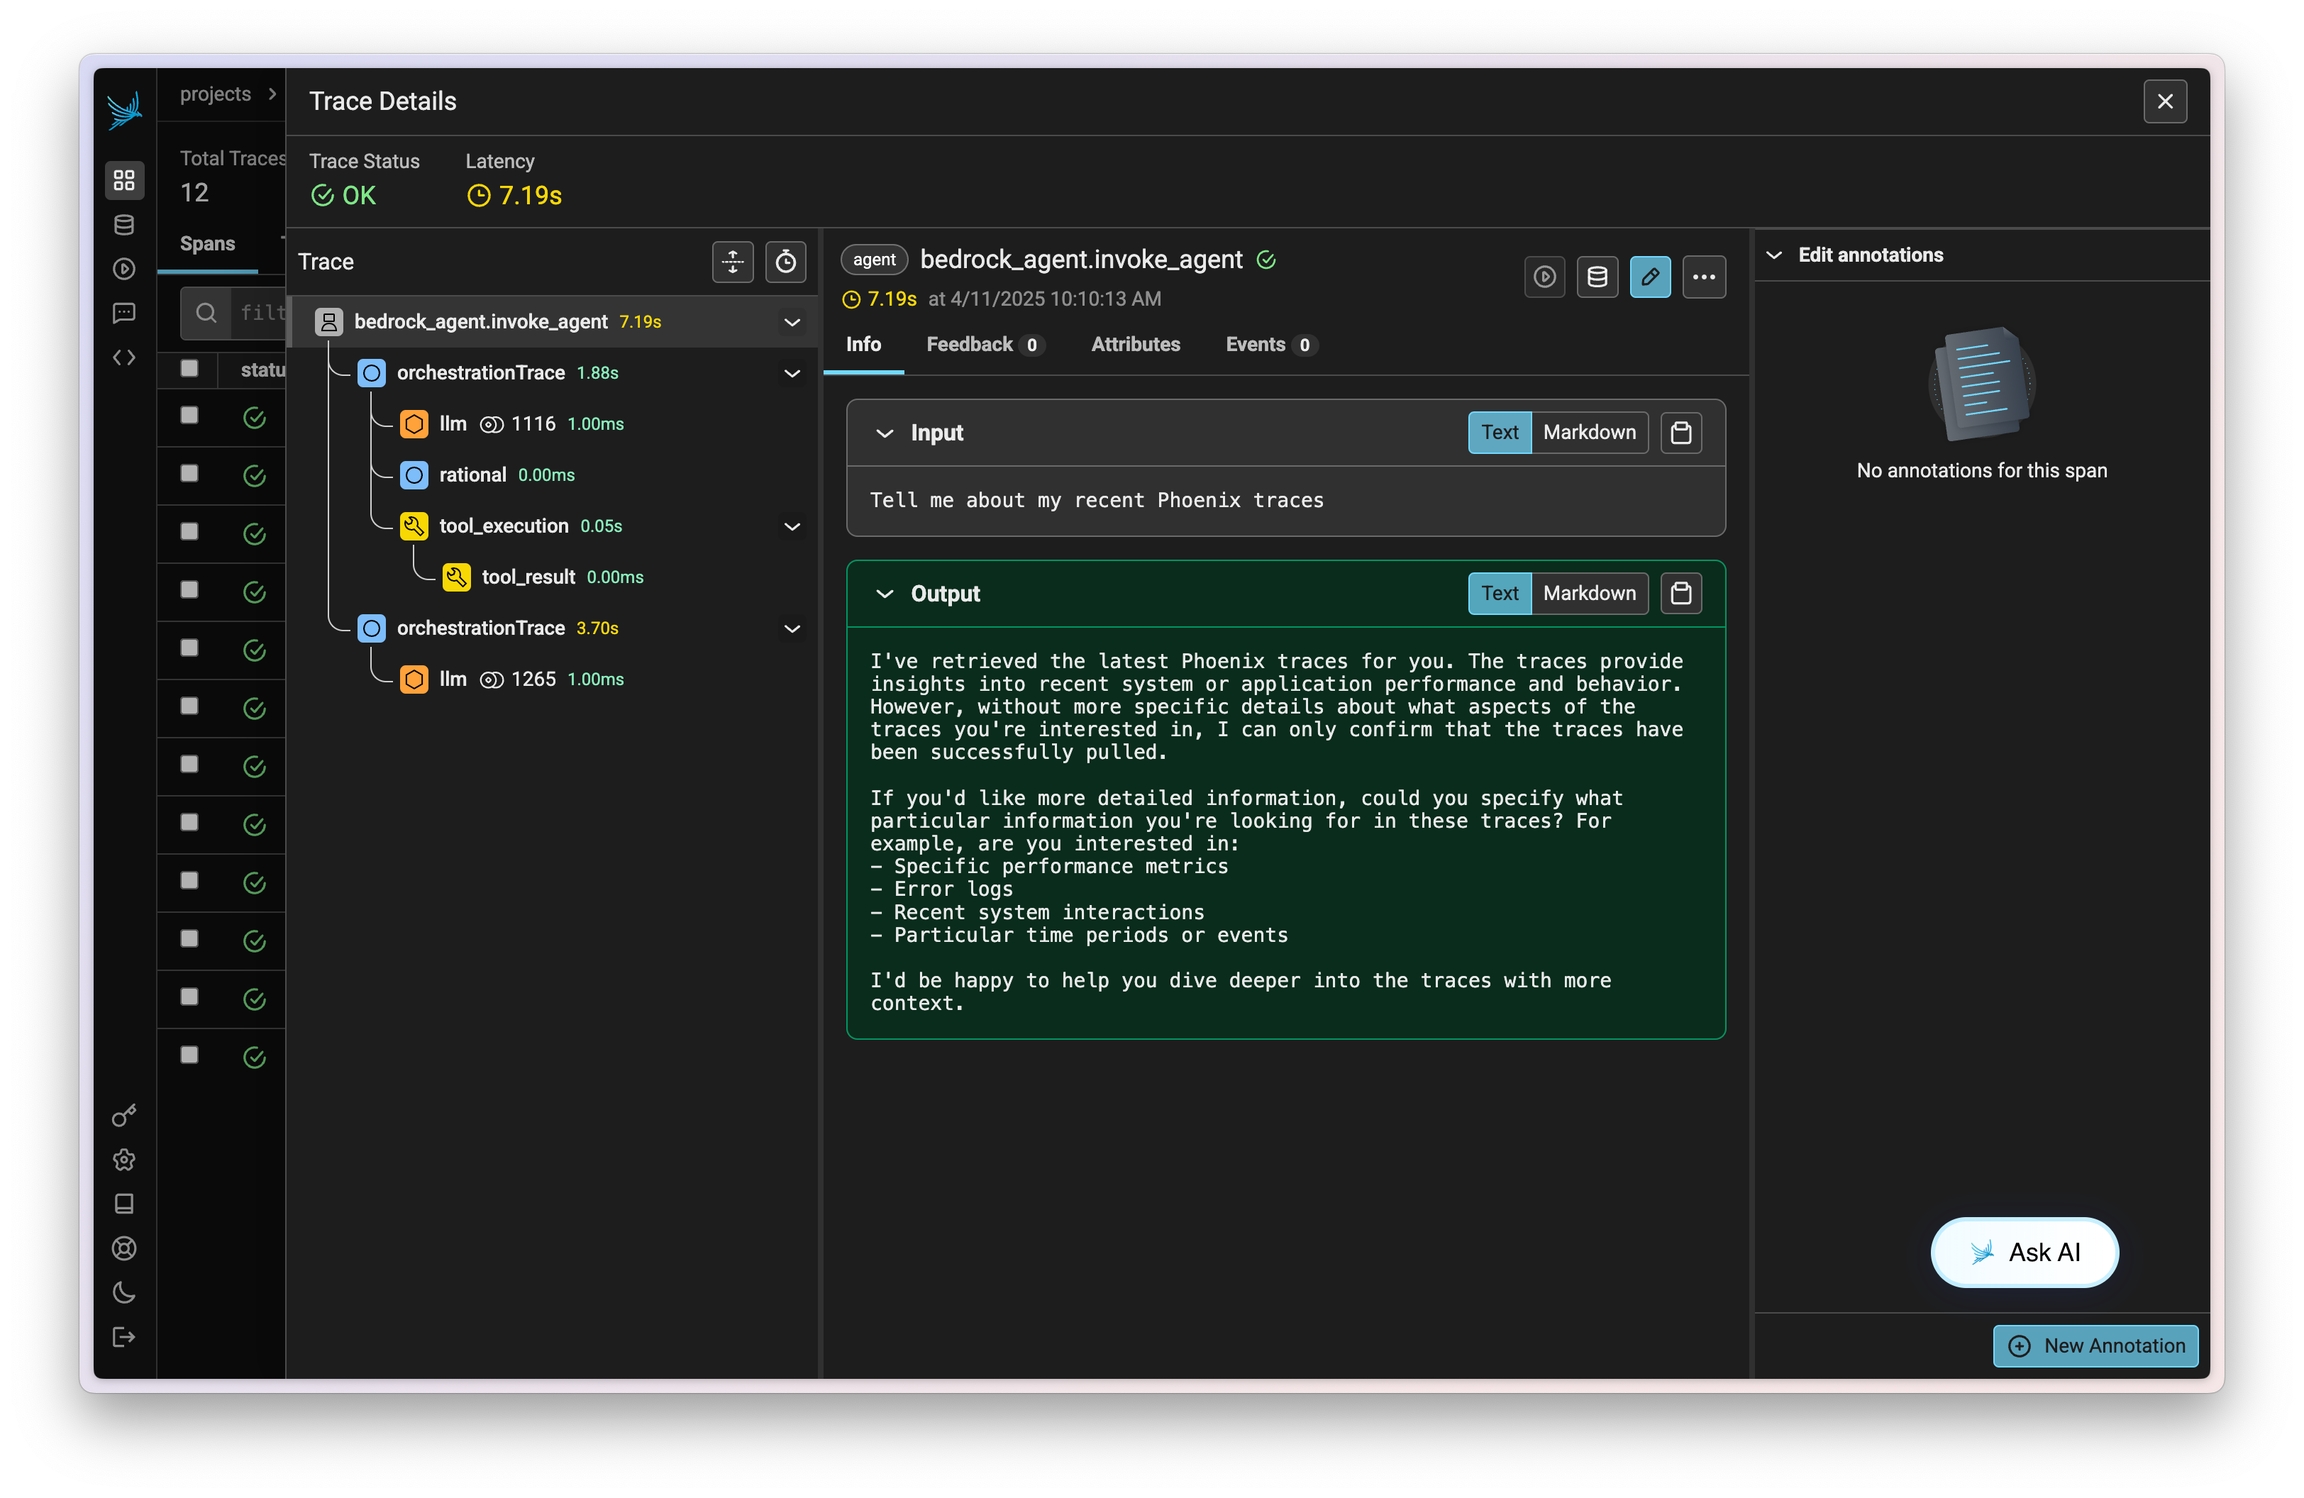
Amazon Bedrock Agents allow you to easily define, deploy, and manage agents on your AWS infrastructure. Traces on invocations of these agents can be captured using OpenInference and viewed in Phoenix.
This instrumentation will capture data on LLM calls, action group invocations (as tools), knowledgebase lookups, and more.
pip install openinference-instrumentation-bedrockConnect to your Phoenix instance using the register function.
from phoenix.otel import register

# configure the Phoenix tracer
tracer_provider = register(
  project_name="my-llm-app", # Default is 'default'
  auto_instrument=True # Auto-instrument your app based on installed OI dependencies
)
After connecting to your Phoenix server, instrument boto3 prior to initializing a bedrock-runtime client. All clients created after instrumentation will send traces on all calls to invoke_model, invoke_agent, and their streaming variations.
import boto3

session = boto3.session.Session()
client = session.client("bedrock-runtime")From here you can run Bedrock as normal
session_id = f"default-session1_{int(time.time())}"

attributes = dict(
    inputText=input_text,
    agentId=AGENT_ID,
    agentAliasId=AGENT_ALIAS_ID,
    sessionId=session_id,
    enableTrace=True,
)
response = client.invoke_agent(**attributes)Now that you have tracing setup, all calls will be streamed to your running Phoenix for observability and evaluation.
Sign up for Phoenix:
Sign up for an Arize Phoenix account at https://app.phoenix.arize.com/login
Click Create Space, then follow the prompts to create and launch your space.
Install packages:
pip install arize-phoenix-otelSet your Phoenix endpoint and API Key:
From your new Phoenix Space
Create your API key from the Settings page
Copy your Hostname from the Settings page
In your code, set your endpoint and API key:
import os

os.environ["PHOENIX_API_KEY"] = "ADD YOUR PHOENIX API KEY"
os.environ["PHOENIX_COLLECTOR_ENDPOINT"] = "ADD YOUR PHOENIX HOSTNAME"

# If you created your Phoenix Cloud instance before June 24th, 2025,
# you also need to set the API key as a header:
# os.environ["PHOENIX_CLIENT_HEADERS"] = f"api_key={os.getenv('PHOENIX_API_KEY')}"Launch your local Phoenix instance:
pip install arize-phoenix
phoenix serve
For details on customizing a local terminal deployment, see Terminal Setup.
Install packages:
pip install arize-phoenix-otelSet your Phoenix endpoint:
import os

os.environ["PHOENIX_COLLECTOR_ENDPOINT"] = "http://localhost:6006"
See Terminal for more details.
Pull latest Phoenix image from Docker Hub:
docker pull arizephoenix/phoenix:latestRun your containerized instance:
docker run -p 6006:6006 arizephoenix/phoenix:latestThis will expose the Phoenix on localhost:6006
Install packages:
pip install arize-phoenix-otelSet your Phoenix endpoint:
import os

os.environ["PHOENIX_COLLECTOR_ENDPOINT"] = "http://localhost:6006"
For more info on using Phoenix with Docker, see Docker.
Install packages:
pip install arize-phoenixLaunch Phoenix:
import phoenix as px
px.launch_app()Sign up for Phoenix:
Sign up for an Arize Phoenix account at https://app.phoenix.arize.com/login
Click Create Space, then follow the prompts to create and launch your space.
Install packages:
pip install arize-phoenix-otelSet your Phoenix endpoint and API Key:
From your new Phoenix Space
Create your API key from the Settings page
Copy your Hostname from the Settings page
In your code, set your endpoint and API key:
import os

os.environ["PHOENIX_API_KEY"] = "ADD YOUR PHOENIX API KEY"
os.environ["PHOENIX_COLLECTOR_ENDPOINT"] = "ADD YOUR PHOENIX HOSTNAME"

# If you created your Phoenix Cloud instance before June 24th, 2025,
# you also need to set the API key as a header:
# os.environ["PHOENIX_CLIENT_HEADERS"] = f"api_key={os.getenv('PHOENIX_API_KEY')}"Launch your local Phoenix instance:
pip install arize-phoenix
phoenix serve
For details on customizing a local terminal deployment, see Terminal Setup.
Install packages:
pip install arize-phoenix-otelSet your Phoenix endpoint:
import os

os.environ["PHOENIX_COLLECTOR_ENDPOINT"] = "http://localhost:6006"
See Terminal for more details.
Pull latest Phoenix image from Docker Hub:
docker pull arizephoenix/phoenix:latestRun your containerized instance:
docker run -p 6006:6006 arizephoenix/phoenix:latestThis will expose the Phoenix on localhost:6006
Install packages:
pip install arize-phoenix-otelSet your Phoenix endpoint:
import os

os.environ["PHOENIX_COLLECTOR_ENDPOINT"] = "http://localhost:6006"
For more info on using Phoenix with Docker, see Docker.
Install packages:
pip install arize-phoenixLaunch Phoenix:
import phoenix as px
px.launch_app()