Only this pageAll pages
Powered by GitBook
1 of 19

Self-Hosting

Loading...

Loading...

Loading...

Deployment Options

Loading...

Loading...

Loading...

Loading...

Loading...

Features

Loading...

Loading...

Loading...

Loading...

Upgrade

Loading...

Security

Misc

Loading...

Management

How to manage your Phoenix instance

API allows administrators to programmatically manage their instance. The management APIs are accessible to both system API keys as well as the PHOENIX_ADMIN_SECRET

Authentication

Authenticate your API calls with a system key or admin secret

Authentication: bearer $PHOENIX_ADMIN_SECRET

API Reference

The API provides endpoints for creating, updating, and deleting users, projects, and more.

Railway

Use this guide to deploy Arize Phoenix on Railway via the prebuilt template.

Deploy

Use the following button to deploy the Arize Phoenix template on Railway:

Email

Optionally, you can configure an SMTP server to send transactional emails. These are used for password resets, user invitations, and more.

  • PHOENIX_SMTP_HOSTNAME: The SMTP hostname to use for sending password reset emails.

  • PHOENIX_SMTP_PORT: The SMTP port. Defaults to 587.

  • PHOENIX_SMTP_USERNAME: The SMTP username.

  • PHOENIX_SMTP_PASSWORD: The SMTP password.

  • PHOENIX_SMTP_MAIL_FROM: The from address in the emails. Defaults to noreply@arize.com.

  • PHOENIX_SMTP_VALIDATE_CERTS: Whether to validate the SMTP server's certificate. Defaults to true.

Example usage:

These settings are required for password reset flows when authentication is enabled in Phoenix.

FAQ

  • Which SMTP service should I use?

    • It is recommended to use a reputable SMTP service for transactional emails to ensure delivery and prevent abuse. If you do not have a preferred service from your cloud provider, consider providers like Resend, Mailgun, Sendgrid, or Postmark, which are easy to set up and offer generous free tiers.

FAQs

Permission denied writing to disc

Migrations

Migrations are run at boot

New major versions of Phoenix may contain database migrations that run automatically upon the start of the application. This process is intended to be seamless and should not require manual intervention except in exceptional circumstances.

Migration Reliability & Testing

Phoenix takes database migration reliability seriously and follows strict practices to minimize risk:

  • Conservative Migration Policy: Migrations are only performed during major version bumps (e.g., v8.x to v9.0.0), giving clear advance notice of schema changes.

In the case that you may need to manually apply migration, debug builds are provided for shell access.

Important: Phoenix does not automatically downgrade database schemas when rolling back to an older version. This is because up and down migration logic is colocated within the Phoenix codebase - when you roll back to an older Phoenix version, that version doesn't contain the down migration logic needed to undo schema changes applied by newer versions. If you need to downgrade Phoenix, you must manually apply down migrations using the debug builds or database tools. Plan your deployment strategy accordingly.

License

Arize Phoenix is fully open-source free to self-host

Arize Phoenix is released under the Elastic License 2.0 (ELv2) by Arize AI.

  • Self-hosting on your own infrastructure or in your cloud account is free and fully permitted.

  • There are no feature gates — Phoenix is a fully open-source platform.

See the for details.

You can deploy Arize Phoenix on via a prebuilt template. The template contains all the necessary services and configurations to get you started.

Some phoenix containers run as nonroot and therefore must be granted explicit write permissions to the mounted disc (see ). Phoenix 4.1.3 and above run as root by default to avoid this. However there are debug and nonroot variants of the image as well.

All migrations are documented in the main

Comprehensive Testing: All migrations are thoroughly tested in CI, including both up and down migration paths. See our for details.

For full details, see the .

REST API
Railway
export PHOENIX_SMTP_HOSTNAME="smtp.example.com"
export PHOENIX_SMTP_PORT=587
export PHOENIX_SMTP_USERNAME="phoenix-user"
export PHOENIX_SMTP_PASSWORD="yourpassword"
export PHOENIX_SMTP_MAIL_FROM="noreply@yourdomain.com"
export PHOENIX_SMTP_VALIDATE_CERTS=true

Provisioning

How to provision Phoenix at deploy time

Phoenix can be configured to immediately recieve data via

Admin Access

Phoenix supports the use of the PHOENIX_ADMIN_SECRET environment variable to enable immediate, programmatic access for sending data to your Phoenix instance. This secret acts as a bearer token, authenticating as the first system user, and can be used in place of an API key for secure automation and provisioning workflows.

  • Set the PHOENIX_ADMIN_SECRET environment variable at deploy time.

  • The value must be at least 32 characters long, include at least one digit and one lowercase letter, and must be different from PHOENIX_SECRET.

  • When set, you can use this secret as a bearer token in the Authorization header to authenticate API requests and immediately send data to Phoenix.

Initial Admin User Provisioning

Phoenix allows you to provision the first set of admin users at deploy time using the PHOENIX_ADMINS environment variable. This is useful for bootstrapping access in self-hosted or automated environments.

  • Set the PHOENIX_ADMINS environment variable to a semicolon-separated list of username=email pairs.

  • On startup, Phoenix will create admin users for each pair if they do not already exist.

  • Passwords for these users will be randomly generated and must be reset by the user.

  • If a username or email already exists, the user record will not be modified.

PHOENIX_ADMINS="username1=email1@example.com;username2=email2@example.com"
https://kubernetes.io/docs/tasks/configure-pod-container/security-context/
MIGRATION doc
migration test suite
LICENSE file

Kubernetes (helm)

Deploy Phoenix via Helm

Prerequisites​

Installing

export CHART_URL=oci://registry-1.docker.io/arizephoenix/phoenix-helm
export CHART_VERSION=x.x.x  # replace your version here

New patch versions of the Helm chart defaulting to the latest version of Phoenix are regularly released.

Phoenix can be deployed with PostgreSQL and the default configuration by running

helm install phoenix $CHART_URL --version $CHART_VERSION

To customize the configuration of your deployment, create a values.yaml file describing your desired settings. For example, the following file changes the default Phoenix port from 6006 to 6007:

server:
  port: 6007

To install with your custom configuration, run

helm install phoenix $CHART_URL --version $CHART_VERSION -f values.yaml

Upgrading and Uninstalling

After the initial installation, subsequent upgrades can be applied with

helm upgrade phoenix $CHART_URL --version $CHART_VERSION -f values.yaml

The Helm chart can be uninstalled with

helm uninstall phoenix

Uninstalling will remove all Kubernetes resources (deployments, services, pods, ingresses, etc.) except for the persistent volume claim containing the PostgreSQL database.

Kubernetes (kustomize)

Phoenix can be deployed on Kubernetes with PostGres

Prerequisites​

You must have a working Kubernetes cluster accessible via kubectl.

PostgreSQL

Manifests for PostgreSQL tend to be complex, so we recommend using kustomize.

Clone the Arize-Phoenix repository:

From the repository root, apply the kustomize configuration for PostgreSQL:

This will yield a single node deployment of Phoenix pointed to a remote PostgreSQL.

SQLite with a StatefulSet

We love SQLite! However it might not be the best choice of database if you have a need for a high volume of reads and writes (e.g. you have multiple applications and users using your application simultaniously).

Self-Hosting

How to self-host a Phoenix instance

Architecture

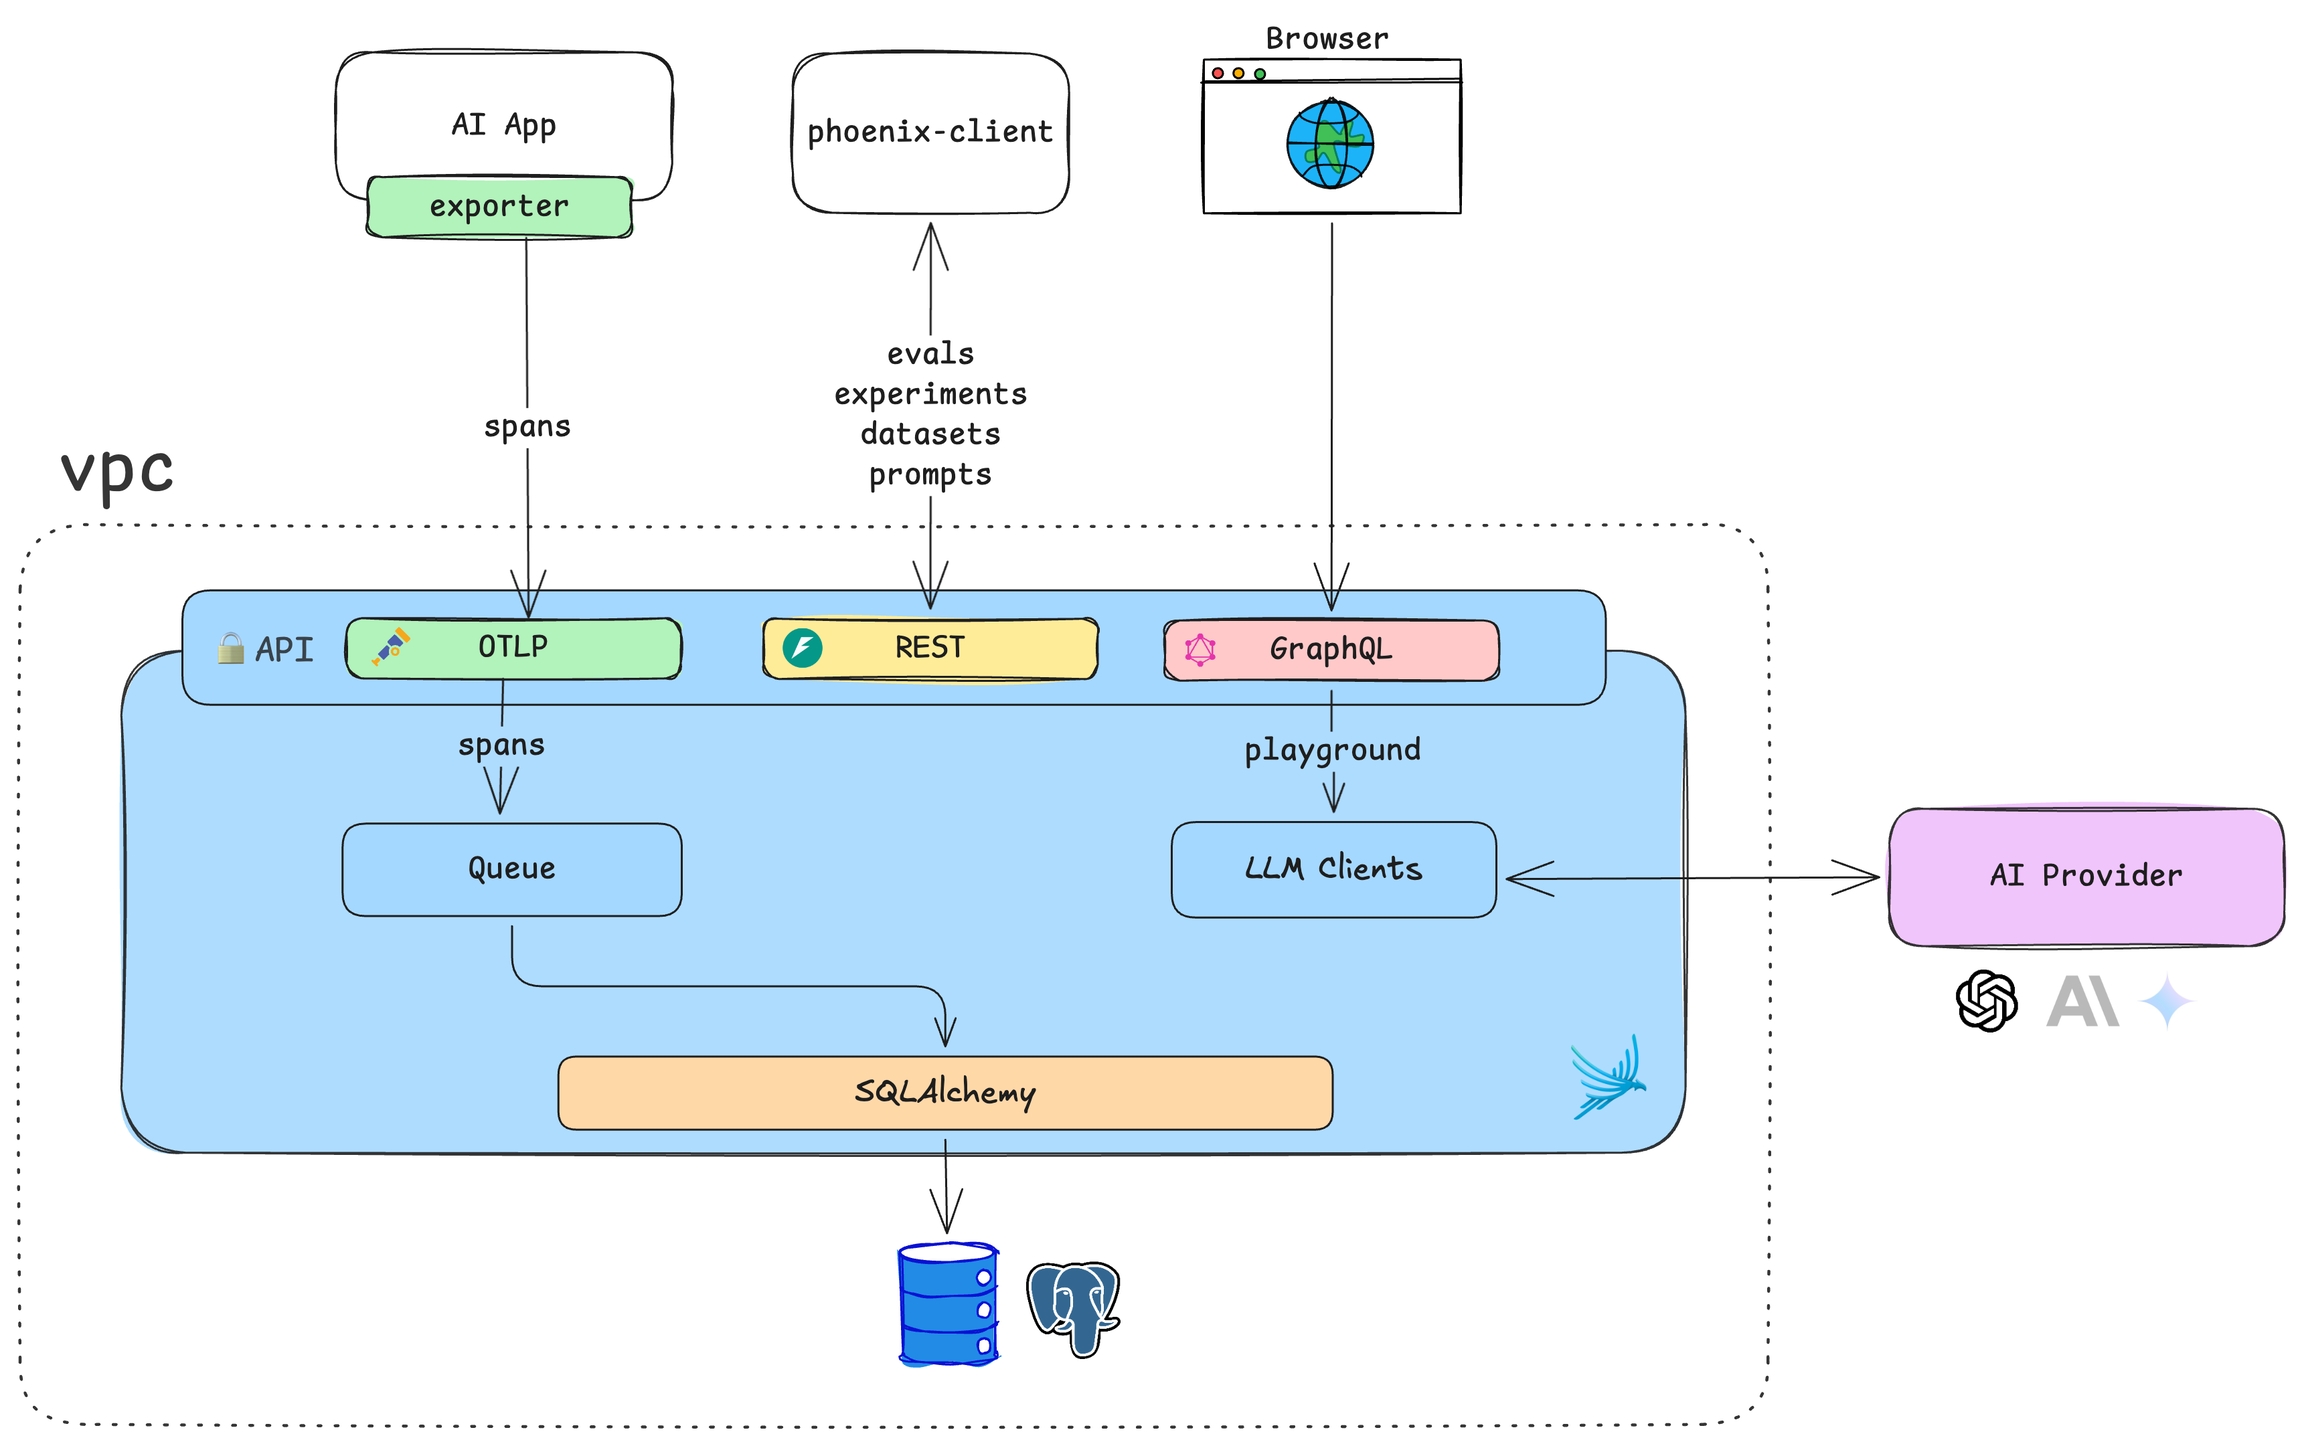
Phoenix is a containerized application designed to collect and analyze traces from your LLM or AI application. It operates with a SQL database backend and provides a robust tracing UI. By default, Phoenix uses SQLite for storage, but it can be configured to use PostgreSQL for production deployments.

SQLite

By default, Phoenix uses SQLite, storing data in ~/.phoenix/ or the directory specified by the PHOENIX_WORKING_DIR environment variable. This allows for simple deployments using a volume mount, making it easy to get started without additional database setup.

PostgreSQL

For production and scalable deployments, Phoenix supports PostgreSQL. Configure the PHOENIX_SQL_DATABASE_URL environment variable to connect Phoenix to your PostgreSQL instance.

Deployment Options

Phoenix can be deployed using several methods, including Docker and Kubernetes. Choose the option that best fits your infrastructure and operational requirements.

Configure Phoenix

Setup Authentication

Images

You must have a working Kubernetes cluster accessible via kubectl as well as the installed locally.

The Phoenix Helm chart is hosted on . First, save the chart URL to a variable.

It's recommended to install a specific version of the Helm chart. Select the latest Helm chart version (e.g., 0.1.0) and save to a variable.

A comprehensive list of configurable values can be found in the .

Clone the Arize-Phoenix repository:

From the repository root, apply the kustomize configuration for SQLite:

This will yield a single node deployment of Phoenix with a local SQLite.

Copy the manifest below into a file named phoenix.yaml.

Apply the manifest:

See the and sections for details.

For other ways to run Phoenix, including Phoenix Cloud, see .

See available to run Phoenix

Customize Phoenix using

Setup

Configuring

This table lists the we publish that can be used to run Phoenix.

Image Tag
Description
helm client
Dockerhub
here
Dockerhub repo overview
git clone https://github.com/Arize-ai/phoenix.git
kubectl apply -k kustomize/backends/postgres
kubectl apply -f phoenix.yaml

arizephoenix/phoenix:latest

Latest released version of Phoenix using root permissions.

arizephoenix/phoenix:latest-nonroot

Latest released version of Phoenix using nonroot permissions. Ensure the image has the required filesystem permissions before using.

arizephoenix/phoenix:latest-debug

Latest released version of Phoenix using a debug base image.

arizephoenix/phoenix:version-X.X.X

Build for a specific release version using root permissions.

arizephoenix/phoenix:version-X.X.X-nonroot

Build for a specific release version using nonroot permissions.

arizephoenix/phoenix:version-X.X.X-debug

Build for a specific release version using a debug image.

Docker

How to deploy Phoenix using Docker

Kubernetes

How to deploy Phoenix on K8S

SQLite
PostgreSQL
Phoenix Deployments
ports
environment variables
authentication
OAuth2 identity providers
images

Configuration

How to customize your self-hosted deployment of Phoenix

Ports

Phoenix is an all-in-one solution that has a tracing UI as well as a trace collector over both HTTP and gRPC. By default, the container exposes the following ports:

If the above ports need to be modified, consult the section below.

Environment Variables

Phoenix uses environment variables to control how data is sent, received, and stored. Here is the comprehensive list:

Server Configuration

The following environment variables will control how your phoenix server runs.

  • PHOENIX_PORT: The port to run the phoenix web server. Defaults to 6006.

  • PHOENIX_GRPC_PORT: The port to run the gRPC OTLP trace collector. Defaults to 4317.

  • PHOENIX_HOST: The host to run the phoenix server. Defaults to 0.0.0.0

  • PHOENIX_WORKING_DIR: The directory in which to save, load, and export data. This directory must be accessible by both the Phoenix server and the notebook environment. Defaults to ~/.phoenix/

  • PHOENIX_SQL_DATABASE_URL: The SQL database URL to use when logging traces and evals. if you plan on using SQLite, it's advised to to use a persistent volume and simply point the PHOENIX_WORKING_DIR to that volume. If URL is not specified, by default Phoenix starts with a file-based SQLite database in a temporary folder, the location of which will be shown at startup. Phoenix also supports PostgresSQL as shown below:

    • PostgreSQL, e.g. postgresql://@host/dbname?user=user&password=password or postgresql://user:password@host/dbname

    • SQLite, e.g. sqlite:///path/to/database.db

  • PHOENIX_POSTGRES_HOST: As an alternative to setting PHOENIX_SQL_DATABASE_URL, you can set the following environment variables to connect to a PostgreSQL database:

    • PHOENIX_POSTGRES_HOST

    • PHOENIX_POSTGRES_PORT

    • PHOENIX_POSTGRES_USER

    • PHOENIX_POSTGRES_PASSWORD

    • PHOENIX_POSTGRES_DB

  • PHOENIX_POSTGRES_PORT: Used with PHOENIX_POSTGRES_HOST to specify the port to use for the PostgreSQL database.

  • PHOENIX_POSTGRES_USER: Used with PHOENIX_POSTGRES_HOST to specify the user to use for the PostgreSQL database.

  • PHOENIX_POSTGRES_PASSWORD: Used with PHOENIX_POSTGRES_HOST to specify the password to use for the PostgreSQL database.

  • PHOENIX_POSTGRES_DB: Used with PHOENIX_POSTGRES_HOST to specify the database to use for the PostgreSQL database.

  • PHOENIX_ENABLE_PROMETHEUS: Whether to enable Prometheus metrics at port 9090. Defaults to false.

  • PHOENIX_SERVER_INSTRUMENTATION_OTLP_TRACE_COLLECTOR_HTTP_ENDPOINT: Specifies an HTTP endpoint for the OTLP trace collector. Specifying this variable enables the OpenTelemetry tracer and exporter for the Phoenix server.

  • PHOENIX_SERVER_INSTRUMENTATION_OTLP_TRACE_COLLECTOR_GRPC_ENDPOINT: Specifies an gRPC endpoint for the OTLP trace collector. Specifying this variable enables the OpenTelemetry tracer and exporter for the Phoenix server.

  • PHOENIX_CSRF_TRUSTED_ORIGINS: A comma-separated list of origins allowed to bypass Cross-Site Request Forgery (CSRF) protection. This setting is recommended when configuring OAuth2 clients or sending password reset emails. If this variable is left unspecified or contains no origins, CSRF protection will not be enabled. In such cases, when a request includes origin or referer headers, those values will not be validated.

Docker

Deploy using docker compose for a local or cloud deployment

This guide provides instructions for installing and setting up your environment to run Phoenix locally using Docker.

Prerequisites

  1. Ensure Docker is installed and running on your system. You can verify this by running:

    If you don't see any server information in the output, make sure Docker is installed correctly and launch the Docker daemon.

  2. Phoenix Version

    1. Our Docker Compose files are pegged to the latest release of Phoenix. If you want to use a different version, you can specify it in the docker-compose.yml file.

  3. Persistent Disc (optional)

    1. You can configure external disc storage to store your data in a SQLite databse

  4. External Postgres(optional).

    1. you will need to set the PHOENIX_SQL_DATABASE_URL environment variable to the connection string for your postgres instance.

    2. Note: We do only officially support Postgres versions >= 14.

Docker

Run a local instance of Arize Phoenix in Docker with 2 commands

Pull the image you would like to run

Pick an image you would like to run or simply run the latest:

Note, you should pin the phoenix version for production to the version of phoenix you plan on using. E.x. arizephoenix/phoenix:4.0.0

See for details on the ports for the container.

Note that the above simply starts the phoenix server locally. A simple way to make sure your application always has a running phoenix server as a collector is to run the phoenix server as a side car.

Here is an example compose.yaml

This way you will always have a running Phoenix instance when you run

For the full details of on how to configure Phoenix, check out the Configuration section

PostgreSQL

You can quickly launch Phoenix with a PostGreSQL backend using docker compose.

Copy the following YAML file into a new file called docker-compose.yml

Run docker compose to run phoenix with postgres

Note that the above setup is using your local disc as a volume mount to store the postgres data. For production deployments you will have to setup a persistent volume.

SQLite

You can also run Phonix using SQLite with a persistent disc attached:

Phoenix running on your virtual private cloud
Port
Protocol
Endpoint
Function
Env Var

PHOENIX_HOST_ROOT_PATH: The root path prefix for your application. If provided, allows Phoenix to run behind a reverse proxy at the specified subpath. See an example .

PHOENIX_SQL_DATABASE_SCHEMA: An optional string specifying the PostgreSQL for the database tables. Similar to folders, schemas help organize tables outside the default public schema. If the specified schema does not exist, it will be created. This option is ignored when using SQLite.

Navigate to and you should see your local Arize Phoenix

First, ensure that Docker Compose is installed on your machine .

docker info
docker pull arizephoenix/phoenix
docker run -p 6006:6006 -p 4317:4317 -i -t arizephoenix/phoenix:latest
services:
  phoenix:
    image: arizephoenix/phoenix:latest
    ports:
      - "6006:6006"  # UI and OTLP HTTP collector
      - "4317:4317"  # OTLP gRPC collector
  backend:
    build:
      context: ./backend
      dockerfile: Dockerfile
      args:
        OPENAI_API_KEY: ${OPENAI_API_KEY}
    ports:
      - "8000:8000"
    environment:
      - OPENAI_API_KEY=${OPENAI_API_KEY}
      - COLLECTOR_ENDPOINT=http://phoenix:6006/v1/traces
      - PROD_CORS_ORIGIN=http://localhost:3000
      # Set INSTRUMENT_LLAMA_INDEX=false to disable instrumentation
      - INSTRUMENT_LLAMA_INDEX=true
    healthcheck:
      test: ["CMD", "wget", "--spider", "http://0.0.0.0:8000/api/chat/healthcheck"]
      interval: 5s
      timeout: 1s
      retries: 5
  frontend:
    build: frontend
    ports:
      - "3000:3000"
    depends_on:
      backend:
        condition: service_healthy
docker compose up
# docker-compose.yml
services:
  phoenix:
    image: arizephoenix/phoenix:latest # Must be greater than 4.0 version to work
    depends_on:
      - db
    ports:
      - 6006:6006  # PHOENIX_PORT
      - 4317:4317  # PHOENIX_GRPC_PORT
      - 9090:9090  # [Optional] PROMETHEUS PORT IF ENABLED
    environment:
      - PHOENIX_SQL_DATABASE_URL=postgresql://postgres:postgres@db:5432/postgres
  db:
    image: postgres
    restart: always
    environment:
      - POSTGRES_USER=postgres
      - POSTGRES_PASSWORD=postgres
      - POSTGRES_DB=postgres
    ports:
      - 5432
    volumes:
      - database_data:/var/lib/postgresql/data
volumes:
  database_data:
    driver: local
docker compose up --build
# docker-compose.yml
services:
  phoenix:
    image: arizephoenix/phoenix:latest # Must be greater than 4.0 version to work
    ports:
      - 6006:6006  # PHOENIX_PORT
      - 4317:4317  # PHOENIX_GRPC_PORT
      - 9090:9090  # [Optional] PROMETHEUS PORT IF ENABLED
    environment:
      - PHOENIX_WORKING_DIR=/mnt/data
    volumes:
      - phoenix_data:/mnt/data   # PHOENIX_WORKING_DIR
volumes:
  phoenix_data:
    driver: local
here
schema
http://0.0.0.0:6006
https://docs.docker.com/compose/install/

6006

HTTP

/

User interface (UI) of the web application.

PHOENIX_PORT

6006

HTTP

/v1/traces

PHOENIX_PORT

4317

gRPC

n/a

PHOENIX_GRPC_PORT

git clone https://github.com/Arize-ai/phoenix.git
kubectl apply -k kustomize/base

Accepts traces in (Protobuf).

Accepts traces in (Protobuf).

OpenTelemetry OTLP format 
# phoenix.yaml
apiVersion: v1
kind: Service
metadata:
  labels:
    app: phoenix
  name: phoenix
spec:
  ports:
  - port: 443
    protocol: TCP
    targetPort: 6006
  selector:
    app: phoenix
  type: ClusterIP
---
apiVersion: apps/v1
kind: StatefulSet
metadata:
  name: phoenix
  namespace: phoenix
spec:
  replicas: 1
  selector:
    matchLabels:
      app: phoenix
  template:
    metadata:
      # Assume k8s pod service discovery for prometheus
      annotations:
        prometheus.io/path: /metrics
        prometheus.io/port: "9090"
        prometheus.io/scrape: "true"
      labels:
        app: phoenix
    spec:
      containers:
      - args:
        - -m
        - phoenix.server.main
        - serve
        command:
        - python
        env:
        - name: PHOENIX_WORKING_DIR
          value: /mnt/data
        # The version of phoenix you want should be used here  
        image: docker.io/arizephoenix/phoenix:version-4.0.0
        ports:
        - containerPort: 6006
        - containerPort: 4317
        - containerPort: 9090
        volumeMounts:
        - mountPath: /mnt/data
          name: phoenix
  volumeClaimTemplates:
  - metadata:
      name: phoenix
    spec:
      resources:
        requests:
          storage: 8Gi
Docker
Logo

AWS with CloudFormation

Phoenix can be deployed on AWS Fargate using CloudFormation

Prerequisites

AWS Account & CLI

Export your AWS Account and Region for future use

Before you run any of the CloudFormation or ECR commands, export two env‑vars so you don’t have to repeat your account/region everywhere:

# grab your AWS account ID and default region from your CLI creds
export ACCOUNT=$(aws sts get-caller-identity --query Account --output text)
export REGION=$(aws configure get region)

IAM Permissions

Before you can deploy any of the CloudFormation stacks above, you’ll want a single, least‑privilege managed policy that your CI/CD user or role can assume.

Create the IAM policy

aws iam create-policy \
  --policy-name PhoenixDeployPermissions \
  --policy-document file://deploy-permissions.json

This will return the new policy’s ARN, e.g.:

arn:aws:iam::123456789012:policy/PhoenixDeployPermissions

Attach it to your deploy principal

a) If you use an IAM User:

bashCopyEditaws iam attach-user-policy \
  --user-name <YOUR_DEPLOY_USER> \
  --policy-arn <PASTE ARN HERE>

b) If you use an IAM Role (e.g. CodeBuild or CI/CD):

bashCopyEditaws iam attach-role-policy \
  --role-name <YOUR_DEPLOY_ROLE> \
  --policy-arn <PASTE ARN HERE>

Once attached, that user or role will have exactly the rights needed to stand up all of the VPCs, ECS/Fargate clusters, ECR repos, Secrets Manager secrets, ALBs, CloudWatch Logs, IAM roles, and CloudFormation stacks in this guide

Set up ECR (Elastic Container Registry) Repositories for Phoenix and your application

Before deploying Phoenix and your application into ECS/Fargate, you need to host your container images in Amazon Elastic Container Registry (ECR). Here’s a quick rundown:

1. Create ECR repositories

Run these once:

# Repository for the Phoenix UI image
aws ecr create-repository \
  --repository-name phoenix \
  --image-scanning-configuration scanOnPush=true \
  --region $REGION

# Repository for your application (agent, backend, frontend, etc.)
aws ecr create-repository \
  --repository-name my-app \
  --image-scanning-configuration scanOnPush=true \
  --region $REGION

Each command returns the repo URI:

$ACCOUNT.dkr.ecr.$REGION.amazonaws.com/phoenix
$ACCOUNT.dkr.ecr.$REGION.amazonaws.com/my-app

2. Authenticate Docker to ECR

ecr get-login-password --region $REGION \
  | docker login \
    --username AWS \
    --password-stdin $ACCOUNT.dkr.ecr.$REGION.amazonaws.com

This writes your Docker credentials so you can push and pull.


3. Push Phoenix and your apps (backend, frontend, db)

If you’ve built locally:

# Tag your local Phoenix image
docker pull arizephoenix/phoenix
docker tag arizephoenix/phoenix:latest \
  $ACCOUNT.dkr.ecr.$REGION.amazonaws.com/phoenix:latest

# Push to ECR
docker push $ACCOUNT.dkr.ecr.$REGION.amazonaws.com/phoenix:latest

# Repeat for your app
docker tag my-app:latest \
  $ACCOUNT.dkr.ecr.$REGION.amazonaws.com/my-app:latest
docker push $ACCOUNT.dkr.ecr.$REGION.amazonaws.com/my-app:latest

Create VPCs and Subnets

This template:

  1. Creates a VPC (10.0.0.0/16 for example) with DNS support

  2. Provisions two public subnets (one per AZ) for your Internet‑facing components (ALBs, NAT gateway)

  3. Provisions two private subnets (one per AZ) for your ECS tasks (Phoenix, agents, backend services)

  4. Deploys a NAT Gateway in the first public subnet so private tasks can reach out (for secrets, Docker registries, external APIs)

  5. Exports the VPC ID and the comma‑separated Public/Private Subnet IDs for easy consumption by downstream stacks

Deploy with:

cloudformation deploy \
  --template-file phoenix-network.yml \
  --stack-name phoenix-network \
  --parameter-overrides \
      AZ1=us-west-2a \
      AZ2=us-west-2b \
  --capabilities CAPABILITY_NAMED_IAM

Make sure to change AZ1 and AZ2 to match your region.

You can now access your VPC and public + private subnet IDs at AWS -> CloudFormation -> Stacks -> phoenix-network -> Outputs.

Extending for multiple components

If you plan to run multiple services (e.g. a separate frontend, backend, worker pool), consider:

  • Additional subnets You might carve out extra AZ‑distributed subnets (e.g. “app‑subnets”, “db‑subnets”) with their own route tables and security rules.

  • Security groups per tier

    • ALB SG: allows inbound HTTP(S) from 0.0.0.0/0

    • App SG: allows inbound from the ALB SG on your HTTP port

    • DB SG: allows inbound only from your App SG on your database port

Deploy Phoenix (with Authentication)

You are now ready to deploy Phoenix to AWS.

Deploy the phoenix-auth.yml stack Consume the network stack’s outputs (VPC‑ID, PublicSubnetIds, PrivateSubnetIds) along with your new ECR URI:

aws cloudformation deploy \
  --template-file phoenix-auth.yml \
  --stack-name phoenix-auth \
  --capabilities CAPABILITY_NAMED_IAM \
  --parameter-overrides \
    PhoenixImageUri=$ACCOUNT.dkr.ecr.$REGION.amazonaws.com/phoenix:latest \
    VpcId=$(aws cloudformation describe-stacks \
            --stack-name phoenix-network \
            --query 'Stacks[0].Outputs[?OutputKey==`VpcId`].OutputValue' \
            --output text) \
    PublicSubnetIds=$(aws cloudformation describe-stacks \
            --stack-name phoenix-network \
            --query 'Stacks[0].Outputs[?OutputKey==`PublicSubnetIds`].OutputValue' \
            --output text) \
    PrivateSubnetIds=$(aws cloudformation describe-stacks \
            --stack-name phoenix-network \
            --query 'Stacks[0].Outputs[?OutputKey==`PrivateSubnetIds`].OutputValue' \
            --output text)

Fetch your Phoenix URL

PHOENIX_URL=$(aws cloudformation describe-stacks \
  --stack-name phoenix-auth \
  --query 'Stacks[0].Outputs[?OutputKey==`PhoenixURL`].OutputValue' \
  --output text)

Log in and create your System API key

  • In your browser, go to $PHOENIX_URL.

  • Sign in as admin@localhost / admin.

  • Set a new admin password.

  • Go to Settings → API Keys and Create System Key.

  • Copy the new key (you’ll need it in the next step).

IMPORTANT: Security‑group ingress is wide open (0.0.0.0/0 on port 80). You should tighten it if you know your CIDR or are behind a corporate proxy.

Store Phoenix API Key + other API Keys

Once you have your Phoenix System API key, bundle it (and any other service keys) into AWS Secrets Manager:

# Store Phoenix API key
aws secretsmanager create-secret \
  --name phoenix-system-api-key \
  --description "Phoenix System API Key for OTLP traces" \
  --secret-string '{"PHOENIX_API_KEY":"<PASTE SYSTEM KEY HERE>"}'

# (Optional) Store other service keys similarly:
aws secretsmanager create-secret \
  --name openai-api-key \
  --description "OpenAI API key for LLM calls" \
  --secret-string '{"OPENAI_API_KEY":"<PASTE OPENAI KEY HERE>"}'

You can now reference these secrets in your downstream CloudFormation templates (e.g. in your application stacks) via the PhoenixArn, OpenAIArn, etc., parameters.

Deploying your App that ships Spans to Phoenix

This CloudFormation stack (app.yaml) launches:

  • An ECS Cluster

  • An IAM Task Execution Role & Task Role (to pull images, read secrets)

  • A Security Group that allows outbound Internet access

  • A Log Group for container logs

  • An ECS Task Definition (family: app)

  • An ECS Service (Fargate) running one copy of the “app” container

The app container will:

  1. Read your OTLP endpoint and Phoenix API key from Secrets Manager

  2. Read your other API keys from Secrets Manager

  3. Emit spans to your Phoenix deployment

IMPORTANT: This template assumes only one secret is being used (OpenAI API Key). Make sure to add ARNs for additional secrets in the list of parameters (line 34 and line 86) and store those additional secrets as environment variables (line 134).

Template parameters

Parameter
Description
Example

AgentImageUri

ECR URI (with tag) of your agent container

123456789012.dkr.ecr.us-west-2.amazonaws.com/agent:latest

PhoenixHost

DNS name (no scheme) of your Phoenix UI load‑balancer

phoenix-auth-ALB-abc123.us-west-2.elb.amazonaws.com

VpcId

Your VPC ID

vpc-0abc123def456ghi7

PublicSubnetIds

Comma‑separated public subnets for the NAT/ALB

subnet-aaa111,subnet-bbb222

PrivateSubnetIds

Comma‑separated private subnets for your ECS tasks

subnet-ccc333,subnet-ddd444

OpenAIArn

ARN of Secrets Manager secret holding {"OPENAI_API_KEY": "…"}

arn:aws:secretsmanager:us-west-2:920904165384:secret:openai-key

PhoenixArn

ARN of secret holding {"PHOENIX_API_KEY": "…"}

arn:aws:secretsmanager:us-west-2:920904165384:secret:phoenix-key

Example deploy command (add additional ARNs for more secrets):

aws cloudformation deploy \
  --template-file app.yml \
  --stack-name app \
  --parameter-overrides \
      AgentImageUri=123456789012.dkr.ecr.us-west-2.amazonaws.com/agent:latest \
      PhoenixHost=phoenix-auth-ALB-abc123.us-west-2.elb.amazonaws.com \
      VpcId=vpc-0abc123def456ghi7 \
      PublicSubnetIds=subnet-aaa111,subnet-bbb222 \
      PrivateSubnetIds=subnet-ccc333,subnet-ddd444 \
      OpenAIArn=arn:aws:secretsmanager:us-west-2:920904165384:secret:openai-key \
      PhoenixArn=arn:aws:secretsmanager:us-west-2:920904165384:secret:phoenix-key \
  --capabilities CAPABILITY_NAMED_IAM

Once complete, ECS will spin up your agent task, and you can verify in the console:

# See the running task
aws ecs list-tasks --cluster agent-only --output table

# Check logs for any “Connectivity to http://<PhoenixHost>” output
aws logs tail \
  --log-group-name /aws/ecs/agent \
  --since 5m

Now your traces should flow from the agent into your Phoenix project!

(Optional) Extending for Additional Components (Frontend, DB, etc.)

Once you have Phoenix + your agent/LLM task up and running, you can easily add more services to the same VPC:

  1. Create new ECR repos for your frontend, backend, DB‑migrations job, worker service, etc.

  2. Add new TaskDefinitions / Services to your app.yml (or split each into its own CFN stack):

    yamlCopyEditParameters:
      FrontendImageUri: …
      BackendImageUri: …
      DbMigrationImageUri: …
    
    Resources:
      # reuse same VpcId, SubnetIds, SecurityGroup
      FrontendTaskDef:
        Type: AWS::ECS::TaskDefinition
        Properties:
          Family: frontend
          ContainerDefinitions:
            - Name: frontend
              Image: !Ref FrontendImageUri
              PortMappings: [{ContainerPort: 80}]
              # …env & secrets…
      FrontendService:
        Type: AWS::ECS::Service
        Properties:
          Cluster: !Ref Cluster
          DesiredCount: 2
          TaskDefinition: !Ref FrontendTaskDef
          LoadBalancers:  # attach to same (or new) ALB
  3. Subnet segmentation If you want stricter isolation, you can carve out “app‑subnets” vs “db‑subnets”, each with its own route table and SG rules. Just update phoenix-network.yml to output those extra subnet IDs.

  4. Security groups per tier

    • ALB SG → allows 0.0.0.0/0 on 80/443

    • App SG → allows inbound from ALB SG on 80

    • DB SG → allows inbound from App SG on 5432 (Postgres) or 3306 (MySQL)

With these patterns you can grow from one simple “agent-only” service into a multi‑tier architecture, all launched and managed via CloudFormation.

Authentication

By default Phoenix deploys with authentication disabled as you may be just trying Phoenix for the very first time or have Phoenix deployed in a VPC. However you might want to further protect access to your data via authentication. Below are the steps.

Authentication will stop collecting traces and block all API access until API keys are created. For that reason we recommend scheduling some downtime if you have already deployed phoenix.

Setup

To enable authentication on your Phoenix, you will have to set two environment variables:

The following environment variables are optional but recommended:

Deploy Phoenix with the above environment variables set. You will know that you have setup authentication correctly if the UI navigates to to a login screen.

By default Phoenix will create an admin user account. To get started:

  1. Log in as the admin user. The email should be admin@localhost and the password will be admin

  2. Set a new password for admin. You will be prompted to set a new password. Use a sufficiently complex password and save it in a safe place.

  3. Go to the settings page on the left nav and create your first system API key. This API key can be used to log traces, use the Phoenix client, and programmatically hit Phoenix's APIs. Store the system API key in a safe place.

Re-deploy your application with the API key created above and you will see traces stream in as before.

The following environment variables are optional but recommended:

User Management

Users can be added and removed from a Phoenix instance with authentication enabled. Users have one of two roles admin or member, see permissions below to learn more about the permissions for each role.

Only admins can manage phoenix users. They can add, delete, and reset the passwords of other members. To manage users go to the /settings page.

Deleting a user results in permanently blocking them from phoenix. The action cannot be undone and the user cannot be reactivated with the same email or username. Please be careful when deleting users.

Permissions

This section outlines the specific actions that users can perform based on their assigned roles within the system: Admin and Member. The permission matrix is divided into two main categories:

  • Mutations: Operations that allow users to create, update, or delete data within the system.

  • Queries: Operations that enable users to retrieve or view data from the system.

Mutations

Mutations are operations that enable users to create, update, or delete data within the system. This permission matrix ensures that only authorized roles can execute sensitive actions, such as managing users and API keys, while allowing members to perform essential account-related updates like changing their own passwords and usernames.

Neither an Admin nor Member is permitted to change email addresses.

Queries

Queries are operations that allow users to retrieve and view data from the system.

This table only shows actions that a Member is not permitted to do. Actions without restrictions are omitted.

API Keys

There are two kinds of API keys in Phoenix: system and user.

System Keys

System keys act on behalf of the system as a whole rather than any particular user. They can only be created by admins, are not meaningfully associated with the admin who creates them except for auditing purposes, and do not disappear if that admin is deleted. A system key would be the recommended kind of key to use in programmatic interactions with Phoenix that do not involve a user (e.g., automated flows querying our REST APIs).

User Keys

User API keys are associated with and act on behalf of the user to which they are issued. That user has the ability to view and delete their own user keys, and if the user is deleted, so are all of their associated user keys. A user might create their own user key into order to run an experiment in a notebook, for example.

Setting and Using API Keys with Environment Variables

Phoenix API keys can be set with the PHOENIX_API_KEY environment variable:

If authentication is enabled on Phoenix, all interactions with the server need to include an authorization header. Phoenix will read the PHOENIX_API_KEY environment variable, and automatically include it as an authorization header. Interactions with Phoenix include:

  • Using phoenix.Client

  • Runing experiments

  • Sending OpenInference traces (more details below)

Sending OpenInference traces

API Keys also need to be included on OpenInference traces sent to the Phoenix server. If you've set the PHOENIX_API_KEY environment variable, the phoenix.otel module will automatically include an authorization header with the API key:

Alternatively, you can explicitly set the authorization header on the exporter if using OpenTelemetry primitives directly.

If setting authorization headers explicitly, ensure that the header field is lowercased to ensure compatibility with sending traces via gRPC

Password Recovery

The password recovery methods described in this section apply when recovering a locally authenticated user's password. In order recover a password for a user logged in via a third-party identity provider such as Google, you will have to consult the documentation of these identity providers

With SMTP (Simple Mail Transfer Protocol)

Using SMTP ensures that your password recovery emails are delivered reliably and securely. SMTP is the standard protocol for sending emails, making sure that you receive the reset link promptly in your inbox. Below is an example configuration to enable SMTP for sendgrid.

Without SMTP

If SMTP is not configured, you have a few options to recover your forgotten password:

  • Contact an administrator and request that they reset your password. Admins can reset user passwords on the settings page.

  • As a last resort, you can manually update the database tuple that contains your password salt and hash.

Configuring OAuth2 Identity Providers

Phoenix supports login via third-party identity providers (IDPs), including:

  • Google

OAuth2 enables applications such as Phoenix to authorize access to resources via identity providers (IDPs) rather than storing and verifying user credentials locally. OpenID Connect is an extension of OAuth2 that additionally authenticates users by verifying identity and providing Phoenix with user information such as email address, username, etc. Phoenix integrates with OpenID Connect IDPs that have a "well-known configuration endpoint" at GET /.well-known/openid-configuration, which provides a standardized way to discover information about the IDP's endpoints and capabilities.

Phoenix uses the OAuth2 authorization code flow for web applications, which requires setting a few environment variables in addition to PHOENIX_ENABLE_AUTH and PHOENIX_SECRET:

Detailed instructions for common IDPs are provided below.

Users that sign into Phoenix via an OAuth2 IDP are initially added as members. Their role can be changed after their first login by a Phoenix admin.

Google

  1. In Google Cloud Console, select a GCP project in which to register your Phoenix OAuth2 app.

  2. Select APIs and Services.

  3. In the Credentials page, click on Create Credentials and select OAuth Client ID.

  4. From the Application type dropdown, select Web application.

  5. Enter a name for your Phoenix app, which will be displayed to users when signing in.

  6. Under Authorized JavaScript origins, click Add URI and enter the origin URL where you will access Phoenix in the browser.

  7. Under Authorized redirect URIs, click Add URI. Take the URL from the previous step and append the slug /oauth2/google/tokens. Alternatively, if you have configured a root path via the PHOENIX_HOST_ROOT_PATH environment variable, append a slug of the form /<root-path>/oauth2/google/tokens. Enter the resulting URL.

  8. Copy your client ID and client secret.

  9. Deploy Phoenix with the three environment variables described above, substituting GOOGLE for <IDP>. The well-known configuration endpoint is https://accounts.google.com/.well-known/openid-configuration.

AWS Cognito

  1. In the AWS Management Console, navigate to the Cognito page.

  2. From the User Pools page, select Create User Pool.

  3. Under Required attributes, in the Additional required attributes dropdown, select email (you can optionally require name and picture to ensure user profiles have this information in Phoenix).

  4. In the Initial app client section:

    1. Under App type, select Confidential client.

    2. Under App client name, enter a name for your Phoenix app.

    3. Under Client secret, ensure Generate a client secret is selected.

  5. Create your user pool and navigate to the page for the newly created user pool by clicking on its name.

  6. Add at least one user to your user pool in the Users section.

  7. Copy and save your user pool ID from the top of the page. The ID should be of the form <region>_<hash>, e.g., us-east-2_x4FTon498.

  8. Under App Integration > Domain, create a domain to contain the sign-in page and OAuth2 endpoints.

  9. Under App Integration > App client list > App clients and analytics, select your newly created client.

  10. Copy and save your client ID and client secret.

  11. Under Hosted UI, click Edit. On the Edit Hosted UI page:

    1. Add an Allowed callback URL of the form <origin-url>/oauth2/aws_cognito/tokens, where <origin-url> is the URL where you will access Phoenix in the browser. Alternatively, if you have configured a root path via the PHOENIX_HOST_ROOT_PATH environment variable, your callback URL will have the form <origin-url>/<root-path>/oauth2/aws_cognito/tokens.

    2. In the Identity Providers dropdown, select Cognito user pool.

    3. Under OAuth 2.0 grant types, select Authorization code grant.

    4. Under OpenID Connect scopes, select OpenID, Email, and Profile.

    5. Save your changes.

  12. The well-known configuration endpoint is of the form https://cognito-idp.<region>.amazonaws.com/<user-pool-id>/.well-known/openid-configuration, where the user pool ID was copied in a previous step and the region is the first part of the user pool ID preceding the underscore. Test this URL in your browser to ensure it is correct before proceeding to the next step.

  13. Deploy Phoenix using the three environment variables described above, substituting AWS_COGNITO for <IDP>.

Microsoft Entra ID

  1. From the Azure portal, navigate to Microsoft Entra ID.

  2. Select Add > App Registration.

  3. On the Register an Application page:

    1. Enter a name for your application.

    2. Under Redirect URI, in the Select a platform dropdown, select Web and a redirect URI of the form <origin-url>/oauth2/microsoft_entra_id/tokens, where <origin-url> is the URL where you will access Phoenix in the browser. Alternatively, if you have configured a root path via the PHOENIX_HOST_ROOT_PATH environment variable, your redirect URI will have the form <origin-url>/<root-path>/oauth2/microsoft_entra_id/tokens.

  4. Copy and save the Application (client) ID.

  5. Under Endpoints, copy and save the well-known configuration endpoint under OpenID Connect metadata document.

  6. Under Client credentials, click Add a certificate or secret. Create a client secret and copy and save its value.

  7. Deploy Phoenix using the three environment variables described above, substituting MICROSOFT_ENTRA_ID for <IDP>.

Keycloak

  1. From the Keycloak Console create a new Realm or skip this part if you want to reuse a existing Realm

  2. Select Clients.

  3. Click on new Client

    1. Enter the Client ID phoenix

    2. Enter the Name Phoenix Client

    3. Enter below Root URL the root url of your phoenix instance, like https://example.com/subpath/subpath

    4. Enter below Home URL the home url of your phoenix instance, like /subpath/subpath

    5. Enter below Valid redirect URIs a redirect url to your phoenix instance, like https://example.com/subpath/subpath/*

    6. Enter below Valid post logout redirect URIs +

    7. Enter below Web origins your url, like https://example.com

    8. Enter below Admin URL your admin url, like https://example.com/subpath/subpath/

    9. Enable Client authentication

    10. Ensure that only Standard flow and Direct access grants is enabled

    11. Hit the Save button

  4. Go to the Client phoenix and to the tab credentials and copy the client-secret

  5. Deploy Phoenix using the three environment variables described above, substituting KEYCLOAK for <IDP>.

    1. PHOENIX_OAUTH2_KEYCLOAK_CLIENT_ID=""

    2. PHOENIX_OAUTH2_KEYCLOAK_OIDC_CONFIG_URL="https:////realms//.well-known/openid-configuration"

    3. PHOENIX_OAUTH2_KEYCLOAK_CLIENT_SECRET=""

Other Identity Providers

Phoenix can integrate with any OAuth2 IDP that supports OpenID Connect and has a well-known configuration endpoint. Detailed instructions will vary by IDP, but the general steps remain the same:

  1. Register a Phoenix client application with your IDP. If prompted to select an application type, select traditional web application or a similarly named application type that allows you to generate a client secret in addition to a client ID.

  2. Find the well-known configuration endpoint for your IDP.

  3. Deploy Phoenix with the environment variables described above, substituting <IDP> with your IDP name, e.g., AUTH0. If you have configured a root path via the PHOENIX_HOST_ROOT_PATH environment variable, ensure that the root path is included in the path of your callback URL.

  4. Phoenix will make a best-effort attempt to display a readable name for your IDP on the login page based on the value substituted in the previous step. If you wish to customize the display name, for example, if your IDP name contains special characters, you may optionally configure the IDP name to be displayed with the PHOENIX_OAUTH2_<IDP>_DISPLAY_NAME environment variable.

An .

and configured (aws configure) with credentials that can deploy CloudFormation stacks.

Copy the following JSON file of permissions:

Copy this CloudFormation template:

Copy this CloudFormation template:

Copy this CloudFormation template:

Variable
Description
Example Value

In your application code, make sure to set the proper authentication headers with the system API key. Phoenix respects headers in the form of , meaning that you should set the header in the form Authorization: Bearer <token>. Note that if you are using the Phoenix Client or Phoenix Otel, you simply need to set the PHOENIX_API_KEY environment variable.

Action
Admin
Member
Action
Admin
Member

(previously known as Azure Active Directory)

IDPs that support and a at GET /.well-known/openid-configuration

Environment Variable
Description
AWS account
AWS CLI v2 installed
permissions.json
phoenix-network.yml
phoenix-auth.yml
app.yml

PHOENIX_ENABLE_AUTH

Set to True to enable authentication on your platform

True or False

PHOENIX_SECRET

A long string value that is used to sign JWTs for your deployment. It should be a good mix of characters and numbers and should be kept in a secret store of some kind.

3413f9a7735bb780c6b8e4db7d946a492b64d26112a955cdea6a797f4c833593

PHOENIX_USE_SECURE_COOKIES

If set to True, access and refresh tokens will be stored in secure cookies. Defaults to False.

PHOENIX_CSRF_TRUSTED_ORIGINS

A comma-separated list of origins allowed to bypass Cross-Site Request Forgery (CSRF) protection. This setting is recommended when configuring OAuth2 clients or sending password reset emails. If this variable is left unspecified or contains no origins, CSRF protection will not be enabled. In such cases, when a request includes origin or referer headers, those values will not be validated.

Create User

✅ Yes

No

Delete User

✅ Yes

No

Change Own Password

✅ Yes

✅ Yes

Change Other's Password

✅ Yes

No

Change Own Username

✅ Yes

✅ Yes

Change Other's Username

✅ Yes

No

Create System API Keys

✅ Yes

No

Delete System API Keys

✅ Yes

No

Create Own User API Keys

✅ Yes

✅ Yes

Delete Own User API Keys

✅ Yes

✅ Yes

Delete Other's User API Keys

✅ Yes

No

List All System API Keys

✅ Yes

No

List All User API Keys

✅ Yes

No

List All Users

✅ Yes

No

Fetch Other User's Info, e.g. emails

✅ Yes

No

export PHOENIX_API_KEY=<SYSTEM-OR-USER-KEY>
from phoenix.otel import register

tracer_provider = register()
from opentelemetry.exporter.otlp.proto.http.trace_exporter import OTLPSpanExporter
from opentelemetry.sdk import trace as trace_sdk
from opentelemetry.sdk.trace.export import ConsoleSpanExporter, SimpleSpanProcessor

endpoint = "http://127.0.0.1:6006/v1/traces"
tracer_provider = trace_sdk.TracerProvider()
exporter = OTLPSpanExporter(
    endpoint,
    headers={"authorization": "Bearer <SYSTEM-OR-USER-KEY>"},
)
tracer_provider.add_span_processor(SimpleSpanProcessor(exporter))
export PHOENIX_SMTP_HOSTNAME=smtp.sendgrid.net
export PHOENIX_SMTP_USERNAME=apikey
export PHOENIX_SMTP_PASSWORD=XXXXXXXXXXXXXXXXX

PHOENIX_OAUTH2_<IDP>_CLIENT_ID

The client ID generated by the IDP when registering the application.

PHOENIX_OAUTH2_<IDP>_CLIENT_SECRET

The client secret generated by the IDP when registering the application.

PHOENIX_OAUTH2_<IDP>_OIDC_CONFIG_URL

The URL to the OpenID Connect well-known configuration endpoint. Entering this URL in your browser will return a JSON object containing authorization server metadata.

bearer auth
AWS Cognito
Microsoft Entra ID
OpenID Connect
well-known configuration endpoint