Loading...
Loading...
Loading...
Loading...
Loading...
Loading...
Loading...
Loading...
Loading...
Loading...
Loading...
Loading...
Loading...
Loading...
Loading...
Loading...
Loading...
Loading...
Loading...
Loading...
Loading...
Loading...
Loading...
Loading...
Loading...
Loading...
Loading...
Loading...
Loading...
Loading...
Loading...
Loading...
Loading...
Loading...
Loading...
Loading...
Loading...
Loading...
Loading...
Loading...
Loading...
Loading...
Loading...
Loading...
Loading...
Loading...
Loading...
Loading...
Loading...
Loading...
Loading...
Loading...
Loading...
Loading...
Loading...
Loading...
Loading...
Loading...
Loading...
Loading...
Loading...
Loading...
Loading...
Loading...
Loading...
Loading...
Loading...
Loading...
Loading...
Loading...
Loading...
Loading...
Loading...
Loading...
Loading...
Loading...
Loading...
Loading...
Loading...
Loading...
Loading...
Loading...
Loading...
Loading...
Instrument LLM calls to AWS Bedrock via the boto3 client using the BedrockInstrumentor
boto3 provides Python bindings to AWS services, including Bedrock, which provides access to a number of foundation models. Calls to these models can be instrumented using OpenInference, enabling OpenTelemetry-compliant observability of applications built using these models. Traces collected using OpenInference can be viewed in Phoenix.
OpenInference Traces collect telemetry data about the execution of your LLM application. Consider using this instrumentation to understand how a Bedrock-managed models are being called inside a complex system and to troubleshoot issues such as extraction and response synthesis.
pip install openinference-instrumentation-bedrock opentelemetry-exporter-otlpConnect to your Phoenix instance using the register function.
from phoenix.otel import register
# configure the Phoenix tracer
tracer_provider = register(
project_name="my-llm-app", # Default is 'default'
auto_instrument=True # Auto-instrument your app based on installed OI dependencies
)After connecting to your Phoenix server, instrument boto3 prior to initializing a bedrock-runtime client. All clients created after instrumentation will send traces on all calls to invoke_model.
import boto3
session = boto3.session.Session()
client = session.client("bedrock-runtime")From here you can run Bedrock as normal
prompt = (
b'{"prompt": "Human: Hello there, how are you? Assistant:", "max_tokens_to_sample": 1024}'
)
response = client.invoke_model(modelId="anthropic.claude-v2", body=prompt)
response_body = json.loads(response.get("body").read())
print(response_body["completion"])Now that you have tracing setup, all calls to invoke_model will be streamed to your running Phoenix for observability and evaluation.
Anthropic is a leading provider for state-of-the-art LLMs. The Anthropic SDK can be instrumented using the openinference-instrumentation-anthropic package.
pip install openinference-instrumentation-anthropic anthropicUse the register function to connect your application to Phoenix:
from phoenix.otel import register
# configure the Phoenix tracer
tracer_provider = register(
project_name="my-llm-app", # Default is 'default'
auto_instrument=True # Auto-instrument your app based on installed OI dependencies
)A simple Anthropic application that is now instrumented
import anthropic
client = anthropic.Anthropic()
message = client.messages.create(
model="claude-3-5-sonnet-20240620",
max_tokens=1000,
temperature=0,
messages=[
{
"role": "user",
"content": [
{
"type": "text",
"text": "Why is the ocean salty?"
}
]
}
]
)
print(message.content)Now that you have tracing setup, all invocations of pipelines will be streamed to your running Phoenix for observability and evaluation.
Configure and run Bedrock for evals
class BedrockModel:
model_id: str = "anthropic.claude-v2"
"""The model name to use."""
temperature: float = 0.0
"""What sampling temperature to use."""
max_tokens: int = 256
"""The maximum number of tokens to generate in the completion."""
top_p: float = 1
"""Total probability mass of tokens to consider at each step."""
top_k: int = 256
"""The cutoff where the model no longer selects the words"""
stop_sequences: List[str] = field(default_factory=list)
"""If the model encounters a stop sequence, it stops generating further tokens. """
session: Any = None
"""A bedrock session. If provided, a new bedrock client will be created using this session."""
client = None
"""The bedrock session client. If unset, a new one is created with boto3."""
max_content_size: Optional[int] = None
"""If you're using a fine-tuned model, set this to the maximum content size"""
extra_parameters: Dict[str, Any] = field(default_factory=dict)
"""Any extra parameters to add to the request body (e.g., countPenalty for a21 models)"""To Authenticate, the following code is used to instantiate a session and the session is used with Phoenix Evals
import boto3
# Create a Boto3 session
session = boto3.session.Session(
aws_access_key_id='ACCESS_KEY',
aws_secret_access_key='SECRET_KEY',
region_name='us-east-1' # change to your preferred AWS region
)#If you need to assume a role
# Creating an STS client
sts_client = session.client('sts')
# (optional - if needed) Assuming a role
response = sts_client.assume_role(
RoleArn="arn:aws:iam::......",
RoleSessionName="AssumeRoleSession1",
#(optional) if MFA Required
SerialNumber='arn:aws:iam::...',
#Insert current token, needs to be run within x seconds of generation
TokenCode='PERIODIC_TOKEN'
)
# Your temporary credentials will be available in the response dictionary
temporary_credentials = response['Credentials']
# Creating a new Boto3 session with the temporary credentials
assumed_role_session = boto3.Session(
aws_access_key_id=temporary_credentials['AccessKeyId'],
aws_secret_access_key=temporary_credentials['SecretAccessKey'],
aws_session_token=temporary_credentials['SessionToken'],
region_name='us-east-1'
)client_bedrock = assumed_role_session.client("bedrock-runtime")
# Arize Model Object - Bedrock ClaudV2 by default
model = BedrockModel(client=client_bedrock)
model("Hello there, how are you?")
# Output: "As an artificial intelligence, I don't have feelings,
# but I'm here and ready to assist you. How can I help you today?"


Instrument LLM calls to AWS Bedrock via the boto3 client using the BedrockInstrumentor
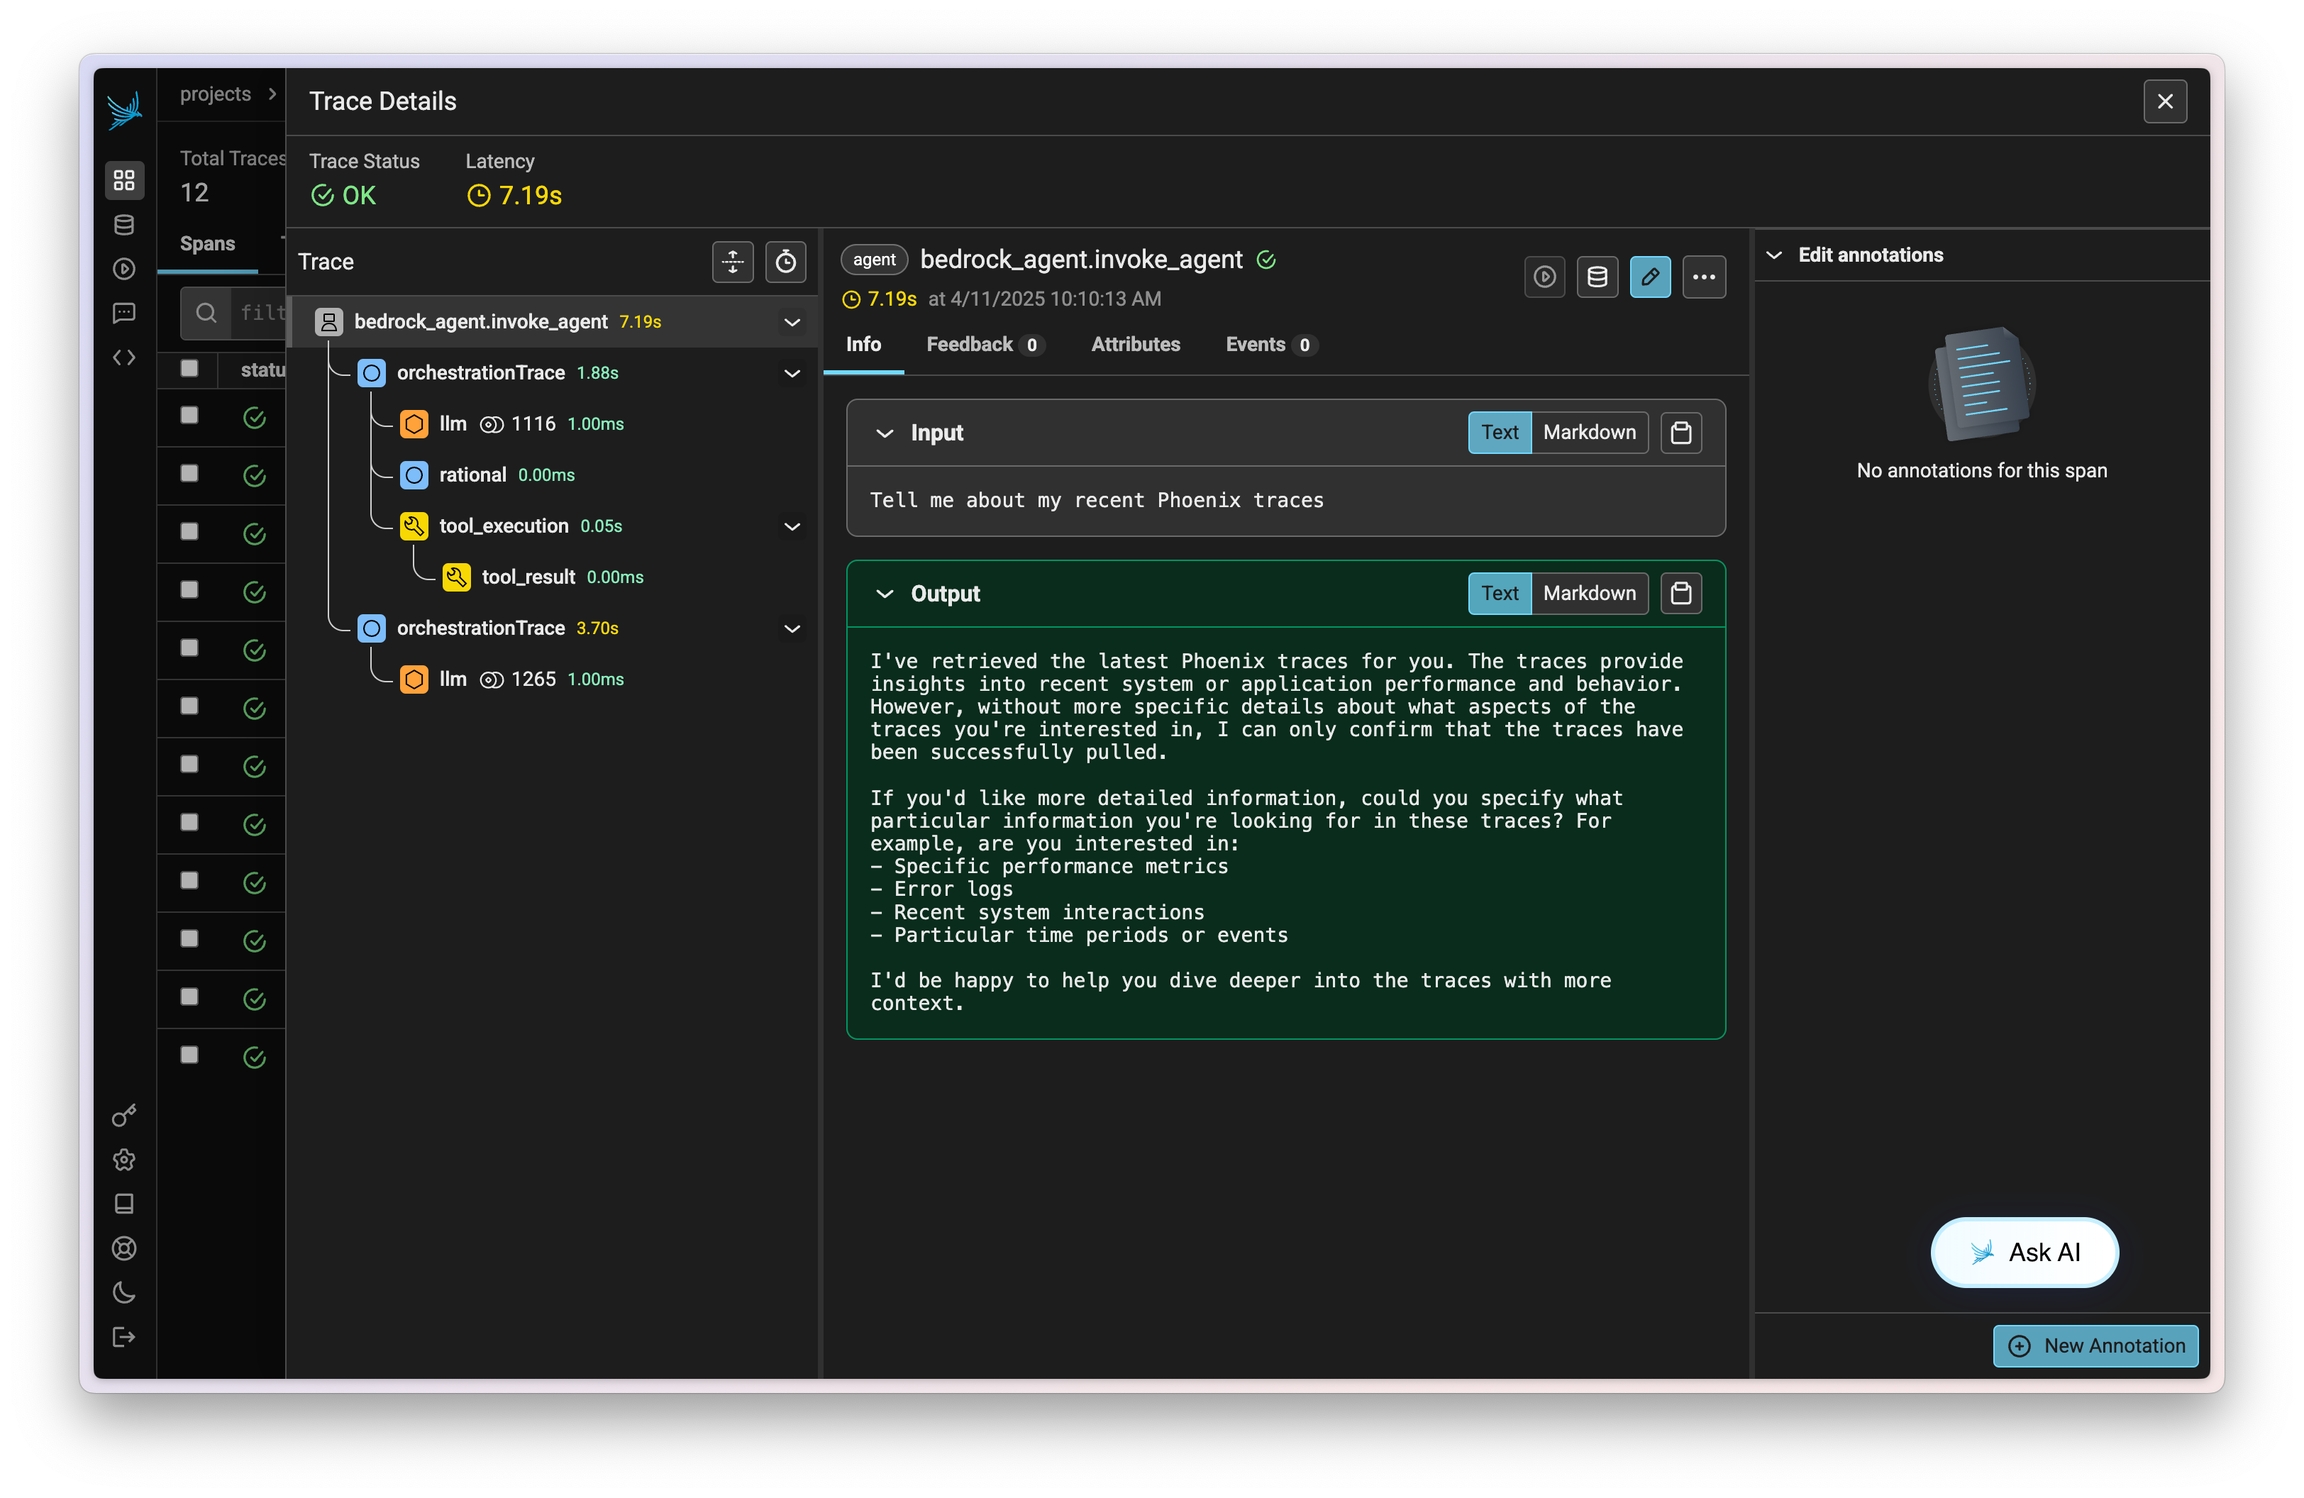
Amazon Bedrock Agents allow you to easily define, deploy, and manage agents on your AWS infrastructure. Traces on invocations of these agents can be captured using OpenInference and viewed in Phoenix.
This instrumentation will capture data on LLM calls, action group invocations (as tools), knowledgebase lookups, and more.
pip install openinference-instrumentation-bedrockConnect to your Phoenix instance using the register function.
from phoenix.otel import register
# configure the Phoenix tracer
tracer_provider = register(
project_name="my-llm-app", # Default is 'default'
auto_instrument=True # Auto-instrument your app based on installed OI dependencies
)After connecting to your Phoenix server, instrument boto3 prior to initializing a bedrock-runtime client. All clients created after instrumentation will send traces on all calls to invoke_model, invoke_agent, and their streaming variations.
import boto3
session = boto3.session.Session()
client = session.client("bedrock-runtime")From here you can run Bedrock as normal
session_id = f"default-session1_{int(time.time())}"
attributes = dict(
inputText=input_text,
agentId=AGENT_ID,
agentAliasId=AGENT_ALIAS_ID,
sessionId=session_id,
enableTrace=True,
)
response = client.invoke_agent(**attributes)Now that you have tracing setup, all calls will be streamed to your running Phoenix for observability and evaluation.
Mistral AI develops open-weight large language models, focusing on efficiency, customization, and cost-effective AI solutions.
Website:
Agno is an open-source Python framework for building lightweight, model-agnostic AI agents with built-in memory, knowledge, tools, and reasoning capabilities
Website:
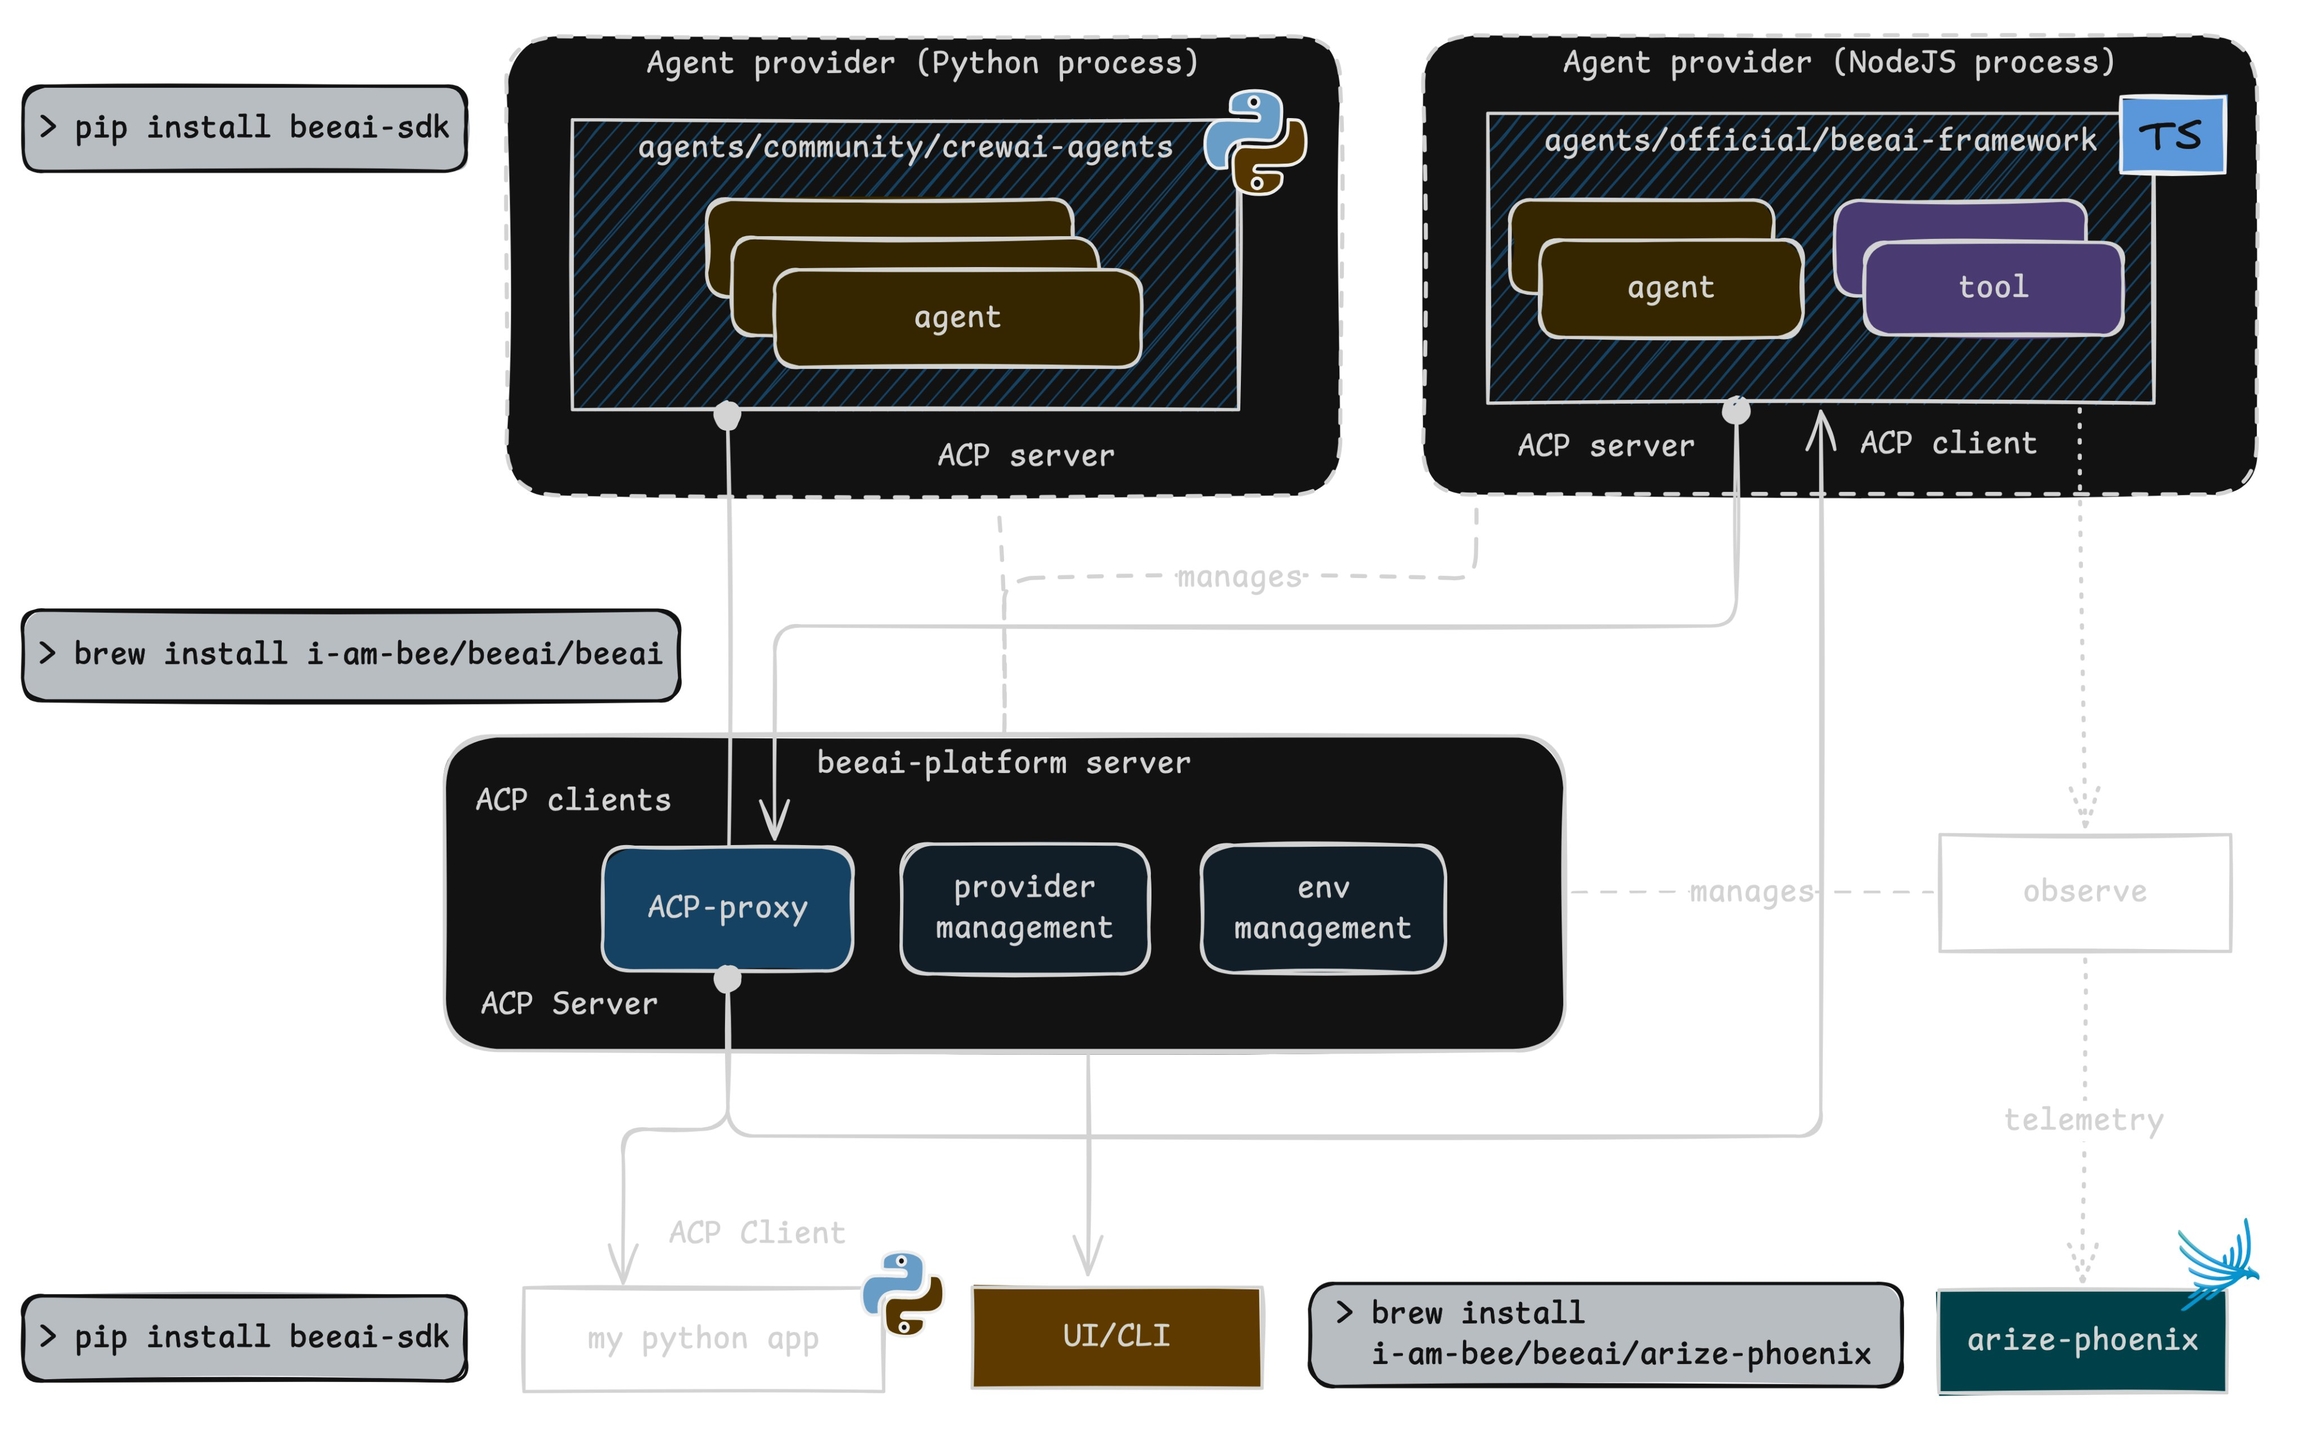
BeeAI is an open-source platform that enables developers to discover, run, and compose AI agents from any framework, facilitating the creation of interoperable multi-agent systems
Website:
Dify lets you visually build, orchestrate, and deploy AI-native apps using LLMs, with low-code workflows and agent frameworks for fast deployment.
Website:
Flowise is a low-code platform for building customized chatflows and agentflows.
Website:
Langflow is an open-source visual framework that enables developers to rapidly design, prototype, and deploy custom applications powered by large language models (LLMs)
Website:
Navigate to the Langflow GitHub repo and pull the project down
Navigate to the repo and create a .env file with all the Arize Phoenix variables.
You can use the .env.example as a template to create the .env file
Add the following environment variable to the .env file
Note: This Langflow integration is for
Start Docker Desktop, build the images, and run the container (this will take around 10 minutes the first time) Go into your terminal into the Langflow directory and run the following commands
In this example, we'll use Simple Agent for this tutorial
Add your OpenAI Key to the Agent component in Langflow
Go into the Playground and run the Agent
Navigate to your project name (should match the name of of your Langflow Agent name)
AgentExecutor Trace is Arize Phoenix instrumentation to capture what's happening with the LangChain being ran during the Langflow components
The other UUID trace is the native Langflow tracing.
Mastra is an open-source TypeScript AI agent framework designed for building production-ready AI applications with agents, workflows, RAG, and observability
Website:
class GeminiModel:
project: Optional[str] = None
location: Optional[str] = None
credentials: Optional["Credentials"] = None
model: str = "gemini-pro"
default_concurrency: int = 5
temperature: float = 0.0
max_tokens: int = 256
top_p: float = 1
top_k: int = 32project = "my-project-id"
location = "us-central1" # as an example
model = GeminiModel(project=project, location=location)
model("Hello there, this is a tesst if you are working?")
# Output: "Hello world, I am working!"Configure and run Anthropic for evals
class AnthropicModel(BaseModel):
model: str = "claude-2.1"
"""The model name to use."""
temperature: float = 0.0
"""What sampling temperature to use."""
max_tokens: int = 256
"""The maximum number of tokens to generate in the completion."""
top_p: float = 1
"""Total probability mass of tokens to consider at each step."""
top_k: int = 256
"""The cutoff where the model no longer selects the words."""
stop_sequences: List[str] = field(default_factory=list)
"""If the model encounters a stop sequence, it stops generating further tokens."""
extra_parameters: Dict[str, Any] = field(default_factory=dict)
"""Any extra parameters to add to the request body (e.g., countPenalty for a21 models)"""
max_content_size: Optional[int] = None
"""If you're using a fine-tuned model, set this to the maximum content size"""In this section, we will showcase the methods and properties that our EvalModels have. First, instantiate your model from the. Once you've instantiated your model, you can get responses from the LLM by simply calling the model and passing a text string.
model = #Instantiate your Anthropic model here
model("Hello there, how are you?")
# Output: "As an artificial intelligence, I don't have feelings,
# but I'm here and ready to assist you. How can I help you today?"Configure and run MistralAI for evals
class MistralAIModel(BaseModel):
model: str = "mistral-large-latest"
temperature: float = 0
top_p: Optional[float] = None
random_seed: Optional[int] = None
response_format: Optional[Dict[str, str]] = None
safe_mode: bool = False
safe_prompt: bool = False# model = Instantiate your MistralAIModel here
model("Hello there, how are you?")
# Output: "As an artificial intelligence, I don't have feelings,
# but I'm here and ready to assist you. How can I help you today?"Configure and run VertexAI for evals
class VertexAIModel:
project: Optional[str] = None
location: Optional[str] = None
credentials: Optional["Credentials"] = None
model: str = "text-bison"
tuned_model: Optional[str] = None
temperature: float = 0.0
max_tokens: int = 256
top_p: float = 0.95
top_k: int = 40To authenticate with VertexAI, you must pass either your credentials or a project, location pair. In the following example, we quickly instantiate the VertexAI model as follows:
project = "my-project-id"
location = "us-central1" # as an example
model = VertexAIModel(project=project, location=location)
model("Hello there, this is a tesst if you are working?")
# Output: "Hello world, I am working!"# Arize Phoenix Env Variables
PHOENIX_API_KEY="YOUR_PHOENIX_KEY_HERE"docker compose -f docker/dev.docker-compose.yml down || true
docker compose -f docker/dev.docker-compose.yml up --remove-orphans


Google GenAI is a suite of AI tools and models from Google Cloud, designed to help businesses build, deploy, and scale AI applications.
Instrument LLM calls made using the Google Gen AI Python SDK
pip install openinference-instrumentation-google-genai google-genaiSet the GEMINI_API_KEY environment variable. To use the Gen AI SDK with Vertex AI instead of the Developer API, refer to Google's guide on setting the required environment variables.
export GEMINI_API_KEY=[your_key_here]Use the register function to connect your application to Phoenix.
from phoenix.otel import register
# Configure the Phoenix tracer
tracer_provider = register(
project_name="my-llm-app", # Default is 'default'
auto_instrument=True # Auto-instrument your app based on installed OI dependencies
)Now that you have tracing setup, all Gen AI SDK requests will be streamed to Phoenix for observability and evaluation.
import os
from google import genai
def send_message_multi_turn() -> tuple[str, str]:
client = genai.Client(api_key=os.environ["GEMINI_API_KEY"])
chat = client.chats.create(model="gemini-2.0-flash-001")
response1 = chat.send_message("What is the capital of France?")
response2 = chat.send_message("Why is the sky blue?")
return response1.text or "", response2.text or ""LiteLLM is an open-source platform that provides a unified interface to manage and access over 100 LLMs from various providers.
Configure and run LiteLLM for evals
class LiteLLMModel(BaseEvalModel):
model: str = "gpt-3.5-turbo"
"""The model name to use."""
temperature: float = 0.0
"""What sampling temperature to use."""
max_tokens: int = 256
"""The maximum number of tokens to generate in the completion."""
top_p: float = 1
"""Total probability mass of tokens to consider at each step."""
num_retries: int = 6
"""Maximum number to retry a model if an RateLimitError, OpenAIError, or
ServiceUnavailableError occurs."""
request_timeout: int = 60
"""Maximum number of seconds to wait when retrying."""
model_kwargs: Dict[str, Any] = field(default_factory=dict)
"""Model specific params"""You can choose among multiple models supported by LiteLLM. Make sure you have set the right environment variables set prior to initializing the model. For additional information about the environment variables for specific model providers visit: LiteLLM provider specific params
Here is an example of how to initialize LiteLLMModel for llama3 using ollama.
import os
from phoenix.evals import LiteLLMModel
os.environ["OLLAMA_API_BASE"] = "http://localhost:11434"
model = LiteLLMModel(model="ollama/llama3")Instrument LLM calls made using MistralAI's SDK via the MistralAIInstrumentor
MistralAI is a leading provider for state-of-the-art LLMs. The MistralAI SDK can be instrumented using the openinference-instrumentation-mistralai package.
pip install openinference-instrumentation-mistralai mistralaiSet the MISTRAL_API_KEY environment variable to authenticate calls made using the SDK.
export MISTRAL_API_KEY=[your_key_here]Connect to your Phoenix instance using the register function.
from phoenix.otel import register
# configure the Phoenix tracer
tracer_provider = register(
project_name="my-llm-app", # Default is 'default'
auto_instrument=True # Auto-instrument your app based on installed OI dependencies
)import os
from mistralai import Mistral
from mistralai.models import UserMessage
api_key = os.environ["MISTRAL_API_KEY"]
model = "mistral-tiny"
client = Mistral(api_key=api_key)
chat_response = client.chat.complete(
model=model,
messages=[UserMessage(content="What is the best French cheese?")],
)
print(chat_response.choices[0].message.content)
Now that you have tracing setup, all invocations of Mistral (completions, chat completions, embeddings) will be streamed to your running Phoenix for observability and evaluation.
OpenAI provides state-of-the-art LLMs for natural language understanding and generation.
Vertex AI is a fully managed platform by Google Cloud for building, deploying, and scaling machine learning models.
Instrument LLM calls made using VertexAI's SDK via the VertexAIInstrumentor
The VertexAI SDK can be instrumented using the openinference-instrumentation-vertexai package.
pip install openinference-instrumentation-vertexai vertexaiSee Google's guide on setting up your environment for the Google Cloud AI Platform. You can also store your Project ID in the CLOUD_ML_PROJECT_ID environment variable.
Use the register function to connect your application to Phoenix:
from phoenix.otel import register
# configure the Phoenix tracer
tracer_provider = register(
project_name="my-llm-app", # Default is 'default'
auto_instrument=True # Auto-instrument your app based on installed OI dependencies
)import vertexai
from vertexai.generative_models import GenerativeModel
vertexai.init(location="us-central1")
model = GenerativeModel("gemini-1.5-flash")
print(model.generate_content("Why is sky blue?").text)Now that you have tracing setup, all invocations of Vertex models will be streamed to your running Phoenix for observability and evaluation.
AutoGen is an open-source Python framework for orchestrating multi-agent LLM interactions with shared memory and tool integrations to build scalable AI workflows
AutoGen is an agent framework from Microsoft that allows for complex Agent creation. It is unique in its ability to create multiple agents that work together.
The AutoGen Agent framework allows creation of multiple agents and connection of those agents to work together to accomplish tasks.
Phoenix instruments Autogen by instrumenting the underlying model library it's using. If your agents are set up to call OpenAI, use our OpenAI instrumentor per the example below.
If your agents are using a different model, be sure to instrument that model instead by installing its respective OpenInference library.
pip install openinference-instrumentation-openai arize-phoenix-otel arize-phoenixConnect to your Phoenix instance using the register function.
from phoenix.otel import register
# configure the Phoenix tracer
tracer_provider = register(
project_name="my-llm-app", # Default is 'default'
auto_instrument=True # Auto-instrument your app based on installed OI dependencies
)From here you can use Autogen as normal, and Phoenix will automatically trace any model calls made.
The Phoenix support is simple in its first incarnation but allows for capturing all of the prompt and responses that occur under the framework between each agent.
The individual prompt and responses are captured directly through OpenAI calls. If you're using a different underlying model provider than OpenAI, instrument your application using the respective instrumentor instead.
Configure your Dify application to view traces in Phoenix
The fastest way to get started with Phoenix is by signing up for a free Phoenix Cloud account. If you prefer, you can also run Phoenix in a , , or use it directly from your .
Go to the settings page in your Phoenix instance to find your endpoint and API key.
To configure Phoenix tracing in your Dify application:
Open the Dify application you want to monitor.
In the left sidebar, navigate to Monitoring.
On the Monitoring page, select Phoenix in the Tracing drop down to begin setup.
Enter your Phoenix credentials and save. You can verify the monitoring status on the current page.
View Dify traces in Phoenix. Get rich details into tool calls, session data, workflow steps, and more.
Learn more details about the tracing data captured in the Dify documentation
DSPy is an open-source Python framework for declaratively programming modular LLM pipelines and automatically optimizing prompts and model weights
Analyzing and troubleshooting what happens under the hood can be challenging without proper insights. By integrating your Flowise application with Phoenix, you can monitor traces and gain robust observability into your chatflows and agentflows.
Access Configurations: Navigate to settings in your chatflow or agentflow and find configurations.
Connect to Phoenix: Go to the Analyze Chatflow tab and configure your application with Phoenix. Get your API key from your Phoenix instance to create your credentials. Be sure to name your project and confirm that the Phoenix toggle is enabled before saving.
Note: If you are using using an environment that is not Phoenix Cloud, you may need to modify the Endpoint field.
View Traces: In Phoenix, you will find your project under the Projects tab. Click into this to view and analyze traces as you test your application.
Store and Experiment: Optionally, you can also filter traces, store traces in a dataset to run experiments, analyze patterns, and optimize your workflows over time.
You can also reference Flowise documentation here.
Instrument LLM applications that use the Guardrails AI framework
In this example we will instrument a small program that uses the Guardrails AI framework to protect their LLM calls.
pip install openinference-instrumentation-guardrails guardrails-aiConnect to your Phoenix instance using the register function.
from phoenix.otel import register
# configure the Phoenix tracer
tracer_provider = register(
project_name="my-llm-app", # Default is 'default'
auto_instrument=True # Auto-instrument your app based on installed OI dependencies
)From here, you can run Guardrails as normal:
from guardrails import Guard
from guardrails.hub import TwoWords
import openai
guard = Guard().use(
TwoWords(),
)
response = guard(
llm_api=openai.chat.completions.create,
prompt="What is another name for America?",
model="gpt-3.5-turbo",
max_tokens=1024,
)
print(response)
Now that you have tracing setup, all invocations of underlying models used by Guardrails (completions, chat completions, embeddings) will be streamed to your running Phoenix for observability and evaluation. Additionally, Guards will be present as a new span kind in Phoenix.
pip install openinference-instrumentation-instructor instructorBe sure you also install the OpenInference library for the underlying model you're using along with Instructor. For example, if you're using OpenAI calls directly, you would also add: openinference-instrumentation-openai
Connect to your Phoenix instance using the register function.
from phoenix.otel import register
# configure the Phoenix tracer
tracer_provider = register(
project_name="my-llm-app", # Default is 'default'
auto_instrument=True # Auto-instrument your app based on installed OI dependencies
)From here you can use instructor as normal.
import instructor
from pydantic import BaseModel
from openai import OpenAI
# Define your desired output structure
class UserInfo(BaseModel):
name: str
age: int
# Patch the OpenAI client
client = instructor.from_openai(OpenAI())
# Extract structured data from natural language
user_info = client.chat.completions.create(
model="gpt-3.5-turbo",
response_model=UserInfo,
messages=[{"role": "user", "content": "John Doe is 30 years old."}],
)
print(user_info.name)
#> John Doe
print(user_info.age)
#> 30Now that you have tracing setup, all invocations of your underlying model (completions, chat completions, embeddings) and instructor triggers will be streamed to your running Phoenix for observability and evaluation.
LangChain is an open-source framework for building language model applications with prompt chaining, memory, and external integrations
LangGraph is an open-source framework for building graph-based LLM pipelines with modular nodes and seamless data integrations
Phoenix has first-class support for LangGraph applications.
pip install openinference-instrumentation-langchainInstall the OpenInference Langchain library before your application code. Our LangChainInstrumentor works for both standard LangChain applications and for LangGraph agents.
Use the register function to connect your application to Phoenix:
from phoenix.otel import register
# configure the Phoenix tracer
tracer_provider = register(
project_name="my-llm-app", # Default is 'default'
auto_instrument=True # Auto-instrument your app based on installed OI dependencies
)By instrumenting LangGraph, spans will be created whenever an agent is invoked and will be sent to the Phoenix server for collection.
Now that you have tracing setup, all invocations of chains will be streamed to your running Phoenix for observability and evaluation.
Portkey is an AI Gateway and observability platform that provides routing, guardrails, caching, and monitoring for 200+ LLMs with enterprise-grade security and reliability features.
Website: https://portkey.ai/
Milvus is an open-source vector database built for GenAI applications.
Website: milvus.io
Phoenix can be used to trace and evaluate applications that use Zilliz or Milvus as a vector database.
Instrument LLM applications built with Groq
provides low latency and lightning-fast inference for AI models. Arize supports instrumenting Groq API calls, including role types such as system, user, and assistant messages, as well as tool use. You can create a free GroqCloud account and to get started.
Connect to your Phoenix instance using the register function.
A simple Groq application that is now instrumented
Now that you have tracing setup, all invocations of pipelines will be streamed to your running Phoenix for observability and evaluation.
allows developers to call all LLM APIs using the openAI format. is a proxy server to call 100+ LLMs in OpenAI format. Both are supported by this auto-instrumentation.
Any calls made to the following functions will be automatically captured by this integration:
completion()
acompletion()
completion_with_retries()
embedding()
aembedding()
image_generation()
aimage_generation()
Use the register function to connect your application to Phoenix:
Add any API keys needed by the models you are using with LiteLLM.
You can now use LiteLLM as normal and calls will be traces in Phoenix.
Traces should now be visible in Phoenix!
Phoenix provides auto-instrumentation for the .
We have several code samples below on different ways to integrate with OpenAI, based on how you want to use Phoenix.
Add your OpenAI API key as an environment variable:
Use the register function to connect your application to Phoenix:
Now that you have tracing setup, all invocations of OpenAI (completions, chat completions, embeddings) will be streamed to your running Phoenix for observability and evaluation.
Instrument and observe BeeAI agents
Phoenix provides seamless observability and tracing for BeeAI agents through the .
Connect to your Phoenix instance using the register function.
Sample agent built using BeeAI with automatic tracing:
Phoenix provides visibility into your BeeAI agent operations by automatically tracing all interactions.
How to use the SmolagentsInstrumentor to trace smolagents by Hugging Face
smolagents is a minimalist AI agent framework developed by Hugging Face, designed to simplify the creation and deployment of powerful agents with just a few lines of code. It focuses on simplicity and efficiency, making it easy for developers to leverage large language models (LLMs) for various applications.
Phoenix provides auto-instrumentation, allowing you to track and visualize every step and call made by your agent.
We have several code samples below on different ways to integrate with smolagents, based on how you want to use Phoenix.
Add your HF_TOKEN as an environment variable:
Connect to your Phoenix instance using the register function.
Create your Hugging Face Model, and at every run, traces will be sent to Phoenix.
Now that you have tracing setup, all invocations and steps of your Agent will be streamed to your running Phoenix for observability and evaluation.
How to use the python LlamaIndexInstrumentor to trace LlamaIndex Workflows
are a subset of the LlamaIndex package specifically designed to support agent development.
Our LlamaIndexInstrumentor automatically captures traces for LlamaIndex Workflows agents. If you've already enabled that instrumentor, you do not need to complete the steps below.
Initialize the LlamaIndexInstrumentor before your application code. This instrumentor will trace both LlamaIndex Workflows calls, as well as calls to the general LlamaIndex package.
By instrumenting LlamaIndex, spans will be created whenever an agent is invoked and will be sent to the Phoenix server for collection.
Now that you have tracing setup, all invocations of chains will be streamed to your running Phoenix for observability and evaluation.
How to use the python LangChainInstrumentor to trace LangChain
Phoenix has first-class support for applications.
Use the register function to connect your application to Phoenix:
By instrumenting LangChain, spans will be created whenever a chain is run and will be sent to the Phoenix server for collection.
Now that you have tracing setup, all invocations of chains will be streamed to your running Phoenix for observability and evaluation.
Anthropic's Model Context Protocol is a standard for connecting AI assistants to the systems where data lives, including content repositories, business tools, and development environments.
Website:
Vercel is a cloud platform that simplifies building, deploying, and scaling modern web applications with features like serverless functions, edge caching, and seamless Git integration
Website:
PydanticAI is a Python agent framework designed to make it less painful to build production-grade applications with Generative AI, built by the team behind Pydantic with type-safe structured outputs
PromptFlow is a framework for designing, orchestrating, testing, and monitoring end-to-end LLM prompt workflows with built-in versioning and analytics
Website:
Don't see an integration you were looking for? We'd love to
Phoenix has a wide range of integrations. Generally these fall into a few categories:
Tracing integrations - where Phoenix will capture traces of applications built using a specific library.
E.g. , , , ,
Eval Model integrations - where Phoenix's eval Python package will make calls to a specific model.
E.g. , , ,
Eval Library integrations - where Phoenix traces can be evaluated using an outside eval library, instead of Phoenix's eval library, and visualized in Phoenix.
E.g. ,
Each partner listing in this section contains integration docs and relevant tutorials.


RAG with MongoDB and LlamaIndex
Learn to build and evaluate a RAG system powered by MongoDB Atlas


RAG with Zilliz and LlamaIndex
Learn to build and evaluate a RAG system powered by Zilliz
pip install openinference-instrumentation-groq groqfrom phoenix.otel import register
# configure the Phoenix tracer
tracer_provider = register(
project_name="my-llm-app", # Default is 'default'
auto_instrument=True # Auto-instrument your app based on installed OI dependencies
)import os
from groq import Groq
client = Groq(
# This is the default and can be omitted
api_key=os.environ.get("GROQ_API_KEY"),
)
chat_completion = client.chat.completions.create(
messages=[
{
"role": "user",
"content": "Explain the importance of low latency LLMs",
}
],
model="mixtral-8x7b-32768",
)
print(chat_completion.choices[0].message.content)pip install openinference-instrumentation-litellm litellmfrom phoenix.otel import register
# configure the Phoenix tracer
tracer_provider = register(
project_name="my-llm-app", # Default is 'default'
auto_instrument=True # Auto-instrument your app based on installed OI dependencies
)import os
os.environ["OPENAI_API_KEY"] = "PASTE_YOUR_API_KEY_HERE"import litellm
completion_response = litellm.completion(model="gpt-3.5-turbo",
messages=[{"content": "What's the capital of China?", "role": "user"}])
print(completion_response)pip install openinference-instrumentation-openai openaiexport OPENAI_API_KEY=[your_key_here]from phoenix.otel import register
# configure the Phoenix tracer
tracer_provider = register(
project_name="my-llm-app", # Default is 'default'
auto_instrument=True # Auto-instrument your app based on installed dependencies
)import openai
client = openai.OpenAI()
response = client.chat.completions.create(
model="gpt-4o",
messages=[{"role": "user", "content": "Write a haiku."}],
)
print(response.choices[0].message.content)pip install openinference-instrumentation-beeai beeai-frameworkfrom phoenix.otel import register
# configure the Phoenix tracer
tracer_provider = register(
project_name="beeai-agent", # Default is 'default'
auto_instrument=True # Auto-instrument your app based on installed OI dependencies
)import asyncio
from beeai_framework.agents.react import ReActAgent
from beeai_framework.agents.types import AgentExecutionConfig
from beeai_framework.backend.chat import ChatModel
from beeai_framework.backend.types import ChatModelParameters
from beeai_framework.memory import TokenMemory
from beeai_framework.tools.search.duckduckgo import DuckDuckGoSearchTool
from beeai_framework.tools.search.wikipedia import WikipediaTool
from beeai_framework.tools.tool import AnyTool
from beeai_framework.tools.weather.openmeteo import OpenMeteoTool
llm = ChatModel.from_name(
"ollama:granite3.1-dense:8b",
ChatModelParameters(temperature=0),
)
tools: list[AnyTool] = [
WikipediaTool(),
OpenMeteoTool(),
DuckDuckGoSearchTool(),
]
agent = ReActAgent(llm=llm, tools=tools, memory=TokenMemory(llm))
prompt = "What's the current weather in Las Vegas?"
async def main() -> None:
response = await agent.run(
prompt=prompt,
execution=AgentExecutionConfig(
max_retries_per_step=3, total_max_retries=10, max_iterations=20
),
)
print("Agent 🤖 : ", response.result.text)
asyncio.run(main())pip install openinference-instrumentation-smolagents smolagentsos.environ["HF_TOKEN"] = "<your_hf_token_value>"from phoenix.otel import register
# configure the Phoenix tracer
tracer_provider = register(
project_name="my-llm-app", # Default is 'default'
auto_instrument=True # Auto-instrument your app based on installed OI dependencies
)from smolagents import (
CodeAgent,
InferenceClientModel,
ToolCallingAgent,
VisitWebpageTool,
WebSearchTool,
)
model = InferenceClientModel()
managed_agent = ToolCallingAgent(
tools=[DuckDuckGoSearchTool(), VisitWebpageTool()],
model=model,
name="managed_agent",
description="This is an agent that can do web search.",
)
manager_agent.run("Based on the latest news, what is happening in extraterrestrial life?")pip install openinference-instrumentation-llama_indexfrom openinference.instrumentation.llama_index import LlamaIndexInstrumentor
from phoenix.otel import register
tracer_provider = register()
LlamaIndexInstrumentor().instrument(tracer_provider=tracer_provider)pip install openinference-instrumentation-langchain langchain_openaifrom phoenix.otel import register
# configure the Phoenix tracer
tracer_provider = register(
project_name="my-llm-app", # Default is 'default'
auto_instrument=True # Auto-instrument your app based on installed OI dependencies
)from langchain_core.prompts import ChatPromptTemplate
from langchain_openai import ChatOpenAI
prompt = ChatPromptTemplate.from_template("{x} {y} {z}?").partial(x="why is", z="blue")
chain = prompt | ChatOpenAI(model_name="gpt-3.5-turbo")
chain.invoke(dict(y="sky"))
Instrument LLM calls made using the Google ADK Python SDK
Launch Phoenix
pip install openinference-instrumentation-google-adk google-adk arize-phoenix-otelSet the GOOGLE_API_KEY environment variable. Refer to Google's ADK documentation for more details on authentication and environment variables.
export GOOGLE_API_KEY=[your_key_here]Use the register function to connect your application to Phoenix.
from phoenix.otel import register
# Configure the Phoenix tracer
tracer_provider = register(
project_name="my-llm-app", # Default is 'default'
auto_instrument=True # Auto-instrument your app based on installed OI dependencies
)Now that you have tracing setup, all Google ADK SDK requests will be streamed to Phoenix for observability and evaluation.
import asyncio
from google.adk.agents import Agent
from google.adk.runners import InMemoryRunner
from google.genai import types
def get_weather(city: str) -> dict:
"""Retrieves the current weather report for a specified city.
Args:
city (str): The name of the city for which to retrieve the weather report.
Returns:
dict: status and result or error msg.
"""
if city.lower() == "new york":
return {
"status": "success",
"report": (
"The weather in New York is sunny with a temperature of 25 degrees"
" Celsius (77 degrees Fahrenheit)."
),
}
else:
return {
"status": "error",
"error_message": f"Weather information for '{city}' is not available.",
}
agent = Agent(
name="test_agent",
model="gemini-2.0-flash-exp",
description="Agent to answer questions using tools.",
instruction="You must use the available tools to find an answer.",
tools=[get_weather]
)
async def main():
app_name = "test_instrumentation"
user_id = "test_user"
session_id = "test_session"
runner = InMemoryRunner(agent=agent, app_name=app_name)
session_service = runner.session_service
await session_service.create_session(
app_name=app_name,
user_id=user_id,
session_id=session_id
)
async for event in runner.run_async(
user_id=user_id,
session_id=session_id,
new_message=types.Content(role="user", parts=[
types.Part(text="What is the weather in New York?")]
)
):
if event.is_final_response():
print(event.content.parts[0].text.strip())
if __name__ == "__main__":
asyncio.run(main())Phoenix provides seamless observability and tracing for Agno agents through the OpenInference instrumentation package. This integration automatically captures agent interactions, tool usage, reasoning steps, and multi-agent conversations, giving you complete visibility into your Agno applications. Monitor performance, debug issues, and evaluate agent behavior in real-time as your agents execute complex workflows and collaborate in teams.
Agno is a lightweight, high-performance Python framework for building AI agents with tools, memory, and reasoning capabilities. It enables developers to create autonomous agents that can perform complex tasks, access knowledge bases, and collaborate in multi-agent teams. With support for 23+ model providers and lightning-fast performance (~3μs instantiation), Agno is designed for production-ready AI applications.
Model Agnostic: Connect to OpenAI, Anthropic, Google, and 20+ other providers
Lightning Fast: Agents instantiate in ~3μs with minimal memory footprint
Built-in Reasoning: First-class support for chain-of-thought and reasoning models
Multi-Modal: Native support for text, image, audio, and video processing
Agentic RAG: Advanced retrieval-augmented generation with hybrid search
Multi-Agent Teams: Coordinate multiple agents for complex workflows
Production Ready: Pre-built FastAPI routes and monitoring capabilities
pip install openinference-instrumentation-agno agnoUse the register function to connect your application to Phoenix:
from phoenix.otel import register
# configure the Phoenix tracer
tracer_provider = register(
project_name="my-llm-app", # Default is 'default'
auto_instrument=True # Auto-instrument your app based on installed OI dependencies
)from agno.agent import Agent
from agno.models.openai import OpenAIChat
from agno.tools.duckduckgo import DuckDuckGoTools
agent = Agent(
model=OpenAIChat(id="gpt-4o-mini"),
tools=[DuckDuckGoTools()],
markdown=True,
debug_mode=True,
)
agent.run("What is currently trending on Twitter?")Now that you have tracing setup, all invocations of Agno agents will be streamed to Phoenix for observability and evaluation.
Auto-instrument your AgentChat application for seamless observability
AutoGen AgentChat is the framework within Microsoft's AutoGen that enables robust multi-agent application.
pip install openinference-instrumentation-autogen-agentchat autogen-agentchat autogen_extConnect to your Phoenix instance using the register function.
from phoenix.otel import register
# configure the Phoenix tracer
tracer_provider = register(
project_name="agentchat-agent", # Default is 'default'
auto_instrument=True # Auto-instrument your app based on installed OI dependencies
)We’re going to run an AgentChat example using a multi-agent team. To get started, install the required packages to use your LLMs with AgentChat. In this example, we’ll use OpenAI as the LLM provider.
pip install autogen_exit openaiimport asyncio
import os
from autogen_agentchat.agents import AssistantAgent
from autogen_agentchat.conditions import TextMentionTermination
from autogen_agentchat.teams import RoundRobinGroupChat
from autogen_ext.models.openai._openai_client import OpenAIChatCompletionClient
os.environ["OPENAI_API_KEY"] = "your-api-key"
async def main():
model_client = OpenAIChatCompletionClient(
model="gpt-4",
)
# Create two agents: a primary and a critic
primary_agent = AssistantAgent(
"primary",
model_client=model_client,
system_message="You are a helpful AI assistant.",
)
critic_agent = AssistantAgent(
"critic",
model_client=model_client,
system_message="""
Provide constructive feedback.
Respond with 'APPROVE' when your feedbacks are addressed.
""",
)
# Termination condition: stop when the critic says "APPROVE"
text_termination = TextMentionTermination("APPROVE")
# Create a team with both agents
team = RoundRobinGroupChat(
[primary_agent, critic_agent],
termination_condition=text_termination
)
# Run the team on a task
result = await team.run(task="Write a short poem about the fall season.")
await model_client.close()
print(result)
if __name__ == "__main__":
asyncio.run(main())Phoenix provides visibility into your AgentChat operations by automatically tracing all interactions.
This module provides automatic instrumentation for LangChain.js, more specifically, the @langchain/core module. which may be used in conjunction with @opentelemetry/sdk-trace-node.
npm install --save @arizeai/openinference-instrumentation-langchainTo load the LangChain instrumentation, manually instrument the @langchain/core/callbacks/manager module. The callbacks manager must be manually instrumented due to the non-traditional module structure in @langchain/core. Additional instrumentations can be registered as usual in the registerInstrumentations function.
import { NodeTracerProvider } from "@opentelemetry/sdk-trace-node";
import {
LangChainInstrumentation
} from "@arizeai/openinference-instrumentation-langchain";
import * as CallbackManagerModule from "@langchain/core/callbacks/manager";
const provider = new NodeTracerProvider();
provider.register();
const lcInstrumentation = new LangChainInstrumentation();
// LangChain must be manually instrumented as it doesn't have
// a traditional module structure
lcInstrumentation.manuallyInstrument(CallbackManagerModule);
Instrumentation version >1.0.0 supports both attribute masking and context attribute propagation to spans.
>1.0.0
✅
✅
✅
>0.2.0
❌
✅
✅
>0.1.0
❌
❌
✅
You can specify a custom tracer provider for LangChain instrumentation in multiple ways:
const lcInstrumentation = new LangChainInstrumentation({
tracerProvider: customTracerProvider,
});
lcInstrumentation.manuallyInstrument(CallbackManagerModule);const lcInstrumentation = new LangChainInstrumentation();
lcInstrumentation.setTracerProvider(customTracerProvider);
lcInstrumentation.manuallyInstrument(CallbackManagerModule);const lcInstrumentation = new LangChainInstrumentation();
lcInstrumentation.manuallyInstrument(CallbackManagerModule);
registerInstrumentations({
instrumentations: [lcInstrumentation],
tracerProvider: customTracerProvider,
});Configure and run OpenAI for evals
To authenticate with OpenAI you will need, at a minimum, an API key. The model class will look for it in your environment, or you can pass it via argument as shown above. In addition, you can choose the specific name of the model you want to use and its configuration parameters. The default values specified above are common default values from OpenAI. Quickly instantiate your model as follows:
The code snippet below shows how to initialize OpenAIModel for Azure:
Azure OpenAI supports specific options:
For full details on Azure OpenAI, check out the
Instrument multi-agent applications using CrewAI
CrewAI uses either Langchain or LiteLLM under the hood to call models, depending on the version.
If you're using CrewAI<0.63.0, we recommend installing our openinference-instrumentation-langchain library to get visibility of LLM calls.
If you're using CrewAI>= 0.63.0, we recommend instead adding our openinference-instrumentation-litellm library to get visibility of LLM calls.
Connect to your Phoenix instance using the register function.
From here, you can run CrewAI as normal
Now that you have tracing setup, all calls to your Crew will be streamed to your running Phoenix for observability and evaluation.
Phoenix MCP Server is an implementation of the Model Context Protocol for the Arize Phoenix platform. It provides a unified interface to Phoenix's capabilites.
Phoenix MCP Server supports:
Prompts Management: Create, list, update, and iterate on prompts
Datasets: Explore datasets, and synthesize new examples
Experiments: Pull experiment results and visualize them with the help of an LLM
From the Cursor Settings page, navigate to the MCP section, and click "Add new global MCP server"
Add the following code to your MCP config file:
Replacing:
with your Phoenix collector endpoint
your-api-key with your Phoenix API key
After saving your config file, you should see the Phoenix server enabled:
You can access Phoenix prompts, experiments, and datasets through Cursor!
From the Claude Desktop settings window, navigate to the Developer Section, and click "Edit Config"
Open your config file and add the following code:
Replacing:
with your Phoenix collector endpoint
your-api-key with your Phoenix API key
Save your file and relaunch Claude Desktop. You should now see your new tools ready for use in Claude!
Add the following code to your MCP config file:
Replacing:
with your Phoenix collector endpoint
your-api-key with your Phoenix API key
The MCP server can be used to interact with Prompts, Experiments, and Datasets. It can be used to retrieve information about each item, and can create and update Prompts.
Some good questions to try:
What prompts do I have in Phoenix?
Create a new prompt in Phoenix that classifies user intent
Update my classification prompt in Phoenix with these new options
Summarize the Phoenix experiments run on my agent inputs dataset
Visualize the results of my jailbreak dataset experiments in Phoenix
@arizeai/phoenix-mcp is ! Issues and PRs welcome.
Instrument LLM applications built with Haystack
Phoenix provides auto-instrumentation for
Use the register function to connect your application to Phoenix:
From here, you can set up your Haystack app as normal:
Now that you have tracing setup, all invocations of pipelines will be streamed to your running Phoenix for observability and evaluation.
Instructor is a library that helps you define structured output formats for LLMs.
Website:
Instructor tracing
Instrument and observe OpenAI calls
This module provides automatic instrumentation for the OpenAI Node.js SDK. which may be used in conjunction with @opentelemetry/sdk-trace-node.
npm install --save @arizeai/openinference-instrumentation-openai openai
npm install --save @opentelemetry/api @opentelemetry/sdk-trace-node \
@opentelemetry/sdk-trace-base \
@opentelemetry/resources \
@opentelemetry/semantic-conventions \
@opentelemetry/instrumentation \
@opentelemetry/exporter-trace-otlp-proto \
@arizeai/openinference-semantic-conventionsTo instrument your application, import and enable OpenAIInstrumentation
Create the instrumentation.js file:
import { OTLPTraceExporter } from "@opentelemetry/exporter-trace-otlp-proto";
import { resourceFromAttributes } from "@opentelemetry/resources";
import { SimpleSpanProcessor } from "@opentelemetry/sdk-trace-base";
import { NodeTracerProvider } from "@opentelemetry/sdk-trace-node";
import { ATTR_SERVICE_NAME } from "@opentelemetry/semantic-conventions";
import { SEMRESATTRS_PROJECT_NAME } from "@arizeai/openinference-semantic-conventions";
import { registerInstrumentations } from "@opentelemetry/instrumentation";
// OpenAI instrumentation
import OpenAI from "openai";
import { OpenAIInstrumentation } from "@arizeai/openinference-instrumentation-openai";
const COLLECTOR_ENDPOINT = "your-phoenix-collector-endpoint";
const SERVICE_NAME = "openai-app";
const provider = new NodeTracerProvider({
resource: resourceFromAttributes({
[ATTR_SERVICE_NAME]: SERVICE_NAME,
[SEMRESATTRS_PROJECT_NAME]: SERVICE_NAME,
}),
spanProcessors: [
new SimpleSpanProcessor(
new OTLPTraceExporter({
url: `${COLLECTOR_ENDPOINT}/v1/traces`,
// (optional) if connecting to Phoenix with Authentication enabled
headers: { Authorization: `Bearer ${process.env.PHOENIX_API_KEY}` },
})
),
],
});
provider.register();
console.log("Provider registered");
const instrumentation = new OpenAIInstrumentation();
instrumentation.manuallyInstrument(OpenAI);
registerInstrumentations({
instrumentations: [instrumentation],
});
console.log("OpenAI instrumentation registered");Import the instrumentation.js file first, then use OpenAI as usual.
import "./instrumentation.js";
import OpenAI from "openai";
// set OPENAI_API_KEY in environment, or pass it in arguments
const openai = new OpenAI({
apiKey: 'your-openai-api-key'
});
openai.chat.completions
.create({
model: "gpt-4o",
messages: [{ role: "user", content: "Write a haiku."}],
})
.then((response) => {
console.log(response.choices[0].message.content);
});After setting up instrumentation and running your OpenAI application, traces will appear in the Phoenix UI for visualization and analysis.
You can specify a custom tracer provider for OpenAI instrumentation in multiple ways:
const instrumentation = new OpenAIInstrumentation({
tracerProvider: customTracerProvider,
});
instrumentation.manuallyInstrument(OpenAI);const instrumentation = new OpenAIInstrumentation();
instrumentation.setTracerProvider(customTracerProvider);
instrumentation.manuallyInstrument(OpenAI);const instrumentation = new OpenAIInstrumentation();
instrumentation.manuallyInstrument(OpenAI);
registerInstrumentations({
instrumentations: [instrumentation],
tracerProvider: customTracerProvider,
});class OpenAIModel:
api_key: Optional[str] = field(repr=False, default=None)
"""Your OpenAI key. If not provided, will be read from the environment variable"""
organization: Optional[str] = field(repr=False, default=None)
"""
The organization to use for the OpenAI API. If not provided, will default
to what's configured in OpenAI
"""
base_url: Optional[str] = field(repr=False, default=None)
"""
An optional base URL to use for the OpenAI API. If not provided, will default
to what's configured in OpenAI
"""
model: str = "gpt-4"
"""Model name to use. In of azure, this is the deployment name such as gpt-35-instant"""
temperature: float = 0.0
"""What sampling temperature to use."""
max_tokens: int = 256
"""The maximum number of tokens to generate in the completion.
-1 returns as many tokens as possible given the prompt and
the models maximal context size."""
top_p: float = 1
"""Total probability mass of tokens to consider at each step."""
frequency_penalty: float = 0
"""Penalizes repeated tokens according to frequency."""
presence_penalty: float = 0
"""Penalizes repeated tokens."""
n: int = 1
"""How many completions to generate for each prompt."""
model_kwargs: Dict[str, Any] = field(default_factory=dict)
"""Holds any model parameters valid for `create` call not explicitly specified."""
batch_size: int = 20
"""Batch size to use when passing multiple documents to generate."""
request_timeout: Optional[Union[float, Tuple[float, float]]] = None
"""Timeout for requests to OpenAI completion API. Default is 600 seconds."""model = OpenAI()
model("Hello there, this is a test if you are working?")
# Output: "Hello! I'm working perfectly. How can I assist you today?"model = OpenAIModel(
model="gpt-35-turbo-16k",
azure_endpoint="https://arize-internal-llm.openai.azure.com/",
api_version="2023-09-15-preview",
)api_version: str = field(default=None)
"""
The verion of the API that is provisioned
https://learn.microsoft.com/en-us/azure/ai-services/openai/reference#rest-api-versioning
"""
azure_endpoint: Optional[str] = field(default=None)
"""
The endpoint to use for azure openai. Available in the azure portal.
https://learn.microsoft.com/en-us/azure/cognitive-services/openai/how-to/create-resource?pivots=web-portal#create-a-resource
"""
azure_deployment: Optional[str] = field(default=None)
azure_ad_token: Optional[str] = field(default=None)
azure_ad_token_provider: Optional[Callable[[], str]] = field(default=None)
pip install openinference-instrumentation-crewai crewai crewai-toolsfrom phoenix.otel import register
# configure the Phoenix tracer
tracer_provider = register(
project_name="my-llm-app", # Default is 'default'
auto_instrument=True # Auto-instrument your app based on installed OI dependencies
)import os
from crewai import Agent, Task, Crew, Process
from crewai_tools import SerperDevTool
os.environ["OPENAI_API_KEY"] = "YOUR_OPENAI_API_KEY"
os.environ["SERPER_API_KEY"] = "YOUR_SERPER_API_KEY"
search_tool = SerperDevTool()
# Define your agents with roles and goals
researcher = Agent(
role='Senior Research Analyst',
goal='Uncover cutting-edge developments in AI and data science',
backstory="""You work at a leading tech think tank.
Your expertise lies in identifying emerging trends.
You have a knack for dissecting complex data and presenting actionable insights.""",
verbose=True,
allow_delegation=False,
# You can pass an optional llm attribute specifying what model you wanna use.
# llm=ChatOpenAI(model_name="gpt-3.5", temperature=0.7),
tools=[search_tool]
)
writer = Agent(
role='Tech Content Strategist',
goal='Craft compelling content on tech advancements',
backstory="""You are a renowned Content Strategist, known for your insightful and engaging articles.
You transform complex concepts into compelling narratives.""",
verbose=True,
allow_delegation=True
)
# Create tasks for your agents
task1 = Task(
description="""Conduct a comprehensive analysis of the latest advancements in AI in 2024.
Identify key trends, breakthrough technologies, and potential industry impacts.""",
expected_output="Full analysis report in bullet points",
agent=researcher
)
task2 = Task(
description="""Using the insights provided, develop an engaging blog
post that highlights the most significant AI advancements.
Your post should be informative yet accessible, catering to a tech-savvy audience.
Make it sound cool, avoid complex words so it doesn't sound like AI.""",
expected_output="Full blog post of at least 4 paragraphs",
agent=writer
)
# Instantiate your crew with a sequential process
crew = Crew(
agents=[researcher, writer],
tasks=[task1, task2],
verbose=2, # You can set it to 1 or 2 to different logging levels
process = Process.sequential
)
# Get your crew to work!
result = crew.kickoff()
print("######################")
print(result)
{
"mcpServers": {
"phoenix": {
"command": "npx",
"args": [
"-y",
"@arizeai/phoenix-mcp@latest",
"--baseUrl",
"https://my-phoenix.com",
"--apiKey",
"your-api-key"
]
}
}{
"mcpServers": {
"phoenix": {
"command": "npx",
"args": [
"-y",
"@arizeai/phoenix-mcp@latest",
"--baseUrl",
"https://my-phoenix.com",
"--apiKey",
"your-api-key"
]
}
}{
"mcpServers": {
"phoenix": {
"command": "npx",
"args": [
"-y",
"@arizeai/phoenix-mcp@latest",
"--baseUrl",
"https://my-phoenix.com",
"--apiKey",
"your-api-key"
]
}
}pip install openinference-instrumentation-haystack haystack-aifrom phoenix.otel import register
# configure the Phoenix tracer
tracer_provider = register(
project_name="my-llm-app", # Default is 'default'
auto_instrument=True # Auto-instrument your app based on installed OI dependencies
)from haystack import Pipeline
from haystack.components.generators import OpenAIGenerator
from haystack.components.builders.prompt_builder import PromptBuilder
prompt_template = """
Answer the following question.
Question: {{question}}
Answer:
"""
# Initialize the pipeline
pipeline = Pipeline()
# Initialize the OpenAI generator component
llm = OpenAIGenerator(model="gpt-3.5-turbo")
prompt_builder = PromptBuilder(template=prompt_template)
# Add the generator component to the pipeline
pipeline.add_component("prompt_builder", prompt_builder)
pipeline.add_component("llm", llm)
pipeline.connect("prompt_builder", "llm")
# Define the question
question = "What is the location of the Hanging Gardens of Babylon?"How to trace Portkey AI Gateway requests with Phoenix for comprehensive LLM observability
Phoenix provides seamless integration with Portkey, the AI Gateway and observability platform that routes to 200+ LLMs with enterprise-grade features including guardrails, caching, and load balancing.
pip install openinference-instrumentation-portkey portkey-aiUse the register function to connect your application to Phoenix:
from phoenix.otel import register
# configure the Phoenix tracer
tracer_provider = register(
project_name="my-portkey-app", # Default is 'default'
auto_instrument=True # Auto-instrument your app based on installed OI dependencies
)By instrumenting Portkey, spans will be created whenever requests are made through the AI Gateway and will be sent to the Phoenix server for collection.
import os
from openai import OpenAI
from portkey_ai import PORTKEY_GATEWAY_URL, createHeaders
# Set up your API keys
os.environ["OPENAI_API_KEY"] = "your-openai-api-key"
os.environ["PORTKEY_API_KEY"] = "your-portkey-api-key" # Optional for self-hosted
client = OpenAI(
api_key=os.environ.get("OPENAI_API_KEY"),
base_url=PORTKEY_GATEWAY_URL,
default_headers=createHeaders(
provider="openai",
api_key=os.environ.get("PORTKEY_API_KEY")
)
)
response = client.chat.completions.create(
model="gpt-4o-mini",
messages=[{"role": "user", "content": "What is artificial intelligence?"}]
)
print(response.choices[0].message.content)from portkey_ai import Portkey
# Initialize Portkey client
portkey = Portkey(
api_key="your-portkey-api-key", # Optional for self-hosted
virtual_key="your-openai-virtual-key" # Or use provider-specific virtual keys
)
response = portkey.chat.completions.create(
model="gpt-4o-mini",
messages=[{"role": "user", "content": "Explain machine learning"}]
)
print(response.choices[0].message.content)Now that you have tracing setup, all requests through Portkey's AI Gateway will be streamed to your running Phoenix instance for observability and evaluation. You'll be able to see:
Request/Response Traces: Complete visibility into LLM interactions
Routing Decisions: Which provider was selected and why
Fallback Events: When and why fallbacks were triggered
Cache Performance: Hit/miss rates and response times
Cost Tracking: Token usage and costs across providers
Latency Metrics: Response times for each provider and route
Ensuring the reliability and accuracy of LLM-generated responses is a critical challenge for production AI systems. Poor-quality training data, ambiguous labels, and untrustworthy outputs can degrade model performance and lead to unreliable results.
Cleanlab TLM is a tool that estimates the trustworthiness of an LLM response. It provides a confidence score that helps detect hallucinations, ambiguous responses, and potential misinterpretations. This enables teams to flag unreliable outputs and improve the robustness of their AI systems.
This guide demonstrates how to integrate Cleanlab’s Trustworthy Language Model (TLM) with Phoenix to systematically identify and improve low-quality LLM responses. By leveraging TLM for automated data quality assessment and Phoenix for response analysis, you can build more robust and trustworthy AI applications.
Specifically, this tutorial will walk through:
Evaluating LLM-generated responses for trustworthiness.
Using Cleanlab TLM to score and flag untrustworthy responses.
Leveraging Phoenix for tracing and visualizing response evaluations.
Install Dependencies, Set up API Keys, Obtain LLM Responses + Trace in Phoenix
Download Trace Dataset
import phoenix as px
spans_df = px.Client().get_spans_dataframe(project_name=[your_project_name])
spans_df.head()Prep data from trace dataset
# Create a new DataFrame with input and output columns
eval_df = spans_df[["context.span_id", "attributes.input.value", "attributes.output.value"]].copy()
eval_df.set_index("context.span_id", inplace=True)
# Combine system and user prompts from the traces
def get_prompt(input_value):
if isinstance(input_value, str):
input_value = json.loads(input_value)
system_prompt = input_value["messages"][0]["content"]
user_prompt = input_value["messages"][1]["content"]
return system_prompt + "\n" + user_prompt
# Get the responses from the traces
def get_response(output_value):
if isinstance(output_value, str):
output_value = json.loads(output_value)
return output_value["choices"][0]["message"]["content"]
# Create a list of prompts and associated responses
prompts = [get_prompt(input_value) for input_value in eval_df["attributes.input.value"]]
responses = [get_response(output_value) for output_value in eval_df["attributes.output.value"]]
eval_df["prompt"] = prompts
eval_df["response"] = responsesSetup TLM & Evaluate each pair
from cleanlab_tlm import TLM
tlm = TLM(options={"log": ["explanation"]})
# Evaluate each of the prompt, response pairs using TLM
evaluations = tlm.get_trustworthiness_score(prompts, responses)
# Extract the trustworthiness scores and explanations from the evaluations
trust_scores = [entry["trustworthiness_score"] for entry in evaluations]
explanations = [entry["log"]["explanation"] for entry in evaluations]
# Add the trust scores and explanations to the DataFrame
eval_df["score"] = trust_scores
eval_df["explanation"] = explanationsUpload Evals to Phoenix
from phoenix.trace import SpanEvaluations
eval_df["score"] = eval_df["score"].astype(float)
eval_df["explanation"] = eval_df["explanation"].astype(str)
px.Client().log_evaluations(SpanEvaluations(eval_name="Trustworthiness", dataframe=eval_df))Check out the full tutorial here:
Ragas is a library that provides robust evaluation metrics for LLM applications, making it easy to assess quality. When integrated with Phoenix, it enriches your experiments with metrics like goal accuracy and tool call accuracy—helping you evaluate performance more effectively and track improvements over time.
This guide will walk you through the process of creating and evaluating agents using Ragas and Arize Phoenix. We'll cover the following steps:
Build a customer support agent with the OpenAI Agents SDK
Trace agent activity to monitor interactions
Generate a benchmark dataset for performance analysis
Evaluate agent performance using Ragas
We will walk through the key steps in the documentation below. Check out the full tutorial here:
Here we've setup a basic agent that can solve math problems. We have a function tool that can solve math equations, and an agent that can use this tool. We'll use the Runner class to run the agent and get the final output.
from agents import Runner, function_tool
@function_tool
def solve_equation(equation: str) -> str:
"""Use python to evaluate the math equation, instead of thinking about it yourself.
Args:
equation: string to pass into eval() in python
"""
return str(eval(equation))from agents import Agent
agent = Agent(
name="Math Solver",
instructions="You solve math problems by evaluating them with python and returning the result",
tools=[solve_equation],
)
Agents can go awry for a variety of reasons. We can use Ragas to evaluate whether the agent responded correctly. Two Ragas measurements help with this:
Tool Call Accuracy - Did our agent choose the right tool with the right arguments?
Agent Goal Accuracy - Did our agent accomplish the stated goal and get to the right outcome?
We'll import both metrics we're measuring from Ragas, and use the multi_turn_ascore(sample) to get the results. The AgentGoalAccuracyWithReference metric compares the final output to the reference to see if the goal was accomplished. The ToolCallAccuracy metric compares the tool call to the reference tool call to see if the tool call was made correctly.
In the notebook, we also define the helper function conversation_to_ragas_sample which converts the agent messages into a format that Ragas can use.
The following code snippets define our task function and evaluators.
import asyncio
from agents import Runner
async def solve_math_problem(input):
if isinstance(input, dict):
input = next(iter(input.values()))
result = await Runner.run(agent, input)
return {"final_output": result.final_output, "messages": result.to_input_list()}from langchain_openai import ChatOpenAI
from ragas.llms import LangchainLLMWrapper
from ragas.metrics import AgentGoalAccuracyWithReference, ToolCallAccuracy
async def tool_call_evaluator(input, output):
sample = conversation_to_ragas_sample(output["messages"], reference_equation=input["question"])
tool_call_accuracy = ToolCallAccuracy()
return await tool_call_accuracy.multi_turn_ascore(sample)
async def goal_evaluator(input, output):
sample = conversation_to_ragas_sample(
output["messages"], reference_answer=output["final_output"]
)
evaluator_llm = LangchainLLMWrapper(ChatOpenAI(model="gpt-4o"))
goal_accuracy = AgentGoalAccuracyWithReference(llm=evaluator_llm)
return await goal_accuracy.multi_turn_ascore(sample)
Once we've generated a dataset of questions, we can use our experiments feature to track changes across models, prompts, parameters for the agent.
import phoenix as px
dataset_df = pd.DataFrame(
{
"question": [conv["question"] for conv in conversations],
"final_output": [conv["final_output"] for conv in conversations],
}
)
dataset = px.Client().upload_dataset(
dataframe=dataset_df,
dataset_name="math-questions",
input_keys=["question"],
output_keys=["final_output"],
)Finally, we run our experiment and view the results in Phoenix.
from phoenix.experiments import run_experiment
experiment = run_experiment(
dataset, task=solve_math_problem, evaluators=[goal_evaluator, tool_call_evaluator]
)Install packages:
npm install @arizeai/openinference-mastraInitialize OpenTelemetry tracing for your Mastra application:
import { Mastra } from "@mastra/core";
import {
OpenInferenceOTLPTraceExporter,
isOpenInferenceSpan,
} from "@arizeai/openinference-mastra";
export const mastra = new Mastra({
// ... other config
telemetry: {
serviceName: "openinference-mastra-agent", // you can rename this to whatever you want to appear in the Phoenix UI
enabled: true,
export: {
type: "custom",
exporter: new OpenInferenceOTLPTraceExporter({
url: process.env.PHOENIX_COLLECTOR_ENDPOINT,
headers: {
Authorization: `Bearer ${process.env.PHOENIX_API_KEY}`, // if you're self-hosting Phoenix without auth, you can remove this header
},
// optional: filter out http, and other node service specific spans
// they will still be exported to Mastra, but not to the target of
// this exporter
spanFilter: isOpenInferenceSpan,
}),
},
},
});From here you can use Mastra as normal. All agents, workflows, and tool calls will be automatically traced.
Here is a full project example to get you started:
The rest of this tutorial will assume you are running Phoenix locally on the default localhost:6006 port.
npm create mastra@latest
# answer the prompts, include agent, tools, and the example when asked
cd chosen-project-name
npm install --save @arizeai/openinference-mastraAdd the OpenInference telemetry code to your index.js file. The complete file should now look like this:
// chosen-project-name/src/index.ts
import { Mastra } from "@mastra/core/mastra";
import { createLogger } from "@mastra/core/logger";
import { LibSQLStore } from "@mastra/libsql";
import {
isOpenInferenceSpan,
OpenInferenceOTLPTraceExporter,
} from "@arizeai/openinference-mastra";
import { weatherAgent } from "./agents/weather-agent";
export const mastra = new Mastra({
agents: { weatherAgent },
storage: new LibSQLStore({
url: ":memory:",
}),
logger: createLogger({
name: "Mastra",
level: "info",
}),
telemetry: {
enabled: true,
serviceName: "weather-agent",
export: {
type: "custom",
exporter: new OpenInferenceOTLPTraceExporter({
url: process.env.PHOENIX_COLLECTOR_ENDPOINT,
headers: {
Authorization: `Bearer ${process.env.PHOENIX_API_KEY}`,
},
spanFilter: isOpenInferenceSpan,
}),
},
},
});
npm run devThe Mastra instrumentation automatically captures:
Agent Executions: Complete agent runs including instructions, model calls, and responses
Workflow Steps: Individual step executions within workflows, including inputs, outputs, and timing
Tool Calls: Function calls made by agents, including parameters and results
LLM Interactions: All model calls with prompts, responses, token usage, and metadata
RAG Operations: Vector searches, document retrievals, and embedding generations
Memory Operations: Agent memory reads and writes
Error Handling: Exceptions and error states in your AI pipeline
Phoenix will capture detailed attributes for each trace:
Agent Information: Agent name, instructions, model configuration
Workflow Context: Workflow name, step IDs, execution flow
Tool Metadata: Tool names, parameters, execution results
Model Details: Model name, provider, token usage, response metadata
Performance Metrics: Execution time, token counts, costs
User Context: Session IDs, user information (if provided)
You can view all of this information in the Phoenix UI to debug issues, optimize performance, and understand your application's behavior.
Create flows using Microsoft PromptFlow and send their traces to Phoenix
This integration will allow you to trace Microsoft PromptFlow flows and send their traces intoarize-phoenix.
pip install promptflowSet up the OpenTelemetry endpoint to point to Phoenix and use Prompt flow's setup_exporter_from_environ to start tracing any further flows and LLM calls.
import os
from opentelemetry.sdk.environment_variables import OTEL_EXPORTER_OTLP_ENDPOINT
from promptflow.tracing._start_trace import setup_exporter_from_environ
endpoint = f"{os.environ["PHOENIX_COLLECTOR_ENDPOINT]}/v1/traces" # replace with your Phoenix endpoint if self-hosting
os.environ[OTEL_EXPORTER_OTLP_ENDPOINT] = endpoint
setup_exporter_from_environ()Proceed with creating Prompt flow flows as usual. See this example notebook for inspiration.
You should see the spans render in Phoenix as shown in the below screenshots.
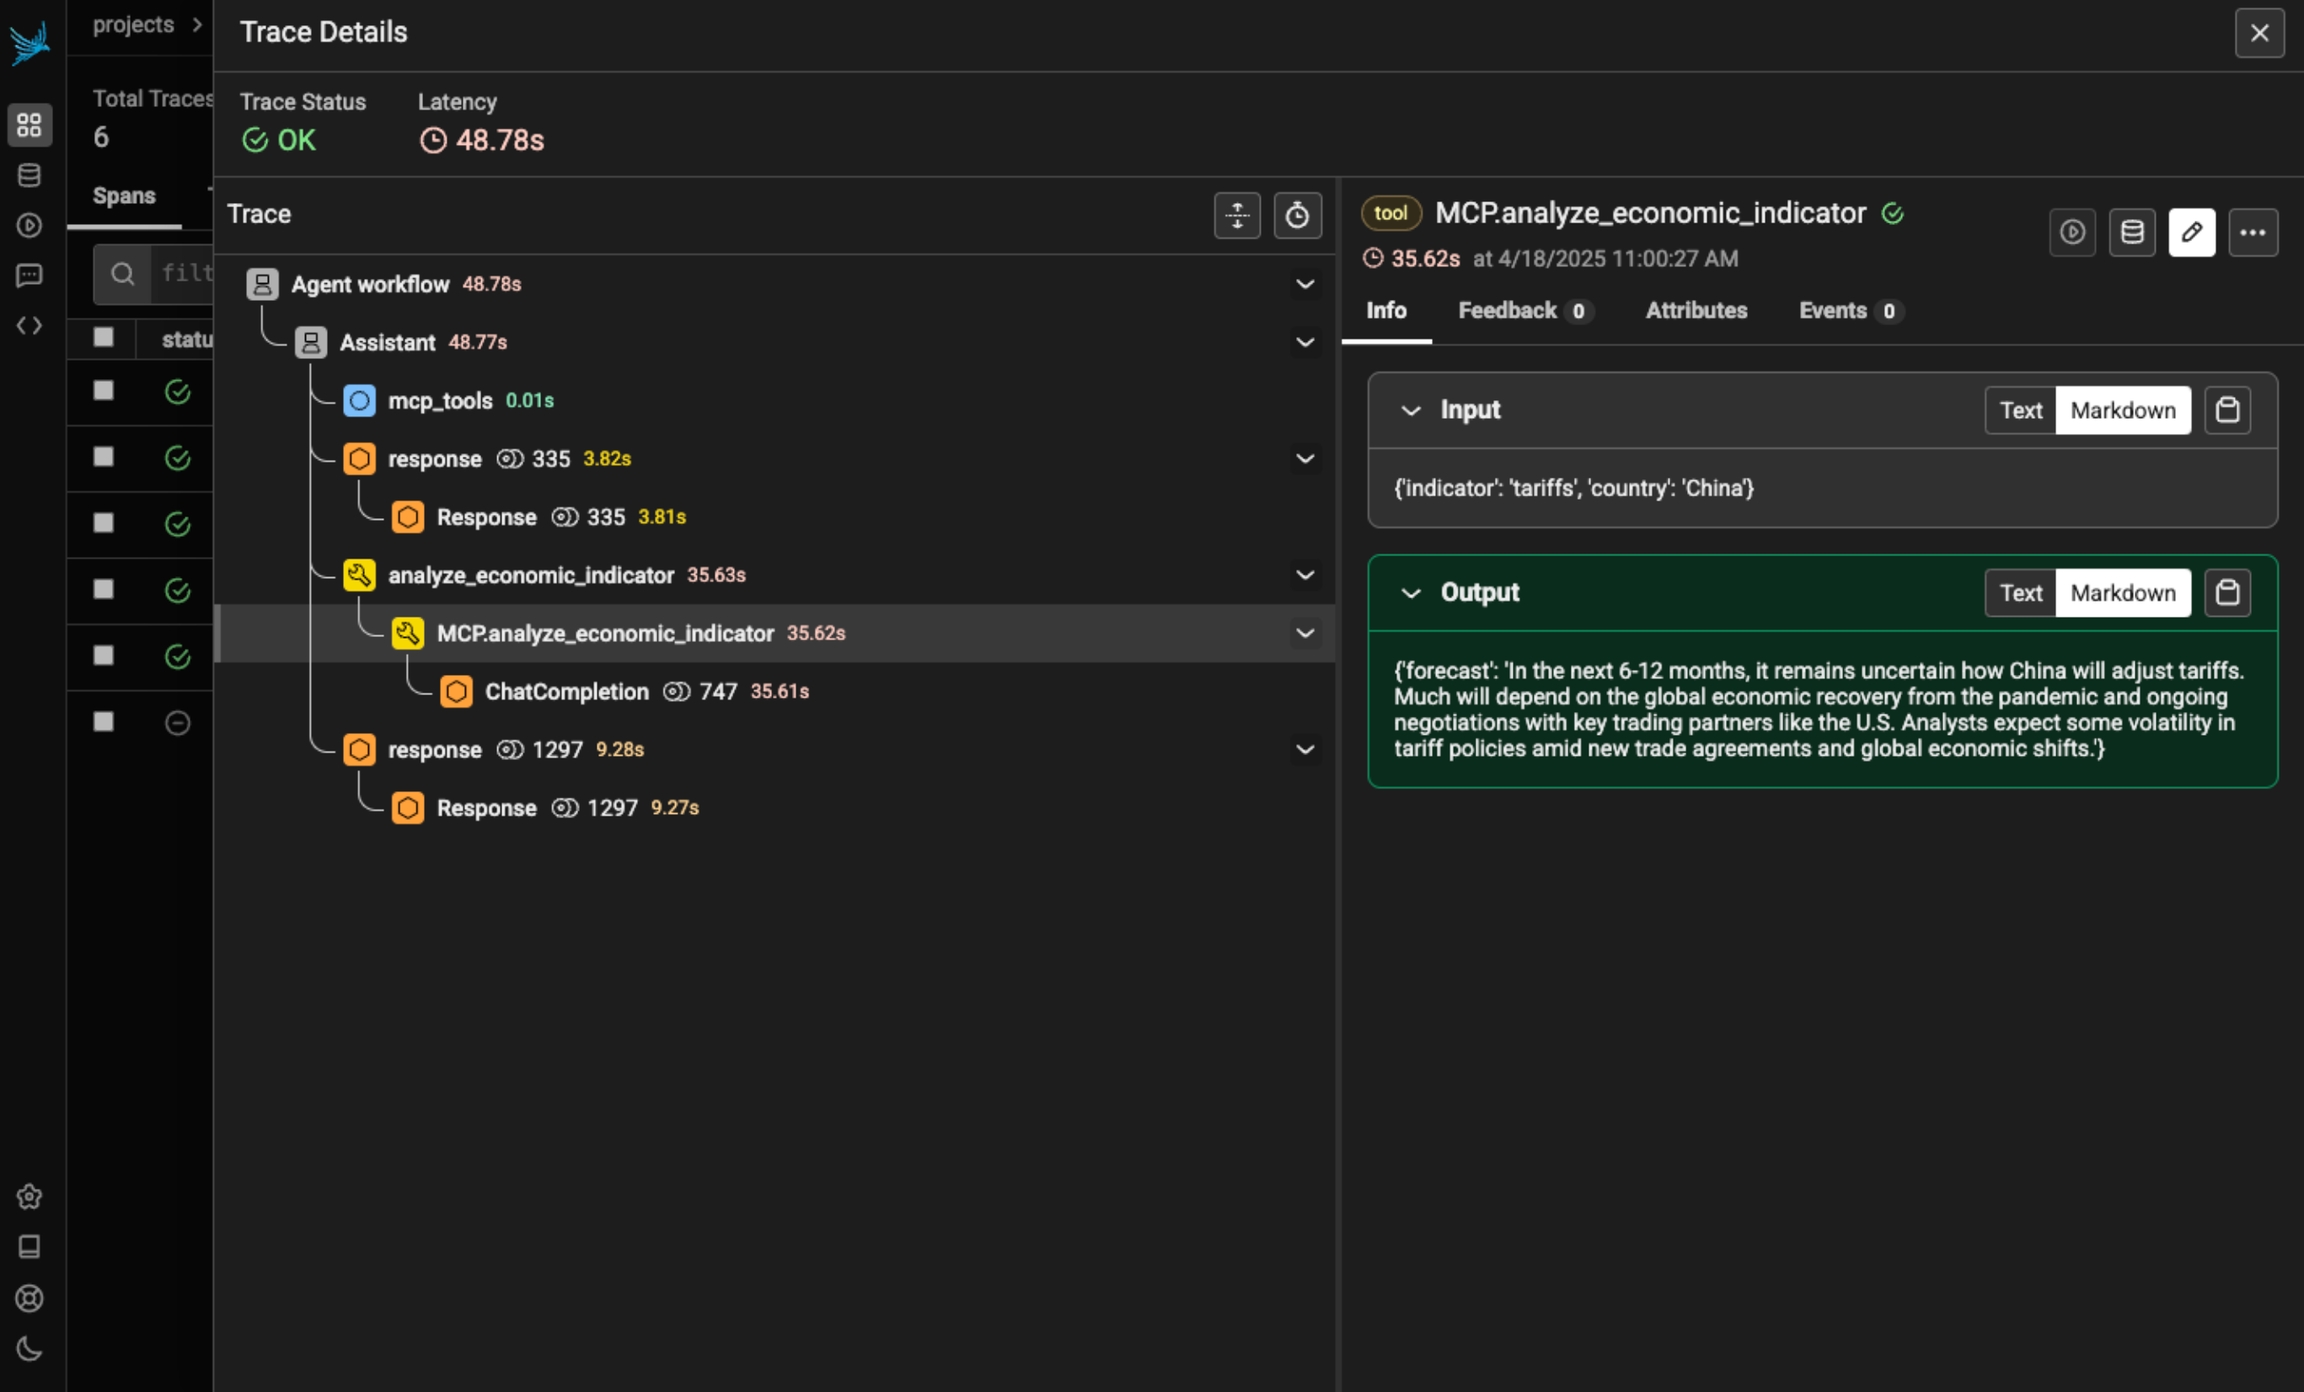
Phoenix provides tracing for MCP clients and servers through OpenInference. This includes the unique capability to trace client to server interactions under a single trace in the correct hierarchy.
The openinference-instrumentation-mcp instrumentor is unique compared to other OpenInference instrumentors. It does not generate any of its own telemetry. Instead, it enables context propagation between MCP clients and servers to unify traces. You still need generate OpenTelemetry traces in both the client and server to see a unified trace.
Because the MCP instrumentor does not generate its own telemetry, you must use it alongside other instrumentation code to see traces.
The example code below uses OpenAI agents, which you can instrument using:
Now that you have tracing setup, all invocations of your client and server will be streamed to Phoenix for observability and evaluation, and connected in the platform.
Use Phoenix and OpenAI Agents SDK for powerful multi-agent tracing
We have several code samples below on different ways to integrate with OpenAI, based on how you want to use Phoenix.
Sign up for Phoenix:
Sign up for an Arize Phoenix account at
Install packages:
Set your Phoenix endpoint and API Key:
Your Phoenix API key can be found on the Keys section of your .
Launch your local Phoenix instance:
For details on customizing a local terminal deployment, see .
Install packages:
Set your Phoenix endpoint:
See Terminal for more details
Pull latest Phoenix image from :
Run your containerized instance:
This will expose the Phoenix on localhost:6006
Install packages:
Set your Phoenix endpoint:
For more info on using Phoenix with Docker, see .
Install packages:
Launch Phoenix:
Add your OpenAI API key as an environment variable:
Use the register function to connect your application to Phoenix:
Run your agentscode.
View your traces in Phoenix.

Sign up for Phoenix:
Sign up for an Arize Phoenix account at https://app.phoenix.arize.com/login
Click Create Space, then follow the prompts to create and launch your space.
Install packages:
pip install arize-phoenix-otelSet your Phoenix endpoint and API Key:
From your new Phoenix Space
Create your API key from the Settings page
Copy your Hostname from the Settings page
In your code, set your endpoint and API key:
import os
os.environ["PHOENIX_API_KEY"] = "ADD YOUR PHOENIX API KEY"
os.environ["PHOENIX_COLLECTOR_ENDPOINT"] = "ADD YOUR PHOENIX HOSTNAME"
# If you created your Phoenix Cloud instance before June 24th, 2025,
# you also need to set the API key as a header:
# os.environ["PHOENIX_CLIENT_HEADERS"] = f"api_key={os.getenv('PHOENIX_API_KEY')}"Launch your local Phoenix instance:
pip install arize-phoenix
phoenix serveFor details on customizing a local terminal deployment, see Terminal Setup.
Install packages:
pip install arize-phoenix-otelSet your Phoenix endpoint:
import os
os.environ["PHOENIX_COLLECTOR_ENDPOINT"] = "http://localhost:6006"See Terminal for more details.
Pull latest Phoenix image from Docker Hub:
docker pull arizephoenix/phoenix:latestRun your containerized instance:
docker run -p 6006:6006 arizephoenix/phoenix:latestThis will expose the Phoenix on localhost:6006
Install packages:
pip install arize-phoenix-otelSet your Phoenix endpoint:
import os
os.environ["PHOENIX_COLLECTOR_ENDPOINT"] = "http://localhost:6006"For more info on using Phoenix with Docker, see Docker.
Install packages:
pip install arize-phoenixLaunch Phoenix:
import phoenix as px
px.launch_app()Sign up for Phoenix:
Sign up for an Arize Phoenix account at https://app.phoenix.arize.com/login
Click Create Space, then follow the prompts to create and launch your space.
Install packages:
pip install arize-phoenix-otelSet your Phoenix endpoint and API Key:
From your new Phoenix Space
Create your API key from the Settings page
Copy your Hostname from the Settings page
In your code, set your endpoint and API key:
import os
os.environ["PHOENIX_API_KEY"] = "ADD YOUR PHOENIX API KEY"
os.environ["PHOENIX_COLLECTOR_ENDPOINT"] = "ADD YOUR PHOENIX HOSTNAME"
# If you created your Phoenix Cloud instance before June 24th, 2025,
# you also need to set the API key as a header:
# os.environ["PHOENIX_CLIENT_HEADERS"] = f"api_key={os.getenv('PHOENIX_API_KEY')}"Launch your local Phoenix instance:
pip install arize-phoenix
phoenix serveFor details on customizing a local terminal deployment, see Terminal Setup.
Install packages:
pip install arize-phoenix-otelSet your Phoenix endpoint:
import os
os.environ["PHOENIX_COLLECTOR_ENDPOINT"] = "http://localhost:6006"See Terminal for more details.
Pull latest Phoenix image from Docker Hub:
docker pull arizephoenix/phoenix:latestRun your containerized instance:
docker run -p 6006:6006 arizephoenix/phoenix:latestThis will expose the Phoenix on localhost:6006
Install packages:
pip install arize-phoenix-otelSet your Phoenix endpoint:
import os
os.environ["PHOENIX_COLLECTOR_ENDPOINT"] = "http://localhost:6006"For more info on using Phoenix with Docker, see Docker.
Install packages:
pip install arize-phoenixLaunch Phoenix:
import phoenix as px
px.launch_app()pip install openinference-instrumentation-mcppip install openinference-instrumentation-openai_agentsimport asyncio
from agents import Agent, Runner
from agents.mcp import MCPServer, MCPServerStdio
from dotenv import load_dotenv
from phoenix.otel import register
load_dotenv()
# Connect to your Phoenix instance
tracer_provider = register(auto_instrument=True)
async def run(mcp_server: MCPServer):
agent = Agent(
name="Assistant",
instructions="Use the tools to answer the users question.",
mcp_servers=[mcp_server],
)
while True:
message = input("\n\nEnter your question (or 'exit' to quit): ")
if message.lower() == "exit" or message.lower() == "q":
break
print(f"\n\nRunning: {message}")
result = await Runner.run(starting_agent=agent, input=message)
print(result.final_output)
async def main():
async with MCPServerStdio(
name="Financial Analysis Server",
params={
"command": "fastmcp",
"args": ["run", "./server.py"],
},
client_session_timeout_seconds=30,
) as server:
await run(server)
if __name__ == "__main__":
asyncio.run(main())import json
import os
from datetime import datetime, timedelta
import openai
from dotenv import load_dotenv
from mcp.server.fastmcp import FastMCP
from pydantic import BaseModel
from phoenix.otel import register
load_dotenv()
# You must also connect your MCP server to Phoenix
tracer_provider = register(auto_instrument=True)
# Get a tracer to add additional instrumentattion
tracer = tracer_provider.get_tracer("financial-analysis-server")
# Configure OpenAI client
client = openai.OpenAI(api_key=os.environ.get("OPENAI_API_KEY"))
MODEL = "gpt-4-turbo"
# Create MCP server
mcp = FastMCP("Financial Analysis Server")
class StockAnalysisRequest(BaseModel):
ticker: str
time_period: str = "short-term" # short-term, medium-term, long-term
@mcp.tool()
@tracer.tool(name="MCP.analyze_stock") # this OpenInference call adds tracing to this method
def analyze_stock(request: StockAnalysisRequest) -> dict:
"""Analyzes a stock based on its ticker symbol and provides investment recommendations."""
# Make LLM API call to analyze the stock
prompt = f"""
Provide a detailed financial analysis for the stock ticker: {request.ticker}
Time horizon: {request.time_period}
Please include:
1. Company overview
2. Recent financial performance
3. Key metrics (P/E ratio, market cap, etc.)
4. Risk assessment
5. Investment recommendation
Format your response as a JSON object with the following structure:
{{
"ticker": "{request.ticker}",
"company_name": "Full company name",
"overview": "Brief company description",
"financial_performance": "Analysis of recent performance",
"key_metrics": {{
"market_cap": "Value in billions",
"pe_ratio": "Current P/E ratio",
"dividend_yield": "Current yield percentage",
"52_week_high": "Value",
"52_week_low": "Value"
}},
"risk_assessment": "Analysis of risks",
"recommendation": "Buy/Hold/Sell recommendation with explanation",
"time_horizon": "{request.time_period}"
}}
"""
response = client.chat.completions.create(
model=MODEL,
messages=[{"role": "user", "content": prompt}],
response_format={"type": "json_object"},
)
analysis = json.loads(response.choices[0].message.content)
return analysis
# ... define any additional MCP tools you wish
if __name__ == "__main__":
mcp.run()Sign up for Phoenix:
Sign up for an Arize Phoenix account at https://app.phoenix.arize.com/login
Click Create Space, then follow the prompts to create and launch your space.
Install packages:
pip install arize-phoenix-otelSet your Phoenix endpoint and API Key:
From your new Phoenix Space
Create your API key from the Settings page
Copy your Hostname from the Settings page
In your code, set your endpoint and API key:
import os
os.environ["PHOENIX_API_KEY"] = "ADD YOUR PHOENIX API KEY"
os.environ["PHOENIX_COLLECTOR_ENDPOINT"] = "ADD YOUR PHOENIX HOSTNAME"
# If you created your Phoenix Cloud instance before June 24th, 2025,
# you also need to set the API key as a header:
# os.environ["PHOENIX_CLIENT_HEADERS"] = f"api_key={os.getenv('PHOENIX_API_KEY')}"Launch your local Phoenix instance:
pip install arize-phoenix
phoenix serveFor details on customizing a local terminal deployment, see Terminal Setup.
Install packages:
pip install arize-phoenix-otelSet your Phoenix endpoint:
import os
os.environ["PHOENIX_COLLECTOR_ENDPOINT"] = "http://localhost:6006"See Terminal for more details.
Pull latest Phoenix image from Docker Hub:
docker pull arizephoenix/phoenix:latestRun your containerized instance:
docker run -p 6006:6006 arizephoenix/phoenix:latestThis will expose the Phoenix on localhost:6006
Install packages:
pip install arize-phoenix-otelSet your Phoenix endpoint:
import os
os.environ["PHOENIX_COLLECTOR_ENDPOINT"] = "http://localhost:6006"For more info on using Phoenix with Docker, see Docker.
Install packages:
pip install arize-phoenixLaunch Phoenix:
import phoenix as px
px.launch_app()docker pull arizephoenix/phoenix:latestdocker run -p 6006:6006 arizephoenix/phoenix:latestpip install arize-phoenix-otelimport os
os.environ["PHOENIX_COLLECTOR_ENDPOINT"] = "http://localhost:6006"pip install arize-phoeniximport phoenix as px
px.launch_app()pip install openinference-instrumentation-openai-agents openai-agentsexport OPENAI_API_KEY=[your_key_here]from phoenix.otel import register
# configure the Phoenix tracer
tracer_provider = register(
project_name="agents", # Default is 'default'
auto_instrument=True # Auto-instrument your app based on installed dependencies
)from agents import Agent, Runner
agent = Agent(name="Assistant", instructions="You are a helpful assistant")
result = Runner.run_sync(agent, "Write a haiku about recursion in programming.")
print(result.final_output)pip install arize-phoenix-otelpip install arize-phoenix
phoenix servepip install arize-phoenix-otelSign up for Phoenix:
Sign up for an Arize Phoenix account at https://app.phoenix.arize.com/login
Click Create Space, then follow the prompts to create and launch your space.
Install packages:
pip install arize-phoenix-otelSet your Phoenix endpoint and API Key:
From your new Phoenix Space
Create your API key from the Settings page
Copy your Hostname from the Settings page
In your code, set your endpoint and API key:
import os
os.environ["PHOENIX_API_KEY"] = "ADD YOUR PHOENIX API KEY"
os.environ["PHOENIX_COLLECTOR_ENDPOINT"] = "ADD YOUR PHOENIX HOSTNAME"
# If you created your Phoenix Cloud instance before June 24th, 2025,
# you also need to set the API key as a header:
# os.environ["PHOENIX_CLIENT_HEADERS"] = f"api_key={os.getenv('PHOENIX_API_KEY')}"Launch your local Phoenix instance:
pip install arize-phoenix
phoenix serveFor details on customizing a local terminal deployment, see Terminal Setup.
Install packages:
pip install arize-phoenix-otelSet your Phoenix endpoint:
import os
os.environ["PHOENIX_COLLECTOR_ENDPOINT"] = "http://localhost:6006"See Terminal for more details.
Pull latest Phoenix image from Docker Hub:
docker pull arizephoenix/phoenix:latestRun your containerized instance:
docker run -p 6006:6006 arizephoenix/phoenix:latestThis will expose the Phoenix on localhost:6006
Install packages:
pip install arize-phoenix-otelSet your Phoenix endpoint:
import os
os.environ["PHOENIX_COLLECTOR_ENDPOINT"] = "http://localhost:6006"For more info on using Phoenix with Docker, see Docker.
Install packages:
pip install arize-phoenixLaunch Phoenix:
import phoenix as px
px.launch_app()Evaluate multi-agent systems using Arize Phoenix, Google Evals, and CrewAI
This guide demonstrates how to evaluate multi-agent systems using Arize Phoenix, Google Gen AI Evals, and CrewAI. It shows how to:
Set up a multi-agent system using CrewAI for collaborative AI agents
Instrument the agents with Phoenix for tracing and monitoring
Evaluate agent performance and interactions using Google GenAI
Analyze the results using Arize Phoenix's observability platform
CrewAI: For orchestrating multi-agent systems
Arize Phoenix: For observability and tracing
Google Cloud Vertex AI: For model hosting and execution
OpenAI: For agent LLM capabilities
We will walk through the key steps in the documentation below. Check out the full tutorial here:
This crew consists of specialized agents working together to analyze and report on a given topic.
from crewai import Agent, Crew, Process, Task
#Define agents here (see full tutorial)
# Create tasks for your agents with explicit context
conduct_analysis_task = Task(
description=f"""Conduct a comprehensive analysis of the latest developments in {topic}.
Identify key trends, breakthrough technologies, and potential industry impacts.
Focus on both research breakthroughs and commercial applications.""",
expected_output="Full analysis report in bullet points with citations to sources",
agent=researcher,
context=[], # Explicitly set empty context
)
fact_checking_task = Task(
description=f"""Review the research findings and verify the accuracy of claims about {topic}.
Identify any potential ethical concerns or societal implications.
Highlight areas where hype may exceed reality and provide a balanced assessment.
Suggest frameworks that should be considered for each major advancement.""",
expected_output="Fact-checking report with verification status for each major claim",
agent=fact_checker,
context=[conduct_analysis_task], # Set context to previous task
)
# Instantiate your crew with a sequential process
crew = Crew(
agents=[researcher, fact_checker, writer],
tasks=[conduct_analysis_task, fact_checking_task, writer_task],
verbose=False,
process=Process.sequential,
)
return crewNext, you'll built an experiment set to test your CrewAI Crew with Phoenix and Google Gen AI evals.
When run, an Experiment will send each row of your dataset through your task, then apply each of your evaluators to the result.
All traces and metrics will then be stored in Phoenix for reference and comparison.
phoenix_client = px.Client()
try:
dataset = phoenix_client.get_dataset(name="crewai-researcher-test-topics")
except ValueError:
dataset = phoenix_client.upload_dataset(
dataframe=df,
dataset_name="crewai-researcher-test-topics",
input_keys=["topic"],
output_keys=["reference_trajectory"],
)This method will be run on each row of your test cases dataset:
def call_crew_with_topic(input):
crew = create_research_crew(topic=input.get("topic"))
result = crew.kickoff()
return resultDefine as many evaluators as you'd need to evaluate your agent. In this case, you'll use Google Gen AI's eval library to evaluate the crew's trajectory.
from vertexai.preview.evaluation import EvalTask
def eval_trajectory_with_google_gen_ai(
output, expected, metric_name="trajectory_exact_match"
) -> float:
eval_dataset = pd.DataFrame(
{
"predicted_trajectory": [create_trajectory_from_response(output)],
"reference_trajectory": [expected.get("reference_trajectory")],
}
)
eval_task = EvalTask(
dataset=eval_dataset,
metrics=[metric_name],
)
eval_result = eval_task.evaluate()
metric_value = eval_result.summary_metrics.get(f"{metric_name}/mean")
if metric_value is None:
return 0.0
return metric_value
def trajectory_exact_match(output, expected):
return eval_trajectory_with_google_gen_ai(
output, expected, metric_name="trajectory_exact_match"
)
def trajectory_precision(output, expected):
return eval_trajectory_with_google_gen_ai(
output, expected, metric_name="trajectory_precision"
)
import nest_asyncio
from phoenix.experiments import run_experiment
nest_asyncio.apply()
experiment = run_experiment(
dataset,
call_crew_with_topic,
experiment_name="agent-experiment",
evaluators=[
trajectory_exact_match,
trajectory_precision,
trajectory_in_order_match,
trajectory_any_order_match,
agent_names_match,
],
)Sign up for Phoenix:
Sign up for an Arize Phoenix account at https://app.phoenix.arize.com/login
Click Create Space, then follow the prompts to create and launch your space.
Install packages:
pip install arize-phoenix-otelSet your Phoenix endpoint and API Key:
From your new Phoenix Space
Create your API key from the Settings page
Copy your Hostname from the Settings page
In your code, set your endpoint and API key:
import os
os.environ["PHOENIX_API_KEY"] = "ADD YOUR PHOENIX API KEY"
os.environ["PHOENIX_COLLECTOR_ENDPOINT"] = "ADD YOUR PHOENIX HOSTNAME"
# If you created your Phoenix Cloud instance before June 24th, 2025,
# you also need to set the API key as a header:
# os.environ["PHOENIX_CLIENT_HEADERS"] = f"api_key={os.getenv('PHOENIX_API_KEY')}"Launch your local Phoenix instance:
pip install arize-phoenix
phoenix serveFor details on customizing a local terminal deployment, see Terminal Setup.
Install packages:
pip install arize-phoenix-otelSet your Phoenix endpoint:
import os
os.environ["PHOENIX_COLLECTOR_ENDPOINT"] = "http://localhost:6006"See Terminal for more details.
Pull latest Phoenix image from Docker Hub:
docker pull arizephoenix/phoenix:latestRun your containerized instance:
docker run -p 6006:6006 arizephoenix/phoenix:latestThis will expose the Phoenix on localhost:6006
Install packages:
pip install arize-phoenix-otelSet your Phoenix endpoint:
import os
os.environ["PHOENIX_COLLECTOR_ENDPOINT"] = "http://localhost:6006"For more info on using Phoenix with Docker, see Docker.
Install packages:
pip install arize-phoenixLaunch Phoenix:
import phoenix as px
px.launch_app()Sign up for Phoenix:
Sign up for an Arize Phoenix account at https://app.phoenix.arize.com/login
Click Create Space, then follow the prompts to create and launch your space.
Install packages:
pip install arize-phoenix-otelSet your Phoenix endpoint and API Key:
From your new Phoenix Space
Create your API key from the Settings page
Copy your Hostname from the Settings page
In your code, set your endpoint and API key:
import os
os.environ["PHOENIX_API_KEY"] = "ADD YOUR PHOENIX API KEY"
os.environ["PHOENIX_COLLECTOR_ENDPOINT"] = "ADD YOUR PHOENIX HOSTNAME"
# If you created your Phoenix Cloud instance before June 24th, 2025,
# you also need to set the API key as a header:
# os.environ["PHOENIX_CLIENT_HEADERS"] = f"api_key={os.getenv('PHOENIX_API_KEY')}"Launch your local Phoenix instance:
pip install arize-phoenix
phoenix serveFor details on customizing a local terminal deployment, see Terminal Setup.
Install packages:
pip install arize-phoenix-otelSet your Phoenix endpoint:
import os
os.environ["PHOENIX_COLLECTOR_ENDPOINT"] = "http://localhost:6006"See Terminal for more details.
Pull latest Phoenix image from Docker Hub:
docker pull arizephoenix/phoenix:latestRun your containerized instance:
docker run -p 6006:6006 arizephoenix/phoenix:latestThis will expose the Phoenix on localhost:6006
Install packages:
pip install arize-phoenix-otelSet your Phoenix endpoint:
import os
os.environ["PHOENIX_COLLECTOR_ENDPOINT"] = "http://localhost:6006"For more info on using Phoenix with Docker, see Docker.
Install packages:
pip install arize-phoenixLaunch Phoenix:
import phoenix as px
px.launch_app()LlamaIndex is an open-source framework that streamlines connecting, ingesting, indexing, and retrieving structured or unstructured data to power efficient, data-aware language model applications.
Weaviate is an open source, AI-native vector database.
Website: weaviate.io
Phoenix can be used to trace and evaluate applications that use Weaviate as a vector database.
Pinecone is a vector database that can be used to power RAG in various applications.
Website: pinecone.io
Phoenix can be used to trace and evaluate applications that use Pinecone as a vector database.


Ingesting Data for Semantic Search
This tutorial will show you how to embed a large volume of data, upload it to a vector database, run top K similarity searches against it, and monitor it in production using VectorFlow, Arize Phoenix, Weaviate and LlamaIndex.
Instrumenting and Evaluating a Weaviate RAG Pipeline
This tutorial serves as a great starting point to see how to manually instrument a RAG chatbot built on Weaviate, and visualize and evaluate the results in Phoenix.

RAG with LangChain and Pinecone
Build a RAG pipeline using Langchain and Pinecone


import os
# Add Phoenix API Key for tracing
PHOENIX_API_KEY = "ADD YOUR API KEY"
os.environ["PHOENIX_CLIENT_HEADERS"] = f"api_key={PHOENIX_API_KEY}"
os.environ["PHOENIX_COLLECTOR_ENDPOINT"] = "https://app.phoenix.arize.com"import os
os.environ["PHOENIX_COLLECTOR_ENDPOINT"] = "http://localhost:6006"Instrument and observe your DSPy application via the DSPyInstrumentor
DSPy is a framework for automatically prompting and fine-tuning language models. It provides composable and declarative APIs that allow developers to describe the architecture of their LLM application in the form of a "module" (inspired by PyTorch's nn.Module). It them compiles these modules using "teleprompters" that optimize the module for a particular task. The term "teleprompter" is meant to evoke "prompting at a distance," and could involve selecting few-shot examples, generating prompts, or fine-tuning language models.
Phoenix makes your DSPy applications observable by visualizing the underlying structure of each call to your compiled DSPy module.
Sign up for Phoenix:
Sign up for an Arize Phoenix account at
Click Create Space, then follow the prompts to create and launch your space.
Install packages:
Set your Phoenix endpoint and API Key:
From your new Phoenix Space
Create your API key from the Settings page
Copy your Hostname from the Settings page
In your code, set your endpoint and API key:
Launch your local Phoenix instance:
For details on customizing a local terminal deployment, see .
Install packages:
Set your Phoenix endpoint:
See for more details.
Pull latest Phoenix image from :
Run your containerized instance:
This will expose the Phoenix on localhost:6006
Install packages:
Set your Phoenix endpoint:
For more info on using Phoenix with Docker, see .
Install packages:
Launch Phoenix:
pip install openinference-instrumentation-dspy openinference-instrumentation-litellm dspyConnect to your Phoenix instance using the register function.
from phoenix.otel import register
# configure the Phoenix tracer
tracer_provider = register(
project_name="my-llm-app", # Default is 'default'
auto_instrument=True # Auto-instrument your app based on installed OI dependencies
)Now run invoke your compiled DSPy module. Your traces should appear inside of Phoenix.
class BasicQA(dspy.Signature):
"""Answer questions with short factoid answers."""
question = dspy.InputField()
answer = dspy.OutputField(desc="often between 1 and 5 words")
if __name__ == "__main__":
turbo = dspy.OpenAI(model="gpt-3.5-turbo")
dspy.settings.configure(lm=turbo)
with using_attributes(
session_id="my-test-session",
user_id="my-test-user",
metadata={
"test-int": 1,
"test-str": "string",
"test-list": [1, 2, 3],
"test-dict": {
"key-1": "val-1",
"key-2": "val-2",
},
},
tags=["tag-1", "tag-2"],
prompt_template_version="v1.0",
prompt_template_variables={
"city": "Johannesburg",
"date": "July 11th",
},
):
# Define the predictor.
generate_answer = dspy.Predict(BasicQA)
# Call the predictor on a particular input.
pred = generate_answer(
question="What is the capital of the united states?" # noqa: E501
) # noqa: E501
print(f"Predicted Answer: {pred.answer}")Now that you have tracing setup, all predictions will be streamed to your running Phoenix for observability and evaluation.
How to use the python LlamaIndexInstrumentor to trace LlamaIndex
LlamaIndex is a data framework for your LLM application. It's a powerful framework by which you can build an application that leverages RAG (retrieval-augmented generation) to super-charge an LLM with your own data. RAG is an extremely powerful LLM application model because it lets you harness the power of LLMs such as OpenAI's GPT but tuned to your data and use-case.
For LlamaIndex, tracing instrumentation is added via an OpenTelemetry instrumentor aptly named the LlamaIndexInstrumentor . This callback is what is used to create spans and send them to the Phoenix collector.
Phoenix supports LlamaIndex's latest instrumentation paradigm. This paradigm requires LlamaIndex >= 0.10.43. For legacy support, see below.
Sign up for Phoenix:
Sign up for an Arize Phoenix account at
Click Create Space, then follow the prompts to create and launch your space.
Install packages:
Set your Phoenix endpoint and API Key:
From your new Phoenix Space
Create your API key from the Settings page
Copy your Hostname from the Settings page
In your code, set your endpoint and API key:
Launch your local Phoenix instance:
For details on customizing a local terminal deployment, see .
Install packages:
Set your Phoenix endpoint:
See for more details.
Pull latest Phoenix image from :
Run your containerized instance:
This will expose the Phoenix on localhost:6006
Install packages:
Set your Phoenix endpoint:
For more info on using Phoenix with Docker, see .
Install packages:
Launch Phoenix:
pip install openinference-instrumentation-llama_index llama-index>=0.11.0Initialize the LlamaIndexInstrumentor before your application code.
from openinference.instrumentation.llama_index import LlamaIndexInstrumentor
from phoenix.otel import register
tracer_provider = register()
LlamaIndexInstrumentor().instrument(tracer_provider=tracer_provider)You can now use LlamaIndex as normal, and tracing will be automatically captured and sent to your Phoenix instance.
from llama_index.core import VectorStoreIndex, SimpleDirectoryReader
import os
os.environ["OPENAI_API_KEY"] = "YOUR OPENAI API KEY"
documents = SimpleDirectoryReader("data").load_data()
index = VectorStoreIndex.from_documents(documents)
query_engine = index.as_query_engine()
response = query_engine.query("Some question about the data should go here")
print(response)View your traces in Phoenix:
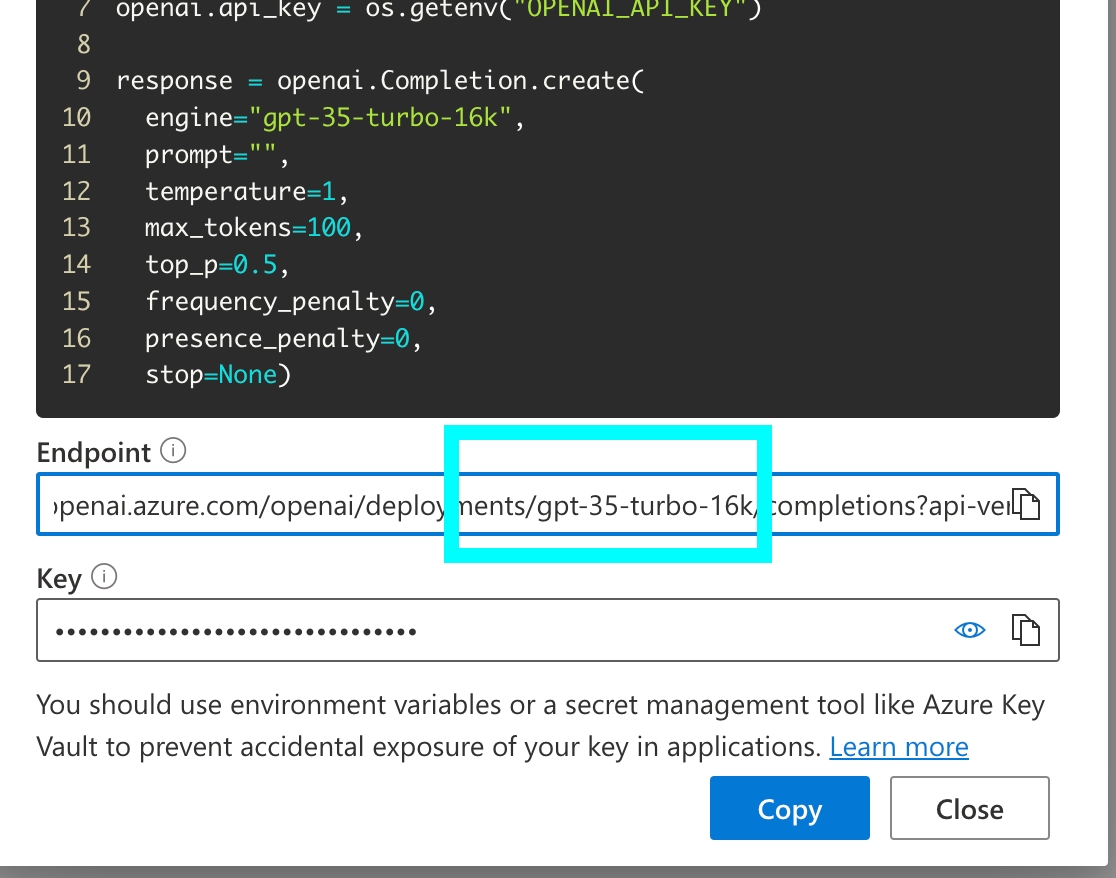
pip install arize-phoenix-otelimport os
os.environ["PHOENIX_API_KEY"] = "ADD YOUR PHOENIX API KEY"
os.environ["PHOENIX_COLLECTOR_ENDPOINT"] = "ADD YOUR PHOENIX HOSTNAME"
# If you created your Phoenix Cloud instance before June 24th, 2025,
# you also need to set the API key as a header:
# os.environ["PHOENIX_CLIENT_HEADERS"] = f"api_key={os.getenv('PHOENIX_API_KEY')}"pip install arize-phoenix
phoenix servepip install arize-phoenix-otelimport os
os.environ["PHOENIX_COLLECTOR_ENDPOINT"] = "http://localhost:6006"docker pull arizephoenix/phoenix:latestdocker run -p 6006:6006 arizephoenix/phoenix:latestpip install arize-phoenix-otelimport os
os.environ["PHOENIX_COLLECTOR_ENDPOINT"] = "http://localhost:6006"pip install arize-phoeniximport phoenix as px
px.launch_app()pip install arize-phoenix-otelimport os
os.environ["PHOENIX_API_KEY"] = "ADD YOUR PHOENIX API KEY"
os.environ["PHOENIX_COLLECTOR_ENDPOINT"] = "ADD YOUR PHOENIX HOSTNAME"
# If you created your Phoenix Cloud instance before June 24th, 2025,
# you also need to set the API key as a header:
# os.environ["PHOENIX_CLIENT_HEADERS"] = f"api_key={os.getenv('PHOENIX_API_KEY')}"pip install arize-phoenix
phoenix servepip install arize-phoenix-otelimport os
os.environ["PHOENIX_COLLECTOR_ENDPOINT"] = "http://localhost:6006"docker pull arizephoenix/phoenix:latestdocker run -p 6006:6006 arizephoenix/phoenix:latestpip install arize-phoenix-otelimport os
os.environ["PHOENIX_COLLECTOR_ENDPOINT"] = "http://localhost:6006"pip install arize-phoeniximport phoenix as px
px.launch_app()
How to use Pydantic Evals with Phoenix to evaluate AI applications using structured evaluation frameworks
Pydantic Evals is an evaluation library that provides preset direct evaluations and LLM Judge evaluations. It can be used to run evaluations over dataframes of cases defined with Pydantic models. This guide shows you how to use Pydantic Evals alongside Arize Phoenix to run evaluations on traces captured from your running application.
Sign up for Phoenix:
Sign up for an Arize Phoenix account at https://app.phoenix.arize.com/login
Install packages:
pip install arize-phoenix-otelSet your Phoenix endpoint and API Key:
import os
# Add Phoenix API Key for tracing
PHOENIX_API_KEY = "ADD YOUR API KEY"
os.environ["PHOENIX_CLIENT_HEADERS"] = f"api_key={PHOENIX_API_KEY}"
os.environ["PHOENIX_COLLECTOR_ENDPOINT"] = "https://app.phoenix.arize.com"Your Phoenix API key can be found on the Keys section of your dashboard.
Launch your local Phoenix instance:
pip install arize-phoenix
phoenix serveFor details on customizing a local terminal deployment, see Terminal Setup.
Install packages:
pip install arize-phoenix-otelSet your Phoenix endpoint:
import os
os.environ["PHOENIX_COLLECTOR_ENDPOINT"] = "http://localhost:6006"See Terminal for more details
Pull latest Phoenix image from Docker Hub:
docker pull arizephoenix/phoenix:latestRun your containerized instance:
docker run -p 6006:6006 arizephoenix/phoenix:latestThis will expose the Phoenix on localhost:6006
Install packages:
pip install arize-phoenix-otelSet your Phoenix endpoint:
import os
os.environ["PHOENIX_COLLECTOR_ENDPOINT"] = "http://localhost:6006"For more info on using Phoenix with Docker, see Docker.
Install packages:
pip install arize-phoenixLaunch Phoenix:
import phoenix as px
px.launch_app()pip install pydantic-evals arize-phoenix openai openinference-instrumentation-openaiEnable Phoenix tracing to capture traces from your application:
from phoenix.otel import register
tracer_provider = register(
project_name="pydantic-evals-tutorial",
auto_instrument=True, # Automatically instrument OpenAI calls
)First, create some example traces by running your AI application. Here's a simple example:
from openai import OpenAI
import os
client = OpenAI()
inputs = [
"What is the capital of France?",
"Who wrote Romeo and Juliet?",
"What is the largest planet in our solar system?",
]
def generate_trace(input):
client.chat.completions.create(
model="gpt-4o-mini",
messages=[
{
"role": "system",
"content": "You are a helpful assistant. Only respond with the answer to the question as a single word or proper noun.",
},
{"role": "user", "content": input},
],
)
for input in inputs:
generate_trace(input)Export the traces you want to evaluate:
import phoenix as px
from phoenix.trace.dsl import SpanQuery
query = SpanQuery().select(
input="llm.input_messages",
output="llm.output_messages",
)
# Query spans from Phoenix
spans = px.Client().query_spans(query, project_name="pydantic-evals-tutorial")
spans["input"] = spans["input"].apply(lambda x: x[1].get("message").get("content"))
spans["output"] = spans["output"].apply(lambda x: x[0].get("message").get("content"))Create a dataset of test cases using Pydantic Evals:
from pydantic_evals import Case, Dataset
cases = [
Case(
name="capital of France",
inputs="What is the capital of France?",
expected_output="Paris"
),
Case(
name="author of Romeo and Juliet",
inputs="Who wrote Romeo and Juliet?",
expected_output="William Shakespeare",
),
Case(
name="largest planet",
inputs="What is the largest planet in our solar system?",
expected_output="Jupiter",
),
]Define evaluators to assess your model's performance:
from pydantic_evals.evaluators import Evaluator, EvaluatorContext
class MatchesExpectedOutput(Evaluator[str, str]):
def evaluate(self, ctx: EvaluatorContext[str, str]) -> float:
is_correct = ctx.expected_output == ctx.output
return is_correct
class FuzzyMatchesOutput(Evaluator[str, str]):
def evaluate(self, ctx: EvaluatorContext[str, str]) -> float:
from difflib import SequenceMatcher
def similarity_ratio(a, b):
return SequenceMatcher(None, a, b).ratio()
# Consider it correct if similarity is above 0.8 (80%)
is_correct = similarity_ratio(ctx.expected_output, ctx.output) > 0.8
return is_correctCreate a task that retrieves outputs from your traced data:
import nest_asyncio
nest_asyncio.apply()
async def task(input: str) -> str:
output = spans[spans["input"] == input]["output"].values[0]
return output
# Create dataset with evaluators
dataset = Dataset(
cases=cases,
evaluators=[MatchesExpectedOutput(), FuzzyMatchesOutput()],
)For more sophisticated evaluation, add an LLM judge:
from pydantic_evals.evaluators import LLMJudge
dataset.add_evaluator(
LLMJudge(
rubric="Output and Expected Output should represent the same answer, even if the text doesn't match exactly",
include_input=True,
model="openai:gpt-4o-mini",
),
)Execute the evaluation:
report = dataset.evaluate_sync(task)
print(report)Upload your evaluation results back to Phoenix for visualization:
from phoenix.trace import SpanEvaluations
# Extract results from the report
results = report.model_dump()
# Create dataframes for each evaluator
meo_spans = spans.copy()
fuzzy_label_spans = spans.copy()
llm_label_spans = spans.copy()
for case in results.get("cases"):
# Extract evaluation results
meo_label = case.get("assertions").get("MatchesExpectedOutput").get("value")
fuzzy_label = case.get("assertions").get("FuzzyMatchesOutput").get("value")
llm_label = case.get("assertions").get("LLMJudge").get("value")
input = case.get("inputs")
# Update labels in dataframes
meo_spans.loc[meo_spans["input"] == input, "label"] = str(meo_label)
fuzzy_label_spans.loc[fuzzy_label_spans["input"] == input, "label"] = str(fuzzy_label)
llm_label_spans.loc[llm_label_spans["input"] == input, "label"] = str(llm_label)
# Add scores for Phoenix metrics
meo_spans["score"] = meo_spans["label"].apply(lambda x: 1 if x == "True" else 0)
fuzzy_label_spans["score"] = fuzzy_label_spans["label"].apply(lambda x: 1 if x == "True" else 0)
llm_label_spans["score"] = llm_label_spans["label"].apply(lambda x: 1 if x == "True" else 0)
# Upload to Phoenix
px.Client().log_evaluations(
SpanEvaluations(
dataframe=meo_spans,
eval_name="Direct Match Eval",
),
SpanEvaluations(
dataframe=fuzzy_label_spans,
eval_name="Fuzzy Match Eval",
),
SpanEvaluations(
dataframe=llm_label_spans,
eval_name="LLM Match Eval",
),
)You can create more complex evaluation workflows by combining multiple evaluators:
from pydantic_evals.evaluators import Evaluator, EvaluatorContext
from typing import Dict, Any
class ComprehensiveEvaluator(Evaluator[str, str]):
def evaluate(self, ctx: EvaluatorContext[str, str]) -> Dict[str, Any]:
# Multiple evaluation criteria
exact_match = ctx.expected_output == ctx.output
# Length similarity
length_ratio = min(len(ctx.output), len(ctx.expected_output)) / max(len(ctx.output), len(ctx.expected_output))
# Semantic similarity (simplified)
from difflib import SequenceMatcher
semantic_score = SequenceMatcher(None, ctx.expected_output.lower(), ctx.output.lower()).ratio()
return {
"exact_match": exact_match,
"length_similarity": length_ratio,
"semantic_similarity": semantic_score,
"overall_score": (exact_match * 0.5) + (semantic_score * 0.3) + (length_ratio * 0.2)
}Once you have evaluation results uploaded to Phoenix, you can:
View evaluation metrics: See overall performance across different evaluation criteria
Analyze individual cases: Drill down into specific examples that passed or failed
Compare evaluators: Understand how different evaluation methods perform
Track improvements: Monitor evaluation scores over time as you improve your application
Debug failures: Identify patterns in failed evaluations to guide improvements
The Phoenix UI will display your evaluation results with detailed breakdowns, making it easy to understand your AI application's performance and identify areas for improvement.
Sign up for an Arize Phoenix account at https://app.phoenix.arize.com/login
Grab your API key from the Keys option on the left bar.
In your code, configure environment variables for your endpoint and API key:
# .env, or shell environment
# Add Phoenix API Key for tracing
PHOENIX_API_KEY="ADD YOUR PHOENIX API KEY"
# And Collector Endpoint for Phoenix Cloud
PHOENIX_COLLECTOR_ENDPOINT="ADD YOUR PHOENIX HOSTNAME"Run Phoenix using Docker, local terminal, Kubernetes etc. For more information, see self-hosting.
In your code, configure environment variables for your endpoint and API key:
# .env, or shell environment
# Collector Endpoint for your self hosted Phoenix, like localhost
PHOENIX_COLLECTOR_ENDPOINT="http://localhost:6006"
# (optional) If authentication enabled, add Phoenix API Key for tracing
PHOENIX_API_KEY="ADD YOUR API KEY"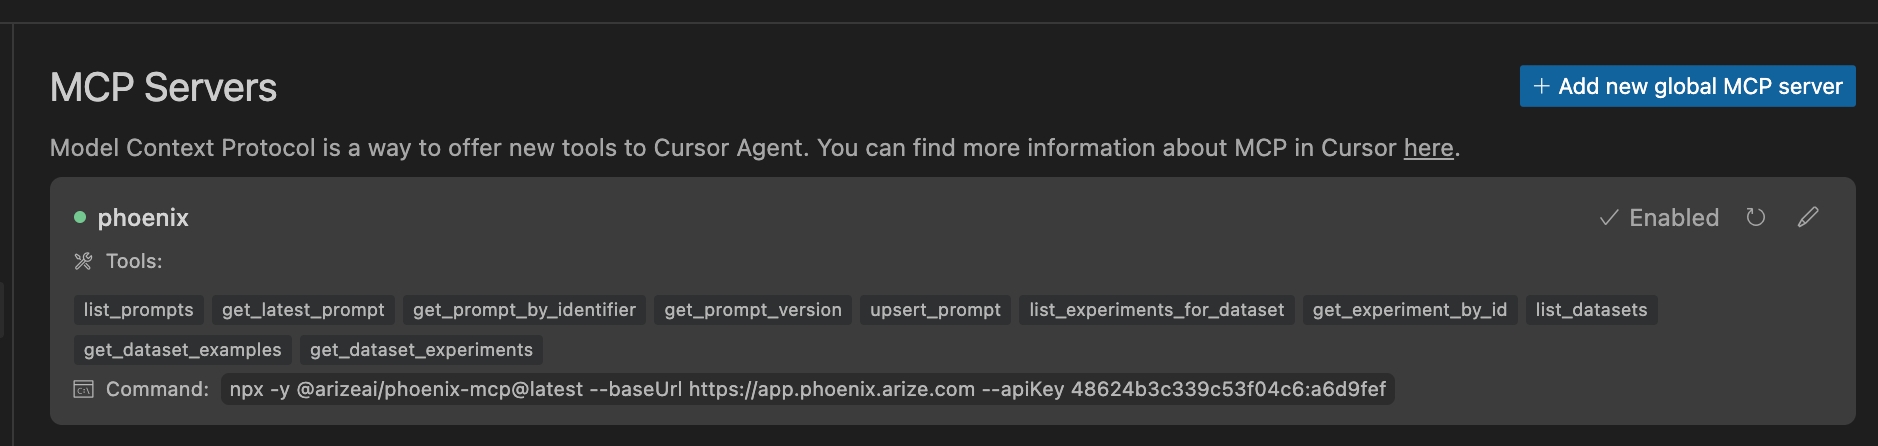
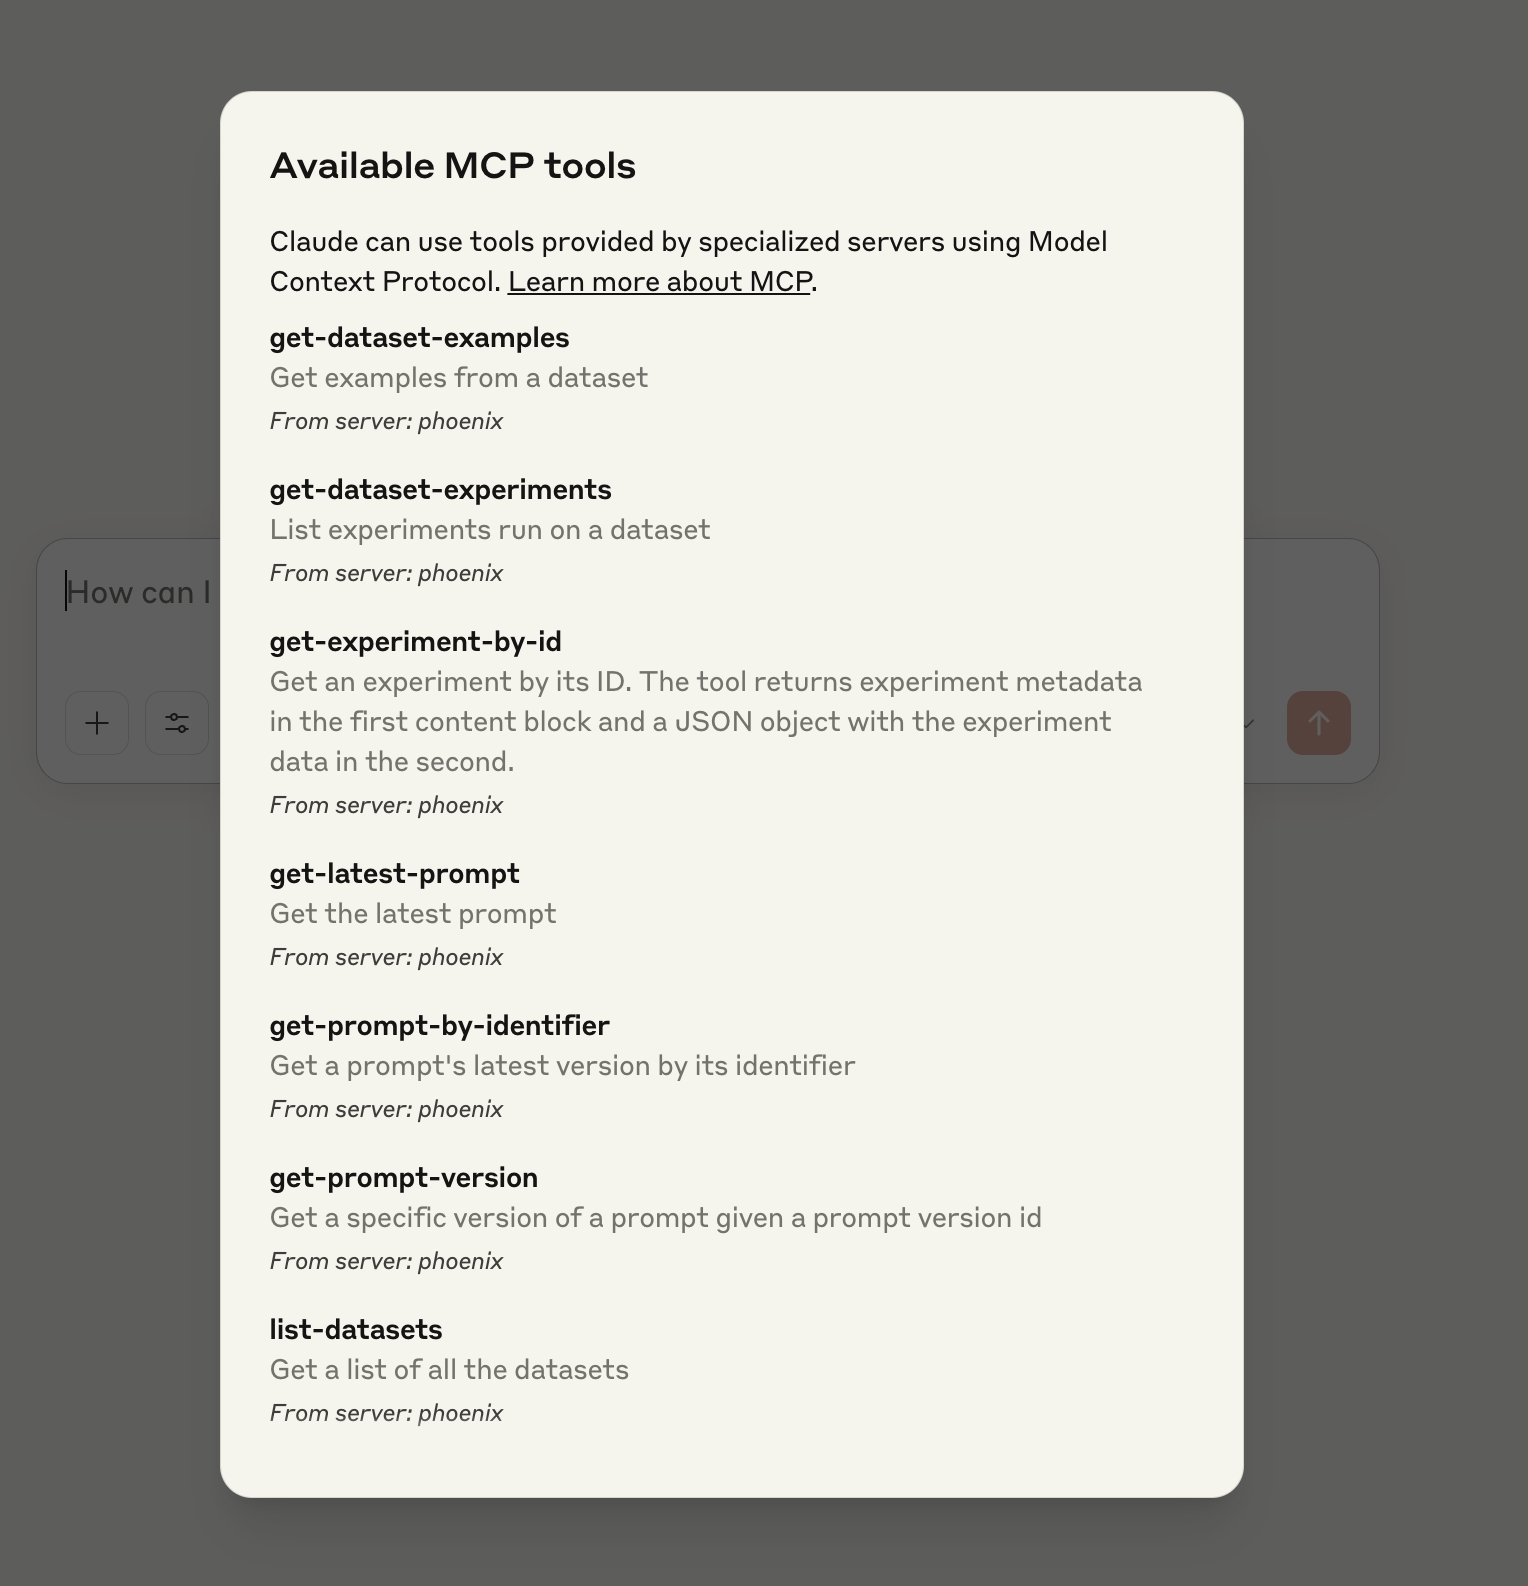

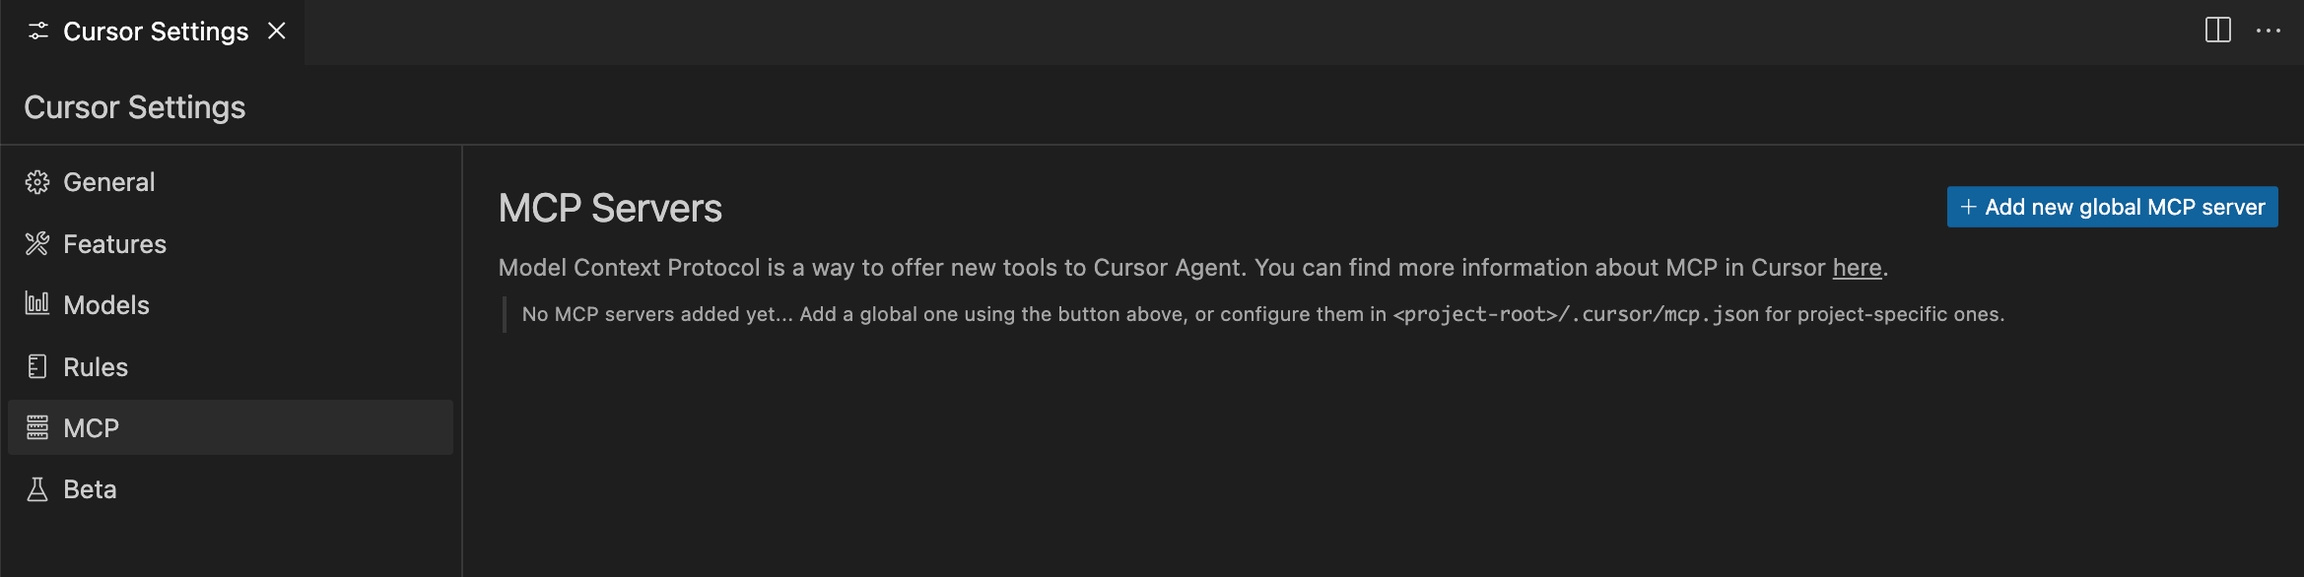
How to use the python PydanticAIInstrumentor to trace PydanticAI agents
PydanticAI is a Python agent framework designed to make it less painful to build production-grade applications with Generative AI. Built by the team behind Pydantic, it provides a clean, type-safe way to build AI agents with structured outputs.
Sign up for Phoenix:
Sign up for an Arize Phoenix account at
Click Create Space, then follow the prompts to create and launch your space.
Install packages:
Set your Phoenix endpoint and API Key:
From your new Phoenix Space
Create your API key from the Settings page
Copy your Hostname from the Settings page
In your code, set your endpoint and API key:
Launch your local Phoenix instance:
For details on customizing a local terminal deployment, see .
Install packages:
Set your Phoenix endpoint:
See for more details.
Pull latest Phoenix image from :
Run your containerized instance:
This will expose the Phoenix on localhost:6006
Install packages:
Set your Phoenix endpoint:
For more info on using Phoenix with Docker, see .
Install packages:
Launch Phoenix:
pip install openinference-instrumentation-pydantic-ai pydantic-ai opentelemetry-sdk opentelemetry-exporter-otlp opentelemetry-apiSet up tracing using OpenTelemetry and the PydanticAI instrumentation:
import os
from opentelemetry import trace
from opentelemetry.exporter.otlp.proto.http.trace_exporter import OTLPSpanExporter
from opentelemetry.sdk.trace import TracerProvider
from openinference.instrumentation.pydantic_ai import OpenInferenceSpanProcessor
from opentelemetry.sdk.trace.export import SimpleSpanProcessor
# Set up the tracer provider
tracer_provider = TracerProvider()
trace.set_tracer_provider(tracer_provider)
# Add the OpenInference span processor
endpoint = f"{os.environ['PHOENIX_COLLECTOR_ENDPOINT']}/v1/traces"
# If you are using a local instance without auth, ignore these headers
headers = {"Authorization": f"Bearer {os.environ['PHOENIX_API_KEY']}"}
exporter = OTLPSpanExporter(endpoint=endpoint, headers=headers)
tracer_provider.add_span_processor(OpenInferenceSpanProcessor())
tracer_provider.add_span_processor(SimpleSpanProcessor(exporter))Here's a simple example using PydanticAI with automatic tracing:
from pydantic import BaseModel
from pydantic_ai import Agent
from pydantic_ai.models.openai import OpenAIModel
import nest_asyncio
nest_asyncio.apply()
# Set your OpenAI API key
os.environ["OPENAI_API_KEY"] = "YOUR_OPENAI_API_KEY"
# Define your Pydantic model
class LocationModel(BaseModel):
city: str
country: str
# Create and configure the agent
model = OpenAIModel("gpt-4", provider='openai')
agent = Agent(model, output_type=LocationModel, instrument=True)
# Run the agent
result = agent.run_sync("The windy city in the US of A.")
print(result)from pydantic import BaseModel, Field
from pydantic_ai import Agent, RunContext
from pydantic_ai.models.openai import OpenAIModel
from typing import List
import httpx
class WeatherInfo(BaseModel):
location: str
temperature: float = Field(description="Temperature in Celsius")
condition: str
humidity: int = Field(description="Humidity percentage")
# Create an agent with system prompts and tools
weather_agent = Agent(
model=OpenAIModel("gpt-4"),
output_type=WeatherInfo,
system_prompt="You are a helpful weather assistant. Always provide accurate weather information.",
instrument=True
)
@weather_agent.tool
async def get_weather_data(ctx: RunContext[None], location: str) -> str:
"""Get current weather data for a location."""
# Mock weather API call - replace with actual weather service
async with httpx.AsyncClient() as client:
# This is a placeholder - use a real weather API
mock_data = {
"temperature": 22.5,
"condition": "partly cloudy",
"humidity": 65
}
return f"Weather in {location}: {mock_data}"
# Run the agent with tool usage
result = weather_agent.run_sync("What's the weather like in Paris?")
print(result)Now that you have tracing setup, all PydanticAI agent operations will be streamed to your running Phoenix instance for observability and evaluation. You'll be able to see:
Agent interactions: Complete conversations between your application and the AI model
Structured outputs: Pydantic model validation and parsing results
Tool usage: When agents call external tools and their responses
Performance metrics: Response times, token usage, and success rates
Error handling: Validation errors, API failures, and retry attempts
Multi-agent workflows: Complex interactions between multiple agents
The traces will provide detailed insights into your AI agent behaviors, making it easier to debug issues, optimize performance, and ensure reliability in production.
Auto-instrument and observe BeeAI agents
This module provides automatic instrumentation for . It integrates seamlessly with the package to collect and export telemetry data.
To instrument your application, import and enable BeeAIInstrumentation. Create the instrumentation.js file:
Sample agent built using BeeAI with automatic tracing:
Phoenix provides visibility into your BeeAI agent operations by automatically tracing all interactions.
Add the following at the top of your instrumentation.js to see OpenTelemetry diagnostic logs in your console while debugging:
If traces aren't appearing, a common cause is an outdated beeai-framework package. Check the diagnostic logs for version or initialization errors and update your package as needed.
You can specify a custom tracer provider for BeeAI instrumentation in multiple ways:
pip install arize-phoenix-otelimport os
os.environ["PHOENIX_API_KEY"] = "ADD YOUR PHOENIX API KEY"
os.environ["PHOENIX_COLLECTOR_ENDPOINT"] = "ADD YOUR PHOENIX HOSTNAME"
# If you created your Phoenix Cloud instance before June 24th, 2025,
# you also need to set the API key as a header:
# os.environ["PHOENIX_CLIENT_HEADERS"] = f"api_key={os.getenv('PHOENIX_API_KEY')}"pip install arize-phoenix
phoenix servepip install arize-phoenix-otelimport os
os.environ["PHOENIX_COLLECTOR_ENDPOINT"] = "http://localhost:6006"docker pull arizephoenix/phoenix:latestdocker run -p 6006:6006 arizephoenix/phoenix:latestpip install arize-phoenix-otelimport os
os.environ["PHOENIX_COLLECTOR_ENDPOINT"] = "http://localhost:6006"pip install arize-phoeniximport phoenix as px
px.launch_app()npm install --save beeai-framework \
@arizeai/openinference-instrumentation-beeai \
@arizeai/openinference-semantic-conventions \
@opentelemetry/sdk-trace-node \
@opentelemetry/resources \
@opentelemetry/exporter-trace-otlp-proto \
@opentelemetry/semantic-conventions \
@opentelemetry/instrumentationimport {
NodeTracerProvider,
SimpleSpanProcessor,
ConsoleSpanExporter,
} from "@opentelemetry/sdk-trace-node";
import { diag, DiagConsoleLogger, DiagLogLevel } from "@opentelemetry/api";
import { resourceFromAttributes } from "@opentelemetry/resources";
import { OTLPTraceExporter } from "@opentelemetry/exporter-trace-otlp-proto";
import { ATTR_SERVICE_NAME } from "@opentelemetry/semantic-conventions";
import { SEMRESATTRS_PROJECT_NAME } from "@arizeai/openinference-semantic-conventions";
import * as beeaiFramework from "beeai-framework";
import { registerInstrumentations } from "@opentelemetry/instrumentation";
import { BeeAIInstrumentation } from "@arizeai/openinference-instrumentation-beeai";
const COLLECTOR_ENDPOINT = "your-phoenix-collector-endpoint";
const provider = new NodeTracerProvider({
resource: resourceFromAttributes({
[ATTR_SERVICE_NAME]: "beeai-project",
[SEMRESATTRS_PROJECT_NAME]: "beeai-project",
}),
spanProcessors: [
new SimpleSpanProcessor(new ConsoleSpanExporter()),
new SimpleSpanProcessor(
new OTLPTraceExporter({
url: `${COLLECTOR_ENDPOINT}/v1/traces`,
// (optional) if connecting to Phoenix with Authentication enabled
headers: { Authorization: `Bearer ${process.env.PHOENIX_API_KEY}` },
}),
),
],
});
provider.register();
const beeAIInstrumentation = new BeeAIInstrumentation();
beeAIInstrumentation.manuallyInstrument(beeaiFramework);
registerInstrumentations({
instrumentations: [beeAIInstrumentation],
});
console.log("👀 OpenInference initialized");import "./instrumentation.js";
import { ToolCallingAgent } from "beeai-framework/agents/toolCalling/agent";
import { TokenMemory } from "beeai-framework/memory/tokenMemory";
import { DuckDuckGoSearchTool } from "beeai-framework/tools/search/duckDuckGoSearch";
import { OpenMeteoTool } from "beeai-framework/tools/weather/openMeteo";
import { OpenAIChatModel } from "beeai-framework/adapters/openai/backend/chat";
const llm = new OpenAIChatModel(
"gpt-4o",
{},
{ apiKey: 'your-openai-api-key' }
);
const agent = new ToolCallingAgent({
llm,
memory: new TokenMemory(),
tools: [
new DuckDuckGoSearchTool(),
new OpenMeteoTool(), // weather tool
],
});
async function main() {
const response = await agent.run({ prompt: "What's the current weather in Berlin?" });
console.log(`Agent 🤖 : `, response.result.text);
}
main();import { diag, DiagConsoleLogger, DiagLogLevel } from "@opentelemetry/api";
// Enable OpenTelemetry diagnostic logging
diag.setLogger(new DiagConsoleLogger(), DiagLogLevel.INFO);const beeAIInstrumentation = new BeeAIInstrumentation({
tracerProvider: customTracerProvider,
});
beeAIInstrumentation.manuallyInstrument(beeaiFramework);const beeAIInstrumentation = new BeeAIInstrumentation();
beeAIInstrumentation.setTracerProvider(customTracerProvider);
beeAIInstrumentation.manuallyInstrument(beeaiFramework);const beeAIInstrumentation = new BeeAIInstrumentation();
beeAIInstrumentation.manuallyInstrument(beeaiFramework);
registerInstrumentations({
instrumentations: [beeAIInstrumentation],
tracerProvider: customTracerProvider,
});This package provides a set of utilities to ingest Vercel AI SDK(>= 3.3) spans into platforms like Arize and Phoenix.
Note: This package requires you to be using the Vercel AI SDK version 3.3 or higher.
npm i --save @arizeai/openinference-vercelYou will also need to install OpenTelemetry packages into your project.
npm i --save @arizeai/openinference-semantic-conventions @opentelemetry/api @opentelemetry/exporter-trace-otlp-proto @opentelemetry/resources @opentelemetry/sdk-trace-node @opentelemetry/semantic-conventions@arizeai/openinference-vercel provides a set of utilities to help you ingest Vercel AI SDK spans into OpenTelemetry compatible platforms and works in conjunction with Vercel's AI SDK OpenTelemetry support. @arizeai/openinference-vercel works with typical node projects, as well as Next.js projects. This page will describe usage within a node project, for detailed usage instructions in Next.js follow Vercel's guide on instrumenting Next.js.
To process your Vercel AI SDK Spans, setup a typical OpenTelemetry instrumentation boilerplate file, add a OpenInferenceSimpleSpanProcessor or OpenInferenceBatchSpanProcessor to your OpenTelemetry configuration.
Note: The
OpenInferenceSpanProcessoralone does not handle the exporting of spans so you will need to pass it an exporter as a parameter.
Here are two example instrumentation configurations:
Manual instrumentation config for a Node v23+ application.
Next.js register function utilizing @vercel/otel .
// instrumentation.ts
// Node environment instrumentation
// Boilerplate imports
import { diag, DiagConsoleLogger, DiagLogLevel } from "@opentelemetry/api";
import { OTLPTraceExporter } from "@opentelemetry/exporter-trace-otlp-proto";
import { resourceFromAttributes } from "@opentelemetry/resources";
import { NodeTracerProvider } from "@opentelemetry/sdk-trace-node";
import { ATTR_SERVICE_NAME } from "@opentelemetry/semantic-conventions";
// OpenInference Vercel imports
import { SEMRESATTRS_PROJECT_NAME } from "@arizeai/openinference-semantic-conventions";
import { OpenInferenceSimpleSpanProcessor } from "@arizeai/openinference-vercel";
diag.setLogger(new DiagConsoleLogger(), DiagLogLevel.ERROR);
// e.g. http://localhost:6006
// e.g. https://app.phoenix.arize.com/s/<your-space>
const COLLECTOR_ENDPOINT = process.env.PHOENIX_COLLECTOR_ENDPOINT;
// The project name that may appear in your collector's interface
const SERVICE_NAME = "phoenix-vercel-ai-sdk-app";
export const provider = new NodeTracerProvider({
resource: resourceFromAttributes({
[ATTR_SERVICE_NAME]: SERVICE_NAME,
[SEMRESATTRS_PROJECT_NAME]: SERVICE_NAME,
}),
spanProcessors: [
// In production-like environments it is recommended to use
// OpenInferenceBatchSpanProcessor instead
new OpenInferenceSimpleSpanProcessor({
exporter: new OTLPTraceExporter({
url: `${COLLECTOR_ENDPOINT}/v1/traces`,
// (optional) if connecting to a collector with Authentication enabled
headers: { Authorization: `Bearer ${process.env.PHOENIX_API_KEY}` },
}),
}),
],
});
provider.register();
console.log("Provider registered");
// Run this file before the rest of program execution
// e.g node --import ./instrumentation.ts index.ts
// or at the top of your application's entrypoint
// e.g. import "instrumentation.ts"; // instrumentation.ts
// Vercel / Next.js environment instrumentation
import { registerOTel, OTLPHttpProtoTraceExporter } from "@vercel/otel";
import {
isOpenInferenceSpan,
OpenInferenceSimpleSpanProcessor,
} from "@arizeai/openinference-vercel";
import { SEMRESATTRS_PROJECT_NAME } from "@arizeai/openinference-semantic-conventions";
import { diag, DiagConsoleLogger, DiagLogLevel } from "@opentelemetry/api";
diag.setLogger(new DiagConsoleLogger(), DiagLogLevel.ERROR);
// e.g. http://localhost:6006
// e.g. https://app.phoenix.arize.com/s/<your-space>
const COLLECTOR_ENDPOINT = process.env.PHOENIX_COLLECTOR_ENDPOINT;
// The project name that may appear in your collector's interface
const SERVICE_NAME = "phoenix-vercel-ai-sdk-app";
/**
* Register function used by Next.js to instantiate instrumentation
* correctly in all environments that Next.js can be deployed to
*/
export function register() {
registerOTel({
serviceName: SERVICE_NAME,
attributes: {
[SEMRESATTRS_PROJECT_NAME]: SERVICE_NAME,
},
spanProcessors: [
new OpenInferenceSimpleSpanProcessor({
exporter: new OTLPHttpProtoTraceExporter({
url: `${COLLECTOR_ENDPOINT}/v1/traces`,
}),
spanFilter: isOpenInferenceSpan,
}),
],
});
console.log("Provider registered");
}See Vercel's instrumentation guide for more details on configuring your instrumentation file and @vercel/otel within a Next.js project
Now enable telemetry in your AI SDK calls by setting the experimental_telemetry parameter to true.
import { generateText } from "ai";
import { openai } from "@ai-sdk/openai";
const result = await generateText({
model: openai("gpt-4o"),
prompt: "Write a short story about a cat.",
experimental_telemetry: { isEnabled: true },
});Ensure your installed version of @opentelemetry/api matches the version installed by ai otherwise the ai sdk will not emit traces to the TracerProvider that you configure. If you install ai before other the packages, then dependency resolution in your package manager should install the correct version.
For details on Vercel AI SDK telemetry see the Vercel AI SDK Telemetry documentation.
To see an example go to the Next.js OpenAI Telemetry Example in the OpenInference repo.
For more information on Vercel OpenTelemetry support see the Vercel AI SDK Telemetry documentation.