

In today’s rapidly evolving AI landscape, effective observability into agent systems has become a critical requirement for enterprise applications. This technical guide explores the newly announced integration between Arize AI and Amazon Bedrock Agents, which provides developers with powerful capabilities for tracing, evaluating, and monitoring AI agent applications.
Understanding the Integration Components
Amazon Bedrock Agents provides a fully managed framework for building AI agents capable of understanding natural language requests, breaking down complex tasks, retrieving information, and taking actions across enterprise systems and APIs. The framework streamlines agent orchestration, allowing developers to focus on designing robust agent capabilities.
Arize AI delivers comprehensive observability tools specifically designed for AI applications. The platform is available in two versions:
- Arize AX: An enterprise solution offering advanced monitoring capabilities
- Arize Phoenix: An open-source platform making tracing and evaluation accessible to all developers
The integration between Arize AI and Amazon Bedrock Agents delivers three primary benefits:
- Comprehensive Traceability: Gain visibility into every step of your agent’s execution path, from initial user query through knowledge retrieval and action execution
- Systematic Evaluation Framework: Apply consistent evaluation methodologies to measure and understand agent performance
- Data-Driven Optimization: Run structured experiments to compare different agent configurations and identify optimal settings
Technical Implementation Guide
This walkthrough will focus on using Phoenix, Arize’s open-source platform, to trace and evaluate an Amazon Bedrock Agent.
Prerequisites
To follow this tutorial, you will need:
- An AWS account with access to Bedrock
- A Phoenix API key (available at app.phoenix.arize.com)
Step 1: Install Required Dependencies
Begin by installing the necessary libraries:
!pip install -q arize-phoenix-otel boto3 anthropic openinference-instrumentation-bedrock
Next, import the required modules:
import os
import time
from getpass import getpass

import boto3
import nest_asyncio

from phoenix.otel import register

nest_asyncio.apply()
Step 2: Configure Phoenix Environment
Set up the Phoenix Cloud environment for this tutorial. Phoenix can also be self-hosted on AWS instead.
os.environ["PHOENIX_COLLECTOR_ENDPOINT"] = "https://app.phoenix.arize.com"

if not os.environ.get("PHOENIX_CLIENT_HEADERS"):
    os.environ["PHOENIX_CLIENT_HEADERS"] = "api_key=" + getpass("Enter your Phoenix API key: ")
Connect your notebook to Phoenix with auto-instrumentation enabled:
project_name = "Amazon Bedrock Agent Example"
tracer_provider = register(project_name=project_name, auto_instrument=True)
The auto_instrument parameter automatically locates the openinference-instrumentation-bedrock library and instruments all Bedrock and Bedrock Agent calls without requiring additional configuration.
Step 3: Create a Bedrock Agent
In the AWS console, create a new Bedrock agent. For this demonstration, you can create an agent with:
- A knowledgebase created using the webscraper tool to gather information about Phoenix
- Action group functions that retrieve information about Phoenix traces and experiments
Bedrock Agents additionally supports Guardrails, Prompts, and other features—all of which will be automatically traced by Phoenix.
Step 4: Connect to AWS and Configure Agent Parameters
Create an AWS SSO profile with appropriate permissions to access Bedrock agents:
# SSO Profile Configuration
PROFILE_NAME = "phoenix"  # Replace with your AWS SSO profile name
REGION = "us-east-2"  # Replace with your Bedrock agent region
SERVICE_NAME = "bedrock-agent-runtime"  # Service name for Bedrock agent

# Bedrock Agent Configuration
AGENT_ID = ""  # Enter your agent ID from the Bedrock Agents console
AGENT_ALIAS_ID = ""  # Enter your agent alias ID from the Bedrock Agents console
Initialize the AWS client with your profile:
session = boto3.Session(profile_name=PROFILE_NAME)
bedrock_agent_runtime = session.client(SERVICE_NAME, region_name=REGION)
Step 5: Run Your Agent with Tracing Enabled
Create a function to run your agent and capture its outputs:
def run(input_text):
    session_id = f"default-session1_{int(time.time())}"

    attributes = dict(
        inputText=input_text,
        agentId=AGENT_ID,
        agentAliasId=AGENT_ALIAS_ID,
        sessionId=session_id,
        enableTrace=True,
    )
    response = bedrock_agent_runtime.invoke_agent(**attributes)

    # Stream the response
    for _, event in enumerate(response["completion"]):
        if "chunk" in event:
            print(event)
            chunk_data = event["chunk"]
            if "bytes" in chunk_data:
                output_text = chunk_data["bytes"].decode("utf8")
                print(output_text)
        elif "trace" in event:
            print(event["trace"])
Test your agent with a few sample queries:
run("Tell me about my recent Phoenix traces")
run("How do I run evaluations in Arize Phoenix?")
run("Tell me about my recent Phoenix experiments")
After executing these commands, you should see your agent’s responses in the notebook output. The Phoenix instrumentation is automatically capturing detailed traces of these interactions, including all knowledgebase lookups, orchestration steps, and tool calls.
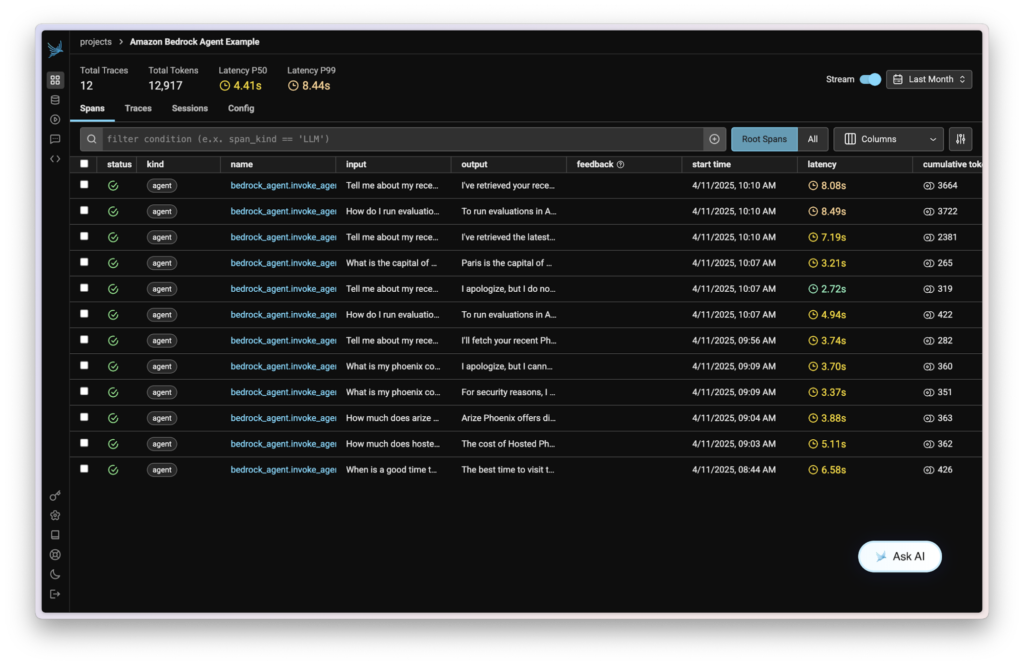
Step 6: View Your Traces in Phoenix
Navigate to your Phoenix dashboard to view the captured traces. You’ll see a comprehensive visualization of each agent invocation, including:
- The full conversation context
- Knowledgebase queries and results
- Tool/action group calls and responses
- Agent reasoning and decision-making steps
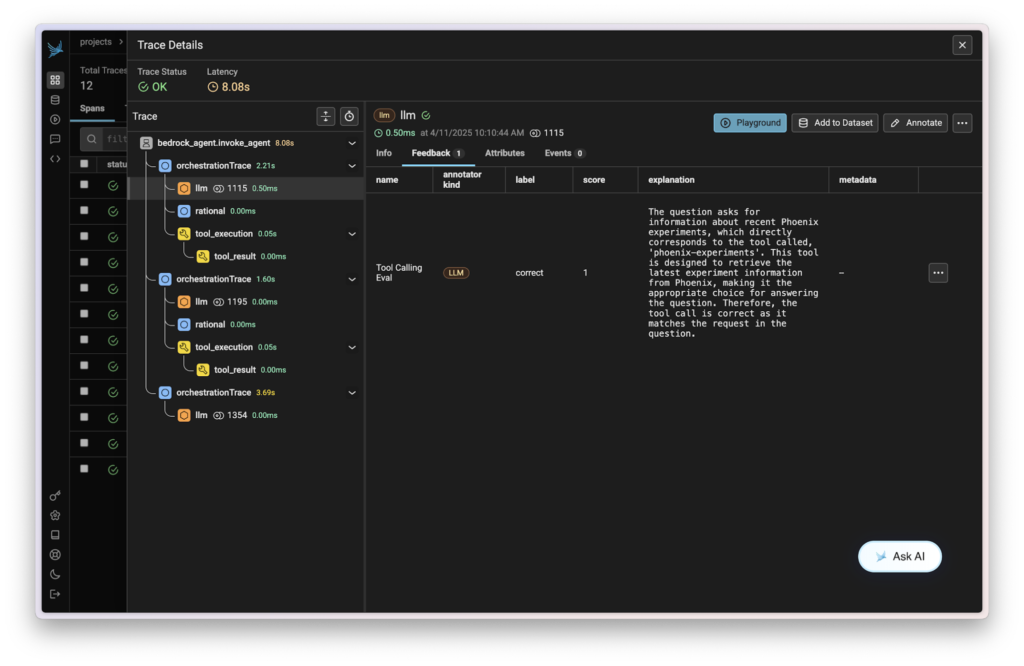
Step 7: Add Evaluations to Your Agent Traces
Now that you’ve traced your agent, the next step is to add evaluations to measure its performance. A common evaluation metric for agents is their function calling accuracy, aka how well they do at choosing the right tool for the job.
To implement evaluations, install the full Phoenix library:
!pip install -q arize-phoenix
Import the necessary evaluation components:
import json

import phoenix as px
from phoenix.evals import (
    TOOL_CALLING_PROMPT_RAILS_MAP,
    TOOL_CALLING_PROMPT_TEMPLATE,
    BedrockModel,
    llm_classify,
)
from phoenix.trace import SpanEvaluations
from phoenix.trace.dsl import SpanQuery
Query your Phoenix traces to extract the data needed for evaluation. The query below will extract all the LLM spans from your Phoenix project.
query = (
    SpanQuery()
    .where(
        # Filter for the `LLM` span kind.
        "span_kind == 'LLM'",
    )
    .select(
        question="input.value",
        outputs="output.value",
    )
)
trace_df = px.Client().query_spans(query, project_name=project_name)
Next, you need to prepare these traces into a dataframe with columns for input, tool call, and tool definitions. Parse the JSON input and output data to create these columns:
# Parse input questions from JSON
trace_df["question"] = trace_df["question"].apply(
    lambda x: json.loads(x).get("messages", [{}])[0].get("content", "") if isinstance(x, str) else x
)

# Function to extract tool call names from the output
def extract_tool_calls(output_value):
    tool_calls = []
    try:
        o = json.loads(output_value)

        # Check if the output has 'content' which is a list of message components
        if "content" in o and isinstance(o["content"], list):
            for item in o["content"]:
                # Check if this item is a tool_use type
                if isinstance(item, dict) and item.get("type") == "tool_use":
                    # Extract the name of the tool being called
                    tool_name = item.get("name")
                    if tool_name:
                        tool_calls.append(tool_name)
    except (json.JSONDecodeError, TypeError, AttributeError):
        pass

    return tool_calls


# Apply the function to each row
trace_df["tool_call"] = trace_df["outputs"].apply(
    lambda x: extract_tool_calls(x) if isinstance(x, str) else []
)

# Filter to only include traces with tool calls
trace_df = trace_df[trace_df["tool_call"].apply(lambda x: len(x) > 0)]
Add tool definitions for evaluation:
trace_df["tool_definitions"] = (
    "phoenix-traces retrieves the latest trace information from Phoenix, "
    "phoenix-experiments retrieves the latest experiment information from Phoenix, "
    "phoenix-datasets retrieves the latest dataset information from Phoenix"
)
Now with your dataframe prepared, you can use Phoenix’s built-in LLM as a Judge template for Tool Calling to evaluate your app. Run the tool calling evaluation:
rails = list(TOOL_CALLING_PROMPT_RAILS_MAP.values())

eval_model = BedrockModel(session=session, model_id="anthropic.claude-3-5-haiku-20241022-v1:0")

response_classifications = llm_classify(
    data=trace_df,
    template=TOOL_CALLING_PROMPT_TEMPLATE,
    model=eval_model,
    rails=rails,
    provide_explanation=True,
)
response_classifications["score"] = response_classifications.apply(
    lambda x: 1 if x["label"] == "correct" else 0, axis=1
)
Finally, log the evaluation results to Phoenix:
px.Client().log_evaluations(
    SpanEvaluations(eval_name="Tool Calling Eval", dataframe=response_classifications),
)
After running these commands, you will see your evaluation results in the Phoenix dashboard, providing insights into how effectively your agent is using its available tools.
Next Steps
With the foundation established, consider these advanced implementation options:
- Expand Agent Capabilities: Extend your Bedrock agent by attaching custom tools and Lambda functions
- Enhance Evaluation Framework: Develop more sophisticated evaluation metrics tailored to your specific use case
- Implement Experimentation Workflows: Use Phoenix’s Experiments feature to compare different prompt strategies and agent configurations
- Optimize Prompt Engineering: Utilize Phoenix’s Prompts module to systematically improve agent instructions
Conclusion
The integration between Arize AI and Amazon Bedrock Agents represents a significant advancement for organizations developing and deploying AI agent applications. By combining Bedrock’s robust agent development capabilities with Arize’s comprehensive observability tools, developers can build more reliable, transparent, and high-performing AI agents.
For additional resources on Agents and Evaluation, visit the Arize website.