

Before you start
Continue with the request you sent in Add an agent span, asking for dinosaur toys for a 6-year-old under $25. To inspect how Wonder Toys handled it, open wonder-toys → Traces in Phoenix and select that request’s trace. In the screenshots, Wonder Toys recommends a toy that costs more than $25. Your results may be different, but you can follow the same steps with your own trace.Step 1: Read the model’s search request
- Select the first
ChatAnthropicmodel call on the left. - Under Info on the right, read the shopper’s message in Input.

The selected model call shows the shopper's request under Input.
search-products. In this example, the model asks the tool for dinosaur toys for age 6.

The model's search request appears under Output.
- If you don’t see
search-products, check the nextChatAnthropicspan. - If none of the model calls requested a search, skip to Step 4.
Step 2: Read the search results
- Select the
search-productsrow and check that Input matches the search from Step 1. - Then read Output to see the returned products.

The tool's Output shows the products returned by the search.
Step 3: Compare the recommendation with the results
Select the nextChatAnthropic model call and find tool: search-products under Input. In this example, that message contains the kit’s $27.99 price.

The search results are included in the next model call's Input.

The answer recommends the kit at $27.99 and notes that it is over budget.
- If there are more searches, repeat this comparison until you reach the final answer.
- If no products came back, check how the answer explains that.
Step 4: Explain the recommendation
For the example in the screenshots, you can now explain:The model asked the tool for dinosaur toys for age 6 and received results that included a Dinosaur Explorer Kit priced at $27.99. It then recommended that kit while noting that it was over budget. The model had the price information but still included a toy above the shopper’s $25 limit.Use your own trace to explain what happened, whether the answer was correct or not. If no search ran, compare the model’s input and answer.
Step 5: Check the cost of the request
You’ve seen how the agent reached its answer. Now let’s check how much its model calls cost.- Find the request total. Read Total Cost at the top of the trace, marked 1 below.
- Compare the model calls. Select each model span, such as
ChatAnthropic. Hover over the token count or cost beneath its name, marked 2, to see the input and output breakdown. Tokens are pieces of content the model reads or generates. - Find the most expensive call. Read its Input and Output to see what information it received and what it produced.
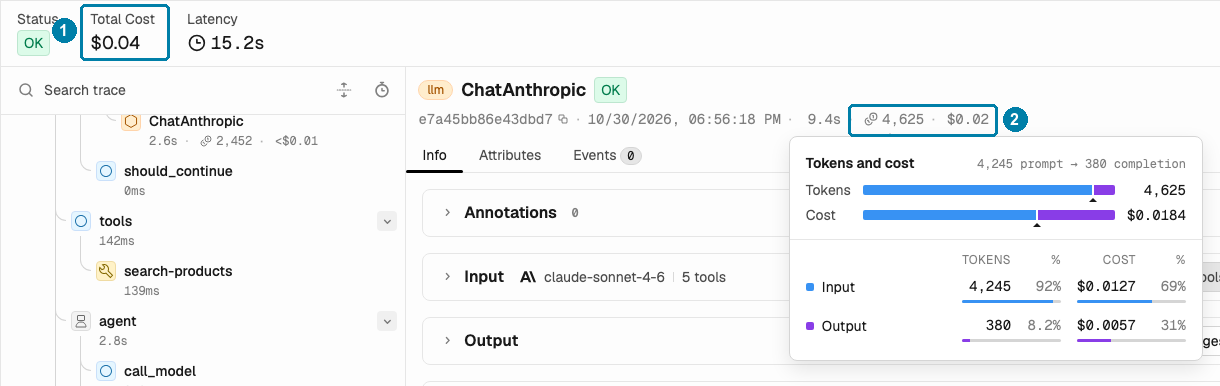

1: Total Cost covers the whole request. 2: Hover over a model call's token count or cost to inspect its breakdown.
Check how long the request took
Check how long the request took
Latency is the elapsed time shown at the top of the trace. Compare individual model and tool calls to find where the agent spent time. Use the trace latency for the whole request; parent and child durations overlap.